Ensure you are logged in as root to proceed.
- MDADM config https://wiki.debian.org/SoftwareRAID
Insert the disks you want to use into the DX4000. It is safe to do this whilst the system is running.
You will need to clear any existing RAID configuration which has been done with the BIOS RAID utility. If you are converting your machine from stock to Linux, this is especially important. Please note that clearing raid configuration is DESTRUCTIVE and will cause ALL DATA ON ALL ARRAYS TO BE IRRECOVERABLY DELETED!
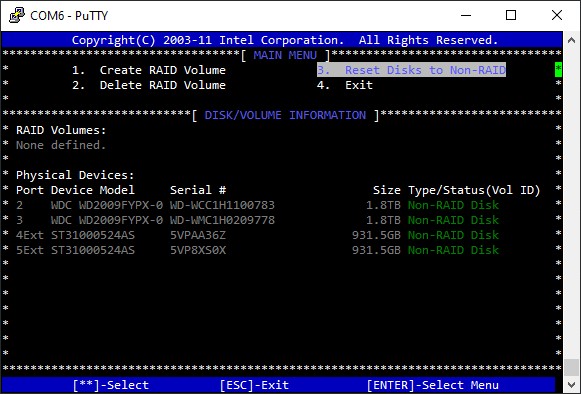
As the system POSTs, you will see the RAID configuration utility displayed. All disks should show as Non-RAID like below, but if they do not you need to make them Non-RAID, so interrupt the startup and enter the utility using CTRL+I (this must be done from a physical keyboard and not PuTTY):

You'll be presented with the RAID configuration menu, which shows clear options for deleting RAID arrays and resetting disks to Non-RAID:
Once you have saved your changes, you can exit back to your OS and all of your disks will show as accessible devices, which can then be properly configured with your Linux install for RAID with MDADM.
You may ask, why not create the RAID volumes here? My reasoning is that this is not a hardware RAID anyway, so it is easier to manage this from your OS rather than the BIOS utility with little to no performance impact. In addition, you can easily move your disks to any other Linux box with MDADM and easily import them into a working array to recover data should you experience a hardware failure.
run apt-get update to get the latest API package list, and then run apt-get install mdadm to install the software needed for a software RAID.
The disks should have spun up in the time you spent installing MDADM. Run ls /dev to list all system devices. In the list you should find the following devices:
- /dev/sda
- /dev/sda1
- /dev/sda2
- /dev/sda3
- /dev/sdb
- /dev/sdc
etc...
We will use Bay 1 and 2 for a RAID. More devices can be used. Refer to MDADM guides for this. MAKE SURE that the sdb and sdc devices are the ones you intend to use!
Wipe the disks with the mdadm --zero-superblock /dev/sdb /dev/sdc command. If you get an error like mdadm: Unrecognised md component device - /dev/sdX you can safely ignore it.
Build a RAID with the disks using the mdadm --create /dev/md0 --level=1 --raid-devices=2 /dev/sdb /dev/sdc command.
Format the new md0 RAID disk with the mkfs.ext4 /dev/md0 command
To mount the array automatically, we must add it to FSTAB.
run nano /etc/fstab to edit the FSTAB file, go to the bottom and insert the following line:
/dev/md0 /data ext4 noatime,rw 0 0
Do CTRL+X to exit, Y to confirm save and ENTER to write and save.
Run the mdadm --detail --scan /dev/md0 >> /etc/mdadm/mdadm.conf command to build the MDADM config.
Update the boot image with the update-initramfs -u command.
You can now reboot with shutdown -r now and the RAID will mount to /data for you to use. You can find out more about the array with the df -h command.