::page{title="Get things done and solve real problems with GenAI"}
Often, I hear that LLMs and AI are overblown and nothing more than glorified chatbots or PDF summarizers. Perhaps you've even dabbled in creating your own chatbot or RAG sytem and questioned if AI is truly just hype.
But what if we could harness the true power of AI to solve real-world problems, add tangible value to businesses, and create applications that go beyond the ordinary?
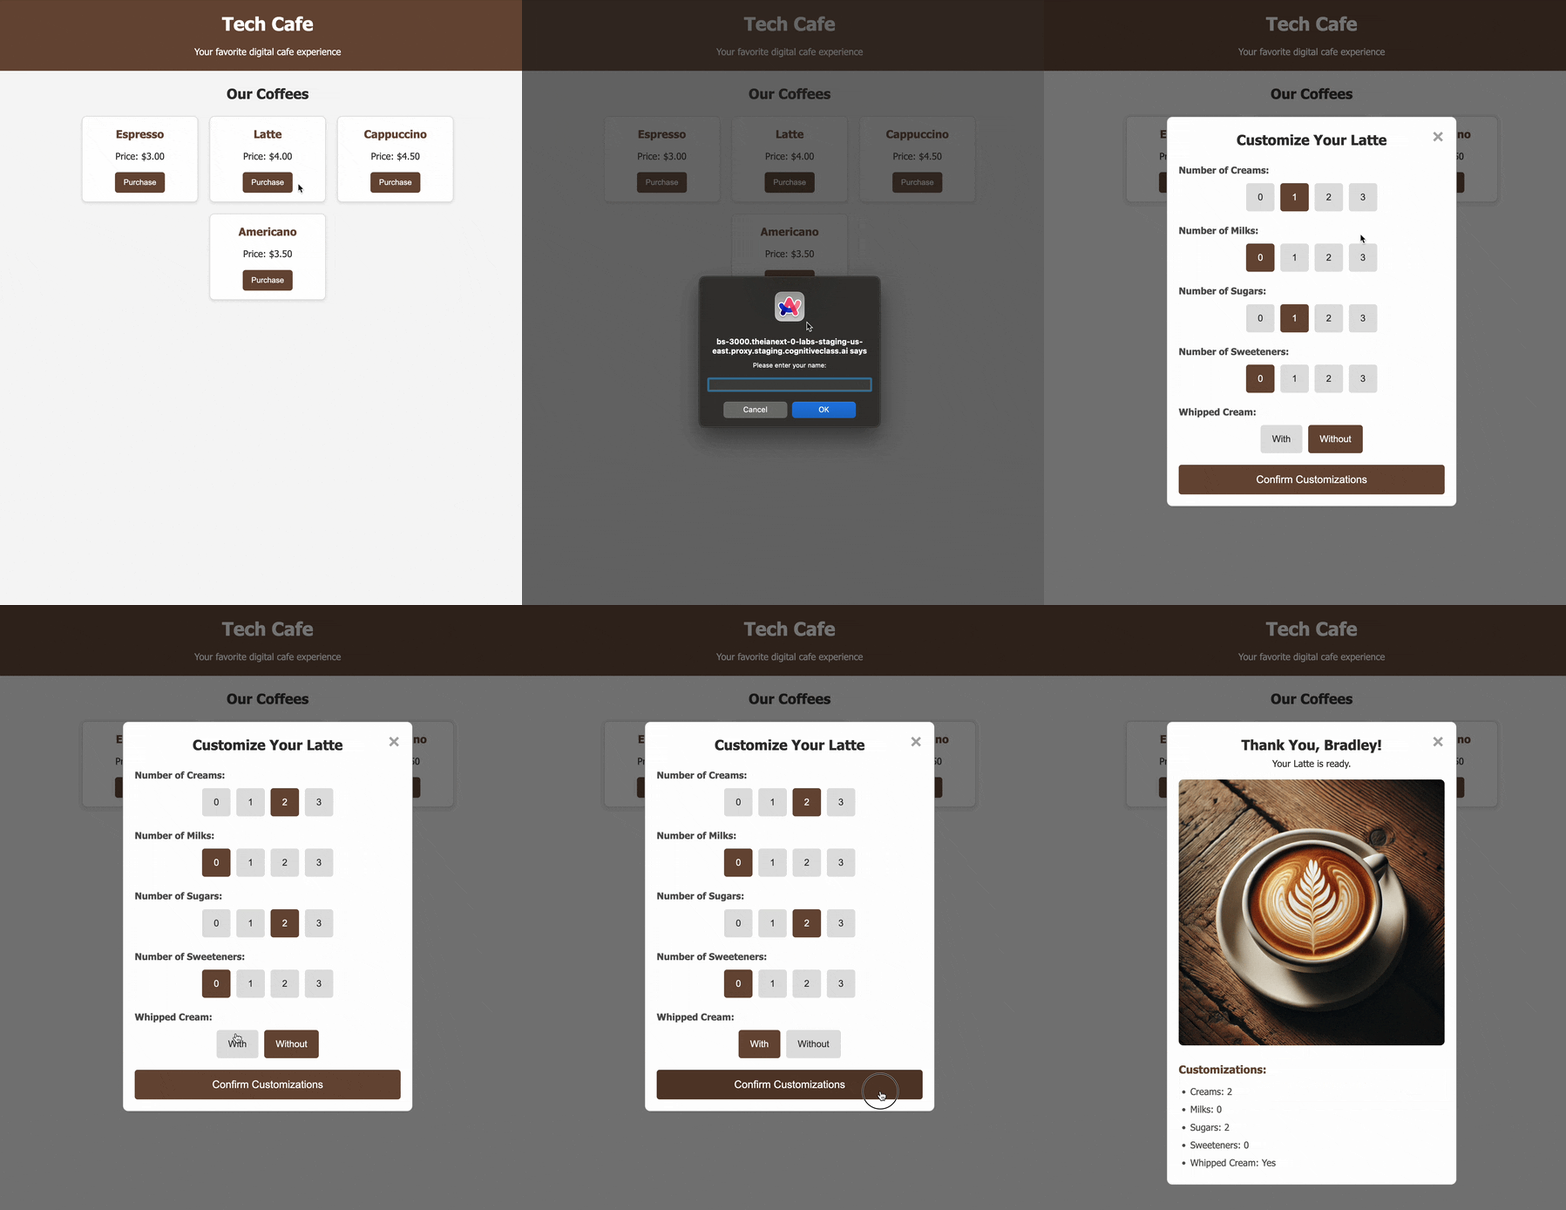
In this Guided Project, we’ll embark on a hands-on journey, enhancing a [fictional] coffee company called Tech Cafe. Through various examples, we’ll demonstrate how to integrate advanced AI features into real applications. We’ll cover cutting-edge technologies and techniques that will help you move beyond basic chatbots and unlock the true potential of LLMs.
By the end of this Guided Project, you will be able to:
- Integrate a Large Language Model (LLM) into a Node.js application
- Implement multiple LangGraph-based workflow for complex and modular code flows
- Implement image processing using a Large Language Model (LLM)
- Set up a cron job to periodically update system state
- Implement dynamic pricing based on AI-driven insights
- Implement Human-In-The-Loop (HITL) mechanisms
Let's start by understanding the key components we'll be working with.
LangGraph is a library that allows us to create flexible and modular workflows. It provides a structured way to define the flow of data and operations when working with LLMs, enabling us to build complex applications with ease.
Large Language Models are AI models trained on vast amounts of text data. They can generate human-like text based on the input they receive, making them incredibly versatile for a variety of applications—from generating creative content to understanding and processing human language.
In our project, we’ll primarily use the latest Llama 3.2 and Granite models provided by watsonx.ai. These models offer advanced capabilities that we’ll leverage to enhance our Tech Cafe application.
By combining the structured workflow management of LangGraph with the powerful capabilities of LLMs, we’re equipped to build sophisticated AI-driven features that can revolutionize applications.
In the upcoming steps, we’ll dive into practical implementations, transforming a demo app; Tech Cafe; into an intelligent, AI-enhanced application. Get ready to see how these technologies can solve real problems and add real value!
In the next section, we’ll introduce Tech Cafe and explore the challenges we’re aiming to solve.
::page{title="Introducing Tech Cafe and Our Challenges"}
Tech Cafe is a bustling coffee chain with multiple locations across the city. Renowned for our artisanal brews and cozy atmosphere, we’ve become a favorite spot for coffee enthusiasts and casual visitors alike. As we continue to grow, we’re encountering new challenges that require innovative solutions.
- Personalized Customer Experience: With an ever-increasing customer base, providing a personalized touch to each order has become a significant challenge.
- Dynamic Pricing Strategy: Adjusting prices in real-time based on factors like cafe occupancy and demand is complex but essential for maximizing profitability.
- Adaptive Marketing: Staying ahead in a competitive market means continuously adapting our offerings and promotions based on customer preferences and trends.
To tackle these challenges, we’re developing an AI-enhanced application that revolutionizes how we handle coffee sales. This app represents a real-life sale at Tech Cafe, integrating advanced AI features to:
- Enhance Personalization: Use AI to generate personalized messages and recommendations for customers.
- Implement Dynamic Pricing: Adjust prices based on real-time data like cafe occupancy.
- Enable Human-in-the-Loop: Allow human oversight in AI decision-making processes for better control and accuracy.
In the next section, we’ll set up the project by cloning the repository and running the base application. Let’s get started!
::page{title="Setting Up the Tech Cafe Application"}
In this section, we’ll set up the Tech Cafe application in your development environment. By the end of this step, you’ll have the base application running and ready to start integrating AI-powered features.
To begin, we’ll clone the Tech Cafe application repository from GitHub. This repository contains all the source code we’ll be working with throughout this project as well as snapshots of various parts within the project.
Instructions:
Run the following command in the terminal to clone the repository:
# Clone the repository
git clone https://github.com/ibm-developer-skills-network/goadt-Get-things-done-and-solve-real-problems-with-GenAI.git example-project

# Change your current directory to the cloned repository
cd example-projectBefore we dive into coding, let’s take a moment to understand the structure of the project. Familiarizing yourself with the project layout will make it easier to navigate and modify the code.
Project Structure Overview:
- src/: Contains the source code of the application.
- server.ts: The main application code that runs the express application.
- utils.ts: Provides some helper functions.
- controllers/: Holds the controller files responsible for handling HTTP requests and responses.
- routes/: Defines the URL mappings to the corresponding controllers.
- images/: Stores example images.
- public/: Contains static assets like HTML, CSS, and JavaScript files that are served directly to the client.
- css/: Stylesheets for the application.
- js/: Client-side JavaScript scripts.
- images/: Images used in the application.
- index.html: The main HTML of the app.
- partX/: Contains snapshots of the code for this Guided Project.
- package.json: Lists the project dependencies and scripts. The following scripts are provided:
npm run build: Runstscbuilding the typescript application.npm start: Start the built application (depends on the aforementioned build).npm run dev: Starts the appliction in dev mode which will automatically restart whenever a change is detected (uses:nodemon).npm run console: Starts an interactive shell usingts-node. This is useful to test and debug your application.
- tsconfig.json: Configuration file for TypeScript compiler options.
- README.md: Provides information about the project.
Note the partX folders as these provide snapshots of various parts of this Guided Project. Feel free to experiment and change any aspect of the code, as you can always use one of these folders to restore the state of the project.
The application relies on several Node.js packages. We need to install these dependencies before running the app.
npm installThis will install express, nodemon, ts-node and typescript.
Now that we’ve installed the dependencies, we’re ready to run the application and see it in action.
npm run devThis command starts the appliction on port 3000 (automatically restart whenever a change is detected).
Since we’re running the application in a Cloud IDE environment, we need to expose the port to access it via a browser. Click the button below to open your app:
::startApplication{port="3000" display="internal" name="Open Tech Cafe App" route="/"}
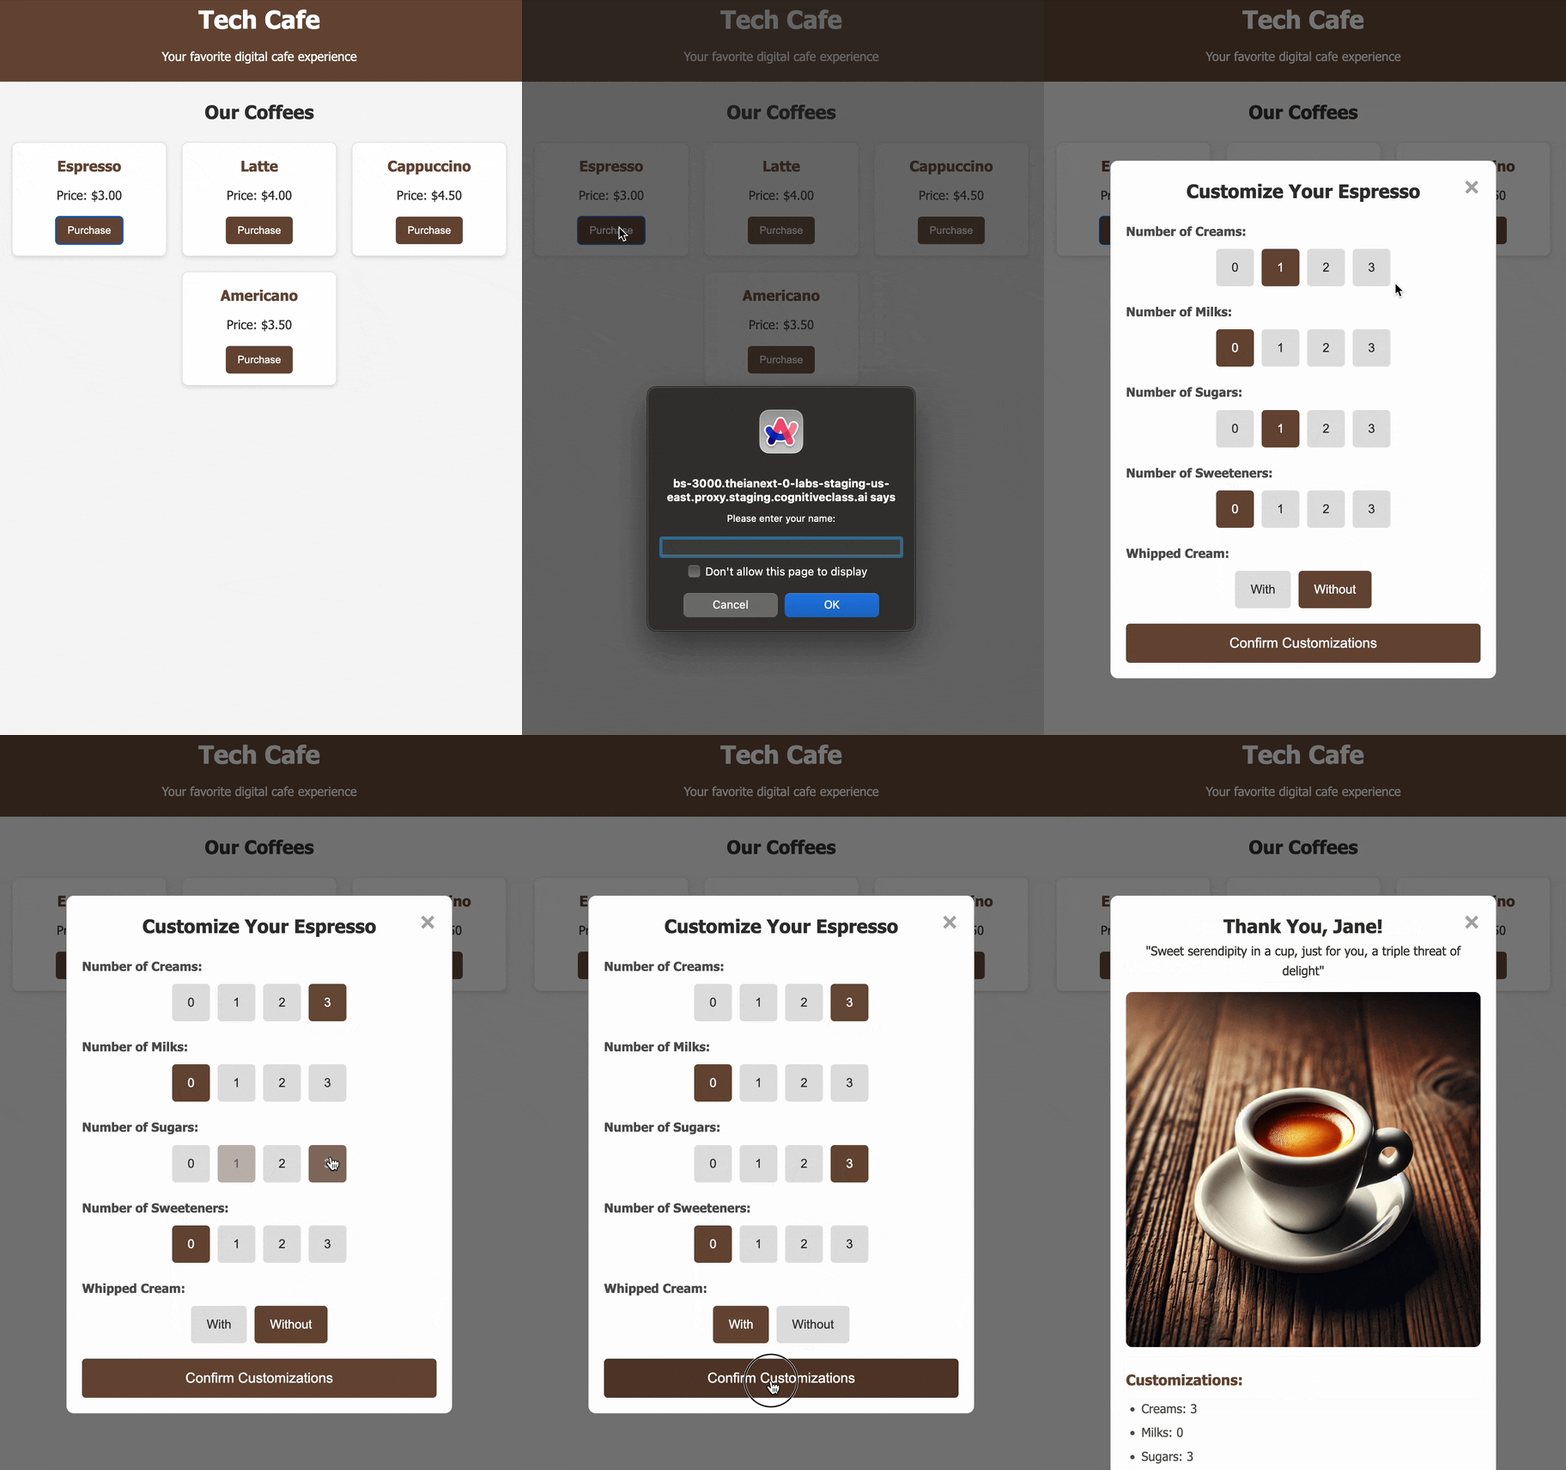
You should now see the Tech Cafe application running in your browser. Feel free to navigate through the app to understand its current functionality.
Features to Notice:
- Coffee Menu: Displays a list of available coffee options.
- Customization Options: Allows you to customize your coffee (e.g., add sugar, milk).
- Order Submission: Lets you place an order and receive a confirmation.
To stop the application press CTRL + C in the terminal window.
Now that you have the base application running and understand its structure, you’re all set to start enhancing it with AI-powered features in the upcoming steps.
Let’s continue our journey to transform Tech Cafe into an intelligent, AI-enhanced application!
::page{title="What is LangGraph?"}
Before we begin enhancing our Cafe application lets first dive into the basics of LangGraph by creating a simple "Hello World" graph. This example will help you understand the core concepts of LangGraph, including creating graphs, defining annotations, and invoking the graph. By the end of this step, you’ll run the graph and you'll also create a visual representation of it!
LangGraph is a powerful library that allows you to define and execute workflows (graphs) in a structured and modular way. It is particularly useful when working with Large Language Models (LLMs), enabling you to create complex AI-driven workflows with ease.
When building AI applications, especially those involving LLMs, you often need to manage complex workflows that include various steps like data preprocessing, model invocation, post-processing, error handling, and conditional logic. Traditional linear code or simple chaining might suffice for straightforward tasks, but as your application grows in complexity, these approaches can become unwieldy and hard to maintain.
Consider a traditional code workflow:
// Traditional linear code
function processData(input) {
  const preprocessed = preprocess(input);
  const modelOutput = invokeModel(preprocessed);
  const result = postprocess(modelOutput);
  return result;
}
This linear flow works well for simple tasks but lacks flexibility. Now imagine you need to handle conditional branching, retries, or integrate human-in-the-loop steps. The code quickly becomes tangled with nested conditionals and callbacks.
LangGraph addresses these challenges by allowing you to represent your workflows as graphs. Each node in the graph represents a discrete unit of work (a function or operation), and edges define the flow between these nodes, including conditional paths.
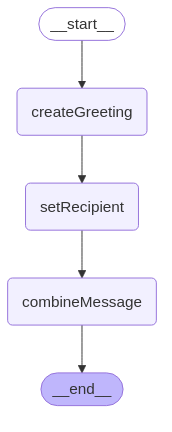
Here’s an illustrative image of a LangGraph workflow:
- Modularity: Each node is a pluggable module, making your codebase more organized and reusable.
- Flexibility: Easily add, remove, or rearrange nodes without disrupting the entire workflow.
- Conditional Logic: Implement complex branching and decision-making processes within your workflow.
- Error Handling: Define alternative paths in case of failures or exceptions.
- Maintainability: Visual representation of workflows makes it easier to understand and maintain the code.
This graph-based approach is especially valuable when working with LLMs because:
- Experimentation: You can experiment with different model configurations or preprocessing steps by swapping nodes.
- Scalability: As your AI application grows, the graph can be extended without rewriting existing code.
- Adaptability: Quickly adapt to new requirements or integrate additional features like logging, monitoring, or human-in-the-loop interactions.
By embracing LangGraph, you gain more control over your workflows, leading to more robust and adaptable AI applications.
::page{title="Creating a Simple Hello World Graph with LangGraph"}
Let's start by installing the LangGraph libraries:
npm install @langchain/langgraph @langchain/coreNow create a new file for our Hello World graph.
::openFile{path="example-project/src/helloWorldGraph.ts"}
First, we’ll import the necessary modules from LangGraph.
import { Annotation, StateGraph, START, END } from '@langchain/langgraph';- Annotation: Defines the structure of the data (state) flowing through your graph—essentially a blueprint for the information your workflow will handle.
- StateGraph: Represents the workflow graph itself, allowing you to create and manage a sequence of connected steps (nodes) in your application.
- START and END: Special constants that mark the beginning and end points of your graph, indicating where the workflow starts and finishes.
Annotations define the structure of the data (state) that flows through the graph.
const HelloWorldAnnotation = Annotation.Root({
  greeting: Annotation<string>,
  recipient: Annotation<string>,
  message: Annotation<string>,
});
We define a root annotation HelloWorldAnnotation with three fields:
- greeting: A string for the greeting word (e.g., "Hello")
- recipient: A string for the recipient’s name (e.g., "World")
- message: A string that will hold the combined message.
Next, we’ll create functions that represent the steps (nodes) in our graph. In general these steps can run arbitrary code (e.g. database, llm, api, etc.) and will generally read_ and/or write from the graph's state.
For our graph we'll have three nodes:
- createGreeting: This will write the greeting to the state
- setRecipient: This will write the recipient to the state
- combineMessage: This will read the greeting and recipient states and write to the message state
// Sets the greeting field to 'Hello' and logs a message.
const createGreeting = async (state: typeof HelloWorldAnnotation.State) => {
  state.greeting = 'Hello';
  console.log('Step 1: Created greeting.');
  return state;
};

// Sets the recipient field to 'World' and logs a message.
const setRecipient = async (state: typeof HelloWorldAnnotation.State) => {
  state.recipient = 'World';
  console.log('Step 2: Set recipient.');
  return state;
};

// Combines the greeting and recipient into a full message and logs a message.
const combineMessage = async (state: typeof HelloWorldAnnotation.State) => {
  state.message = `${state.greeting}, ${state.recipient}!`;
  console.log('Step 3: Combined message.');
  return state;
};Now, we’ll define the graph by adding nodes and edges to represent our workflow.
Here’s the code to construct the graph:
const helloWorldGraph = new StateGraph(HelloWorldAnnotation)
  .addNode('createGreeting', createGreeting)
  .addNode('setRecipient', setRecipient)
  .addNode('combineMessage', combineMessage)
  .addEdge(START, 'createGreeting')
  .addEdge('createGreeting', 'setRecipient')
  .addEdge('setRecipient', 'combineMessage')
  .addEdge('combineMessage', END)
  .compile();
Nodes are steps linked to functions:
createGreeting: Generates a greeting.setRecipient: Sets the message recipient.combineMessage: Combines the greeting and recipient.
Edges define the execution flow between nodes:
START➔createGreetingcreateGreeting➔setRecipientsetRecipient➔combineMessagecombineMessage➔END
export const runHelloWorldGraph = async () => {
  const initialState = {};
  const finalState = await helloWorldGraph.invoke(initialState);
  console.log('Final State:', finalState);
};

// Run the graph
runHelloWorldGraph()npx ts-node src/helloWorldGraph.tsYou should see output similar to:
Step 1: Created greeting. Step 2: Set recipient. Step 3: Combined message. Final State: { greeting: 'Hello', recipient: 'World', message: 'Hello, World!' }
This indicates that our graph executed successfully.
LangGraph allows us to generate a visual diagram of the graph.
There are multiple ways to do this, but we will do it in two parts. First we save a mermaid representation of our graph (as diagram.mmd):
import fs from 'fs';

export const drawGraph = async () => {
    const representation = helloWorldGraph.getGraph();
    const image = await representation.drawMermaid();
    fs.writeFileSync('diagram.mmd', image, 'utf8');
}

drawGraph()
Then install the mermaid-cli which we'll use to convert the mmd to a png:
# Install mermaid-cli
sudo npm install -g @mermaid-js/mermaid-cli
Install other dependencies:
# Install other dependencies
npx -y puppeteer browsers install chrome-headless-shell
Now convert the file:
# Generate diagram.mmd
npx ts-node src/helloWorldGraph.ts

# Convert diagram.mmd to diagram.png
mmdc -i diagram.mmd -o diagram.png
Now you can download this png to view it.
Congratulations! You’ve successfully created a simple LangGraph workflow, invoked it, and generated a visual representation. This exercise introduced you to the core concepts of LangGraph:
- Annotations: Define the data structure flowing through the graph.
- Nodes (Steps): Functions that operate on the state.
- Edges: Define the flow between nodes.
- Graph Invocation: Running the graph with an initial state.
Let’s continue enhancing Tech Cafe with advanced AI features!
::page{title="Setting Up TechCafe's First Workflow"}
Now that you understand the basics, let's setup our first workflow for Tech Cafe.
To start let's create a simple workflow that will take a coffee order as an input and will output a fun customized message we can print on the coffee.
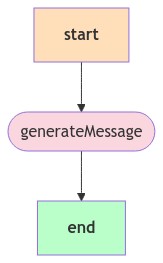
The workflow will just have a single generateMessage node and look like this:
Let's start by creating a new file called graph.ts to add all of the LangGraph logic to:
::openFile{path="example-project/src/graph.ts"}
Let's start by importing the necessary modules and defining our interfaces:
import { Annotation, StateGraph, START, END } from '@langchain/langgraph';
import { generateMessage } from './llm';
Let's break this down:
- As with the previous example we import
Annotation,StateGraph,START, andENDfrom LangGraph. - We import
generateMessagefrom a file calledllm.tsthat we'll create later. This function will handle the interaction with our LLM.
Next, let's define our annotation structure:
interface CoffeeCustomizations {
    creams: number,
    milks: number,
    sugars: number,
    sweeteners: number,
    whippedCream: boolean,
}

const CoffeeAnnotation = Annotation.Root({
    customerName: Annotation<string>,
    coffeeName: Annotation<string>,
    customizations: Annotation<CoffeeCustomizations>,
    message: Annotation<string>,
});
First we define the interface CoffeeCustomizations that describes the structure of our coffee customization options.
This CoffeeAnnotation defines the structure of the data that will flow through our graph. It includes:
customerName: The name of the customercoffeeName: The type of coffee orderedcustomizations: The customizations for the coffee (using ourCoffeeCustomizationsinterface)message: The AI-generated message (which will be populated later in the workflow)
Now let's define the step functions in our workflow.
Add the following code to graph.ts:
const stepGenerateMessage = async (state: typeof CoffeeAnnotation.State) => {
    const coffeeOptions = {
        coffeeName: state.coffeeName,
        customizations: state.customizations
    }

    // Call the LLM
    const message = await generateMessage(state.customerName, coffeeOptions)
    state.message = message;

    // Return the state
    return state;
}
This stepGenerateMessage function is a crucial part of our workflow. Let's break it down:
- It takes a
stateparameter of typeCoffeeAnnotation.State, which contains all the information about the coffee order. - It creates a
coffeeOptionsobject with the coffee name and customizations. - It calls the
generateMessagefunction (which we'll implement later) with the customer name and coffee options. - It updates the
statewith the generated message and returns the updated state.
Now, let's create and export a function to run our graph:
const coffeeMessageGraph = new StateGraph(CoffeeAnnotation)
    .addNode("generateMessage", stepGenerateMessage)
    .addEdge(START, "generateMessage")
    .addEdge("generateMessage", END)
    .compile();

export const runCoffeeMessageGraph = async (initialInput: typeof CoffeeAnnotation.State) => {
    return coffeeMessageGraph.invoke(initialInput);
}
Let's examine this code:
- We create a new
StateGraphusing ourCoffeeAnnotation. - We add a node to the graph called "generateMessage" which uses our
stepGenerateMessagefunction. - We add edges to connect the START of the graph to our "generateMessage" node, and from there to the END of the graph.
- We compile the graph to finalize its structure.
- We export a
runCoffeeMessageGraphfunction that takes an initial input and invokes our graph with that input.
Once again this code generates a graph that looks like this:
This completes our LangGraph workflow setup. In the next step, we'll implement the LLM integration to generate our personalized messages.
::page{title="Integrating the Large Language Model"}
Now that we have our LangGraph workflow set up, let's implement the LLM integration to generate our personalized messages.
Before we begin coding we will need to install the @langchain/community npm package which will include the APIs to use watsonx.ai LLMs. If you wanted to use OpenAI LLMs you would instead install @langchain/openai.
npm install @langchain/communityCreate a new file called llm.ts in the src directory:
::openFile{path="example-project/src/llm.ts"}
Let's start by importing the necessary modules and setting up our LLM:
import { PromptTemplate } from '@langchain/core/prompts';
import { WatsonxAI } from "@langchain/community/llms/watsonx_ai";

export const PROJECT_ID = "skills-network";

const model = new WatsonxAI({
  // ibmCloudApiKey: "set_when_using_your_own_account",
  projectId: PROJECT_ID,
  modelId: "meta-llama/llama-3-2-90b-vision-instruct",
  modelParameters: {
    max_new_tokens: 200,
    min_new_tokens: 0,
    stop_sequences: [],
    repetition_penalty: 1,
  },
});
Let's break this down:
- We import
PromptTemplatefrom LangChain, which we'll use to create our prompt for the LLM. - We import
WatsonxAI, which is the specific LLM we'll be using. - We define our
PROJECT_IDtoskills-networkwhich is a special project that works within this Skills Network lab environment. - We create a new
WatsonxAImodel instance with our API key, project ID, and some model parameters.
Note: When coding this outside this Skills Network labs environment you will need to pass your own projectId and well as ibmCloudApiKey.
- Next, let's define our prompt template:
const template = `
<|begin_of_text|>
<|start_header_id|>system<|end_header_id|>
You are a talented and fun barista working at Tech Cafe.

Your main task is to create 1-3 sentences to write on the coffee.

This is a fun thing we do to ensure our customers have a great experiance.

Make sure to reference the coffee they are ordering, their name, and their customizations [indirectly, don't list the customizations].

Do NOT describe the coffee, instead be creative and poetic.

ONLY respond with the message to write on the coffee NOTHING else.
<|eot_id|>
<|start_header_id|>user<|end_header_id|>
A customer just purchased the following coffee:
- Customer Name: {name}
- Type of Coffee: {coffeeName}
- Number of Creams: {creams}
- Number of Milks: {milk}
- Number of Sugars: {sugars}
- Number of Sweeteners: {sweeteners}
- Whipped Cream: {whippedCream}
<|eot_id|>
<|start_header_id|>assistant<|end_header_id|>
`;

const prompt = new PromptTemplate({
  template,
  inputVariables: ['name', 'coffeeName', 'creams', 'milk', 'sugars', 'sweeteners', 'whippedCream'],
});
This prompt template is crucial for guiding the LLM to generate appropriate messages. It includes:
- A system message that sets the context and gives instructions to the AI.
- A user message that provides the specific details of the coffee order.
- Placeholders for various input variables that we'll fill in with actual order details.
Now that we have our LLM set up and our prompt template defined, let's implement the function to generate personalized messages.
export async function generateMessage(name: string, order: any): Promise<string> {
  const promptText = await prompt.format({
    name: name,
    coffeeName: order.coffeeName,
    creams: order.customizations.creams ?? 0,
    milk: order.customizations.milk ?? 0,
    sugars: order.customizations.sugars ?? 0,
    sweeteners: order.customizations.sweeteners ?? 0,
    whippedCream: order.customizations.whippedCream ? 'Yes' : 'No',
  });

  const response = await model.invoke(promptText);
  return response;
}
Let's break down this generateMessage function:
- It takes two parameters:
name(the customer's name) andorder(an object containing the coffee order details). - It uses the
prompt.format()method to fill in the placeholders in our prompt template with the actual order details. - It then invokes our LLM model with the formatted prompt.
- Finally, it returns the response from the LLM, which will be our personalized message.
This function is what we'll call from our LangGraph workflow to generate the personalized message for each order.
We can quickly test this via the interactive console.
First let's open the interactive console:
npm run consoleNow within this console let's import the runCoffeeMessageGraph function and run it with example code:
import { generateMessage } from './src/llm'

generateMessage("bradley", { customizations: { creams: 2, sugars: 2 } }).then(r => console.log(r))
Wait a few second and you should see the result, something like:
"Bradley, may this cup be the sweet start to a day that's twice as bright as you are"
Now to exit the interactive prompt you can enter .exit or press CTRL+C twice:
.exitWith this, we've completed the setup of our LLM integration. Now, let's update our backend to use this new AI-powered functionality.
::page{title="Updating the Backend"}
Now that we have our LangGraph workflow and LLM integration set up, we need to update our backend to use these new features.
Open the src/controllers/coffeeController.ts file:
::openFile{path="example-project/src/controllers/coffeeController.ts"}
Update the imports at the top of the file:
import { Request, Response } from 'express';
import { runCoffeeMessageGraph } from '../graph';
We're importing the runCoffeeMessageGraph function that we created earlier.
Now, let's update the processOrder function to use our new AI-powered workflow:
export const processOrder = async (req: Request, res: Response) => {
  const order = req.body;
  const graphOutput = await runCoffeeMessageGraph(order);

  res.status(200).json({
    message: graphOutput.message,
    orderId: Math.floor(Math.random() * 1000000),
  });
};
Let's break down the changes:
- We've made the function
asyncbecause we'll be usingawaitinside it. - We run our
runCoffeeMessageGraphfunction with the order data and await its result. - In the response, we now include the
messagefrom the graph output, which is our AI-generated personalized message.
These changes allow our backend to process orders through our AI workflow and return personalized messages to the frontend.
In the next part, we'll update the frontend to display these personalized messages.
::page{title="Updating the Frontend"}
The final step in our AI enhancement is to update the frontend to display the personalized messages generated by our LLM.
Open the src/public/js/main.js file:
::openFile{path="example-project/src/public/js/main.js"}
Update the part of the code that handles the response from the backend when calling the sendOrderToBackend function.
On LINE 206 update the following:
// const message = `Your ${window.currentOrder.coffeeName} is ready.`
const message = data.message;
The key change here is that we're now using data.message as the message to display, which is our AI-generated personalized message.
With these changes, our frontend will now display the AI-generated personalized message for each order.
To run the code run the following to start the server:
npm run devAnd test the updates via:
::startApplication{port="3000" display="internal" name="Open Tech Cafe App" route="/"}
To stop the application press CTRL + C in the terminal window.
Congratulations! You've successfully enhanced Tech Cafe with AI-powered personalization. Users will now receive unique, personalized messages with each coffee order, creating a more engaging and memorable experience.
::page{title=“Enhancing Tech Cafe with Advanced AI Features”}
Up until now, you've just scratching the surface of what’s possible.
In this section, we’ll take Tech Cafe to the next level by incorporating more advanced AI features. We’ll delve into image processing, create more complex graphs, and implement a dynamic pricing system based on real-time foot traffic outside the cafe.
Tech Cafe is situated in bustling locations where foot traffic can vary significantly throughout the day. The management wants to capitalize on peak times and encourage more customers during slower periods by adjusting coffee prices dynamically. To achieve this, they’ve installed a simple webcam that provides a constant stream of images showing the foot traffic outside the cafe.
Our goal is to:
- Analyze Foot Traffic: Use AI to process images from the webcam and estimate the number of people passing by.
- Dynamic Pricing: Adjust coffee prices in real-time based on the estimated foot traffic.
- Advanced Workflows: Utilize LangGraph to manage the complex workflow involving image processing, AI inference, and price adjustments.
By implementing this solution, Tech Cafe can optimize pricing strategies, attract more customers, and maximize profits.
How We’ll Achieve This
We will:
- Implement Image Processing with LLMs: Use the Llama 3.2 Vision model to analyze images and estimate foot traffic.
- Enhance LangGraph Workflows: Create a more complex LangGraph workflow that incorporates image processing steps.
- Set Up Periodic Updates: Use cron jobs to periodically process images and update pricing.
- Implement Dynamic Pricing: Adjust coffee prices in the application based on the AI’s analysis.
- Introduce Human-in-the-Loop (HITL): Allow human administrators to approve or override AI-driven pricing decisions.
By the end of this section, you’ll have hands-on experience integrating advanced AI features into a real application, showcasing the true power and versatility of LLMs and LangGraph.
Let’s Get Started!
In the next step, we’ll begin by enhancing our LangGraph workflow to include image processing capabilities.
::page{title="Implementing the Image Processing Graph"}
Note: If needed, you can use the part1 folder to continue from this point. Ideally, proceed without it unless something went wrong.
Our first task is to implement an image processing feature that will analyze images of the cafe to determine occupancy. This information will be used to dynamically adjust coffee prices.
Open the src/graph.ts file:
::openFile{path="example-project/src/graph.ts"}
Add the following imports at the top of the file:
import { imageToBase64 } from './utils';
import { scanImage } from './llm';
Now scroll to the bottom of the file. Add the following to create a new annotation for our image processing workflow:
const ImageAnnotation = Annotation.Root({
    imageURI: Annotation<string>,
    numPeople: Annotation<number>,
});
Next, we'll create two steps for our image processing workflow:
const stepGetLatestImage = async (state: typeof ImageAnnotation.State) => {
    const filePath = './src/images/street.png';
    const base64ImageWithPrefix = imageToBase64(filePath);
    state.imageURI = base64ImageWithPrefix;
    return state;
}

const stepScanImage = async (state: typeof ImageAnnotation.State) => {
    const scanResults = await scanImage(state.imageURI);
    state.numPeople = scanResults;
    return state;
}stepGetLatestImage: Loads an image from a file (mocking what the webcam would do), converts it to a base64 string, and updates the state with the image URI. Using the imageURI is important as this is what llama3.2 vision expects.stepScanImage: Scans the base64 image for the number of people using llama3.2 vision, updates the state with the result, and returns the updated state.
Now, let's create our image processing graph:
const scanImageGraph = new StateGraph(ImageAnnotation)
    .addNode("stepGetLatestImage", stepGetLatestImage)
    .addNode("stepScanImage", stepScanImage)
    .addEdge(START, "stepGetLatestImage")
    .addEdge("stepGetLatestImage", "stepScanImage")
    .addEdge("stepScanImage", END)
    .compile();

export const runScanImageGraph = async (initialInput: Partial<typeof ImageAnnotation.State> = {}) => {
    return scanImageGraph.invoke(initialInput);
};
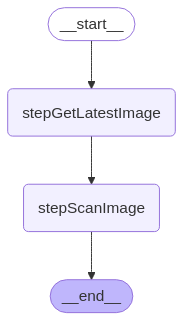
This new graph will get the latest image of the cafe, convert it to a base64 string, and then use our LLM to analyze the image and count the number of people.
In the next step, we'll implement the scanImage function in our llm.ts file.
::page{title="Implementing the scanImage LLM Function"}
Now that we've set up our image processing graph, we need to implement the scanImage function that will use our LLM to analyze the image.
Llama 3.2 Vision is an advanced Large Language Model (LLM) that extends text-based capabilities with image understanding. It can process and analyze images, allowing us to extract meaningful information from visual data. In our case, we’ll use it to count the number of people in an image captured by the cafe’s webcam.
By integrating Llama 3.2 Vision into our application, we can:
- Automate Image Analysis: Remove the need for manual counting or separate image processing systems.
- Simplify Workflow: Incorporate image analysis directly into our LangGraph workflow with ease.
Open the src/llm.ts file:
::openFile{path="example-project/src/llm.ts"}
- Add the following imports at the top of the file:
import axios from 'axios';
import { getToken } from './utils';
Now, let's implement the scanImage function.
Note: At the time of writing the Llama 3.2 vision models are not fully supported in the official watsonx.ai client so we are hitting the API directly
export async function scanImage(imageURI: string): Promise<number> {
  console.log('STARTING SCAN');

  const systemPrompt = `Return how many people you see in the image. Only return the number with no punctuation or quotes and be as accurate as possible.`;

  const accessToken = await getToken();

  const url = "https://us-south.ml.cloud.ibm.com/ml/v1/text/chat?version=2023-05-29";
  const headers = {
    "Accept": "application/json",
    "Content-Type": "application/json",
    "Authorization": `Bearer ${accessToken}`
  };

  const body = {
    messages: [
      {
        // Image recognition currently does not support system messages so we need to send instructions as a user message
        role: "user",
        content: [
          {
            type: "text",
            text: systemPrompt
          }
        ]
      },
      {
        role: "user",
        content: [
          {
            type: "image_url",
            image_url: {
              url: imageURI
            }
          }
        ]
      }
    ],
    project_id: PROJECT_ID,
    model_id: "meta-llama/llama-3-2-90b-vision-instruct",
    decoding_method: "greedy",
    min_new_tokens: 0,
    max_tokens: 3
  };

  try {
    const response = await axios.post(url, body, { headers });
    const resultNumber = response.data?.choices[0]?.message?.content;
    return parseInt(resultNumber);
  } catch (error: any) {
    console.error('Error fetching data:', error);
    throw new Error("Non-200 response");
  }
}
A few key points:
- We specify the model:
meta-llama/llama-3-2-90b-vision-instructwhic is the 90 billion parameter version of llama 3.2. - Setting
max_tokensto3ensures the output is not more than a single number. - The image is passed as a specific
image_urltype and we are passing as a base64 encoded png (e.g.data:image/png;base64,...)
This function sends a request to the WatsonX API with our image and prompts it to count the number of people in the image. It then returns this number.
In the next step, we'll set up a cron job to periodically run our image processing workflow and update our coffee prices based on the results.
::page{title="Setting Up a Cron Job for Dynamic Pricing"}
Now that we have our image processing workflow set up, let's create a cron job that will periodically run this workflow and update our coffee prices based on the cafe's occupancy.
It's important to note that in our example we are just simulating a webcam feed by manually updating (or not updating) the street.png file.
First install the node-cron package:
npm install node-cron
npm install --save-dev @types/node-cron
Open the src/server.ts file:
::openFile{path="example-project/src/server.ts"}
Add the following imports at the top of the file:
import cron from 'node-cron';
import { runScanImageGraph } from './graph';
import { setCoffeePrice } from './controllers/coffeeController';
At the bottom of the file, add the following cron job:
cron.schedule('* * * * *', async () => {
    console.log('Task is running every minute');
    const results = await runScanImageGraph();

    console.log("Detected: ", results.numPeople);

    if (results.numPeople > 20) {
      console.log("More than 20 people found - initiating sale");
      setCoffeePrice(0.7);
    } else {
      setCoffeePrice(1);
    }
});
This cron job will run every minute. It will scan the cafe image, and if there are more than 20 people in the cafe, it will initiate a 30% off sale by calling setCoffeePrice(0.7).
With these changes, our Tech Cafe application now uses advanced AI features to dynamically adjust prices based on the cafe's occupancy. This creates a more realistic and responsive pricing model that can adapt to real-world conditions.
In the next section, we'll update our frontend to reflect these dynamic price changes.
::page{title="Updating the Frontend for Dynamic Pricing"}
Now that we have implemented dynamic pricing on the backend, we need to update our frontend to reflect these price changes in real-time.
Open the src/public/js/main.js file:
::openFile{path="example-project/src/public/js/main.js"}
- Modify the
DOMContentLoadedevent listener to periodically fetch the latest coffee prices:
document.addEventListener('DOMContentLoaded', () => {
  function fetchAndDisplayCoffees() {
    fetch('/api/coffees')
      .then(response => response.json())
      .then(data => {
        const container = document.getElementById('coffees-container');
        data.forEach((coffee, index) => {
          const coffeeDiv = container.children[index];
          if (coffeeDiv) {
            const priceSpan = coffeeDiv.querySelector('p');
            const currentPrice = parseFloat(priceSpan.textContent.split("$")[1]).toFixed(2);
            const newPrice = coffee.price.toFixed(2);

            if (currentPrice !== newPrice) {
              priceSpan.textContent = "Price: $" + newPrice;
              priceSpan.classList.add('price-changed');
              setTimeout(() => priceSpan.classList.remove('price-changed'), 1000);
            }
          } else {
            const coffeeDiv = document.createElement('div');
            coffeeDiv.classList.add('coffee-item');

            coffeeDiv.innerHTML = `
                <h3>${coffee.name}</h3>
                <p>Price: $${coffee.price.toFixed(2)}</p>
                <button class="purchase-button" data-coffee-name="${coffee.name}" data-coffee-id="${coffee.id}">Purchase</button>
            `;

            container.appendChild(coffeeDiv);
          }
        });
      })
      .catch(error => {
        console.error('Error fetching coffees:', error);
      });
  }

  // Initial fetch
  fetchAndDisplayCoffees();

  // Fetch prices every 15 seconds
  setInterval(fetchAndDisplayCoffees, 15000);
});
This modification will fetch the latest coffee prices every 30 seconds and update the display accordingly.
Now let's run the application:
npm run devNow watch the console. Every minute it will run the graph and update the prices as necessary. Also view your application to see the prices changing in realtime:
::startApplication{port="3000" display="internal" name="Open Tech Cafe App" route="/"}
Initially the image we are checking (street.png) will only have a few people so a sale won't be initiated. Switch street1.png for street2.png to have a sale be initiated.
# Simulate a populated street webcam image
cp -f ./src/images/street2.png ./src/images/street.png
To stop the application press CTRL + C in the terminal window.
Congratulations! You've successfully implemented advanced AI features in Tech Cafe, including image processing for occupancy detection and dynamic pricing based on this real-time data. This creates a more realistic and responsive application that can adapt to changing conditions.
This has been a great demonstration of using LLMs with langgraph, but this could be done with more traditional, non-graph code. This is true, and if your application is very simple you likely don't need langgraph, however as you will see shortly, when you have a more complex application that requires agentic thinking or more complicated business logic, graphs are invaluable. Moreover, designing your application with a graph structure makes it extremely modular and easily adaptable to any future changes.
In the next section we will finish off this guided project by digging into a couple powerful langgraph features:
- Human in the Loop (HITL)
- Conditional Branching
::page{title="Understanding Human in the Loop"}
Human in the Loop (HITL) is an AI approach that combines machine learning algorithms with human intervention. In this model, humans play a crucial role in training, tuning, and testing AI systems to improve their accuracy and reliability.
Key aspects of HITL:
- Machine learning algorithms process data and make initial predictions or decisions
- Human experts review and correct the AI's output when needed
- The AI system learns from these corrections, continuously improving its performance
HITL offers several advantages:
- Improved accuracy: Human expertise helps refine AI predictions
- Handling edge cases: Humans can manage complex scenarios the AI may struggle with
- Building trust: Human oversight increases confidence in AI systems
- Continuous learning: The AI improves over time through human feedback
We'll enhance our Tech Cafe app by adding HITL for the dynamic pricing feature:
- The AI will suggest price adjustments based on cafe occupancy
- A human administrator will review and approve/modify these suggestions
- The system will learn from admin decisions to improve future pricing recommendations
Let's start by modifying our backend to support this new workflow.
::page{title="Modifying the Backend for HITL"}
Note: If needed, you can use the part2 folder to continue from this point. Ideally, proceed without it unless something went wrong.
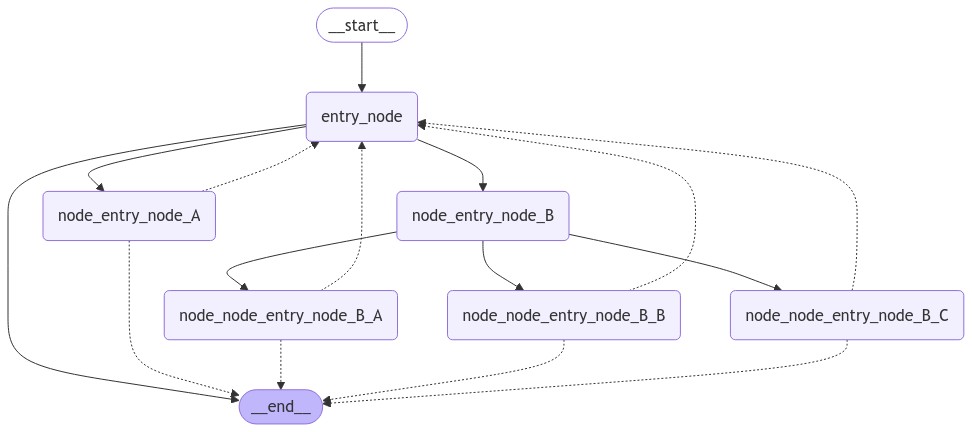
Before we begin let's layout the plan. Rather than the sales being applied automatically, we want to enable HITL so that a store manager is able to approve (and potentially modify) sales before they are applied. Moreover, we will update the code so that the coffee prices are updated within the graph logic (rather than by server.ts). Finally, we will also leverage a conditional edge to stop processing if not enough people are detected outside (and no HITL is needed).
First, we'll update our graph.ts file to support the new HITL workflow:
::openFile{path="example-project/src/graph.ts"}
First let's update our imports at the top of our file:
import { Annotation, StateGraph, MemorySaver, START, END } from '@langchain/langgraph';
import { setCoffeePrice } from './controllers/coffeeController';
To start let's add salePercentage to the ImageAnnotation so that the state knows how much sale to apply (as chosen by the manager):
const ImageAnnotation = Annotation.Root({
    imageURI: Annotation<string>,
    numPeople: Annotation<number>,
    salePercentage: Annotation<number>,
});
Now let's add a new step within our graph to estimate the sale amount based on the number of people detected in the stepScanImage node:
const stepEstimateSale = async (state: typeof ImageAnnotation.State) => {
    if (state.numPeople > 40) {
        state.salePercentage = 50;
    } else if (state.numPeople > 20) {
        state.salePercentage = 20;
    } else {
        state.salePercentage = 0;
    }
    return state;
}
The last new node we need to add is one that actually alters the coffee sale price (this was previously done in server.ts).
Then define the new stepStartSale function which uses it:
const stepStartSale = async (state: typeof ImageAnnotation.State) => {
    setCoffeePrice(state.salePercentage);
    return state;
}
Finally let's define the saleNeeded function that will be used with our conditional node. This function returns a string which represents the node we want to traverse to next - in our case this will be either stepStartSale or END to finish the processing.
const saleNeeded = async (state: typeof ImageAnnotation.State) => {
    if (state.numPeople > 20) {
        console.log("Sale is potentially needed");
        return "stepStartSale"
    }
    return END;
}
Now that we have all of our new node functions defined we can update our graph to enable HITL.
To accomplish this replace the assignment ofscanImageGraph with:
// Set up memory. In production systems this will likely be backed by a database.
const graphStateMemory = new MemorySaver()

const scanImageGraph = new StateGraph(ImageAnnotation)
    .addNode("stepGetLatestImage", stepGetLatestImage)
    .addNode("stepScanImage", stepScanImage)
    .addNode("stepStartSale", stepStartSale)
    .addNode("stepEstimateSale", stepEstimateSale)
    .addEdge(START, "stepGetLatestImage")
    .addEdge("stepGetLatestImage", "stepScanImage")
    .addEdge("stepScanImage", "stepEstimateSale")
    // Third parameter is to support visualizing the graph
    .addConditionalEdges("stepEstimateSale", saleNeeded, ["stepStartSale", END])
    .addEdge("stepStartSale", END)
    .compile({
        checkpointer: graphStateMemory,
        interruptBefore: ["stepStartSale"]
    });
On top of adding in the new nodes you'll notice a few other key changes. Let's break them down:
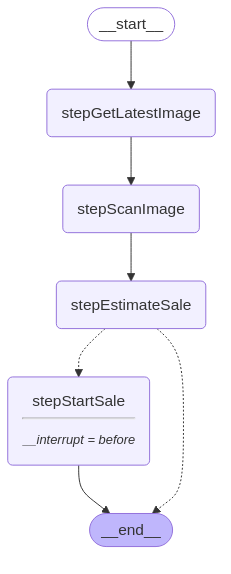
- A conditional edge is added via
addConditionalEdges. This calls thesaleNeededfunction we previous defined which will choose eitherstepStartSaleorENDto traverse to next. We pass the optional 3rd argument simple for visualization purposes. - We set the
checkpointerto ourgraphStateMemoryvariable which will store the state of our graphs in memory. - Setting
interruptBeforetostepStartSalesimple states that we will stop processing the graph until manually restart -- this is where the HITL comes in to play.
Visually this is what the graph looks like:
Now we defined three more helper functions to get the graph state, update the graph state, and run our graph:
// Normally in production you would have many state configs, but for demo purposes we will use a single one hardcoded.
const demoStateConfig = { configurable: { thread_id: "1" }, streamMode: "values" as const };

export const getScanImageGraphState = async () => {
    const currState = await scanImageGraph.getState(demoStateConfig);
    return currState;
};

export const updateScanImageGraphState = async (toUpdate: Partial<typeof ImageAnnotation.State>) => {
    const currState = await scanImageGraph.getState(demoStateConfig);
    await scanImageGraph.updateState(demoStateConfig, { ...currState.values, ...toUpdate });
};

export const runScanImageGraphState = async (initialInput: Partial<typeof ImageAnnotation.State>|null = null) => {
    for await (const event of await scanImageGraph.stream(initialInput, demoStateConfig)) {
        console.log(`Number of people detected in the image: ${event.numPeople}`);
    }
};
::page{title="Creating the Admin Interface"}
Now, let's create an admin interface to review and approve sale suggestions:
Create a new file src/public/admin.html:
::openFile{path="example-project/src/public/admin.html"}
Add the following content:
<!DOCTYPE html>
<html lang="en">
<head>
  <meta charset="UTF-8">
  <meta name="viewport" content="width=device-width, initial-scale=1.0">
  <title>Suggested Sale</title>
  <link rel="stylesheet" href="https://fonts.googleapis.com/css?family=Roboto:300,400,500,700&display=swap">
  <style>
    body {
      font-family: 'Roboto', sans-serif;
      line-height: 1.6;
      color: #333;
      max-width: 800px;
      margin: 0 auto;
      padding: 20px;
      background-color: #f4f4f4;
    }
    h1, h3 {
      color: #2c3e50;
    }
    img {
      max-width: 100%;
      height: auto;
      border-radius: 8px;
      box-shadow: 0 4px 6px rgba(0, 0, 0, 0.1);
    }
    form {
      background-color: #fff;
      padding: 20px;
      border-radius: 8px;
      box-shadow: 0 2px 4px rgba(0, 0, 0, 0.1);
    }
    label {
      display: block;
      margin-bottom: 5px;
    }
    input[type="number"] {
      width: 100%;
      padding: 8px;
      margin-bottom: 10px;
      border: 1px solid #ddd;
      border-radius: 4px;
    }
    button {
      background-color: #3498db;
      color: white;
      padding: 10px 15px;
      border: none;
      border-radius: 4px;
      cursor: pointer;
      margin-right: 10px;
    }
    button:hover {
      background-color: #2980b9;
    }
    button[type="button"] {
      background-color: #e74c3c;
    }
    button[type="button"]:hover {
      background-color: #c0392b;
    }
    #noSaleMessage {
      text-align: center;
      font-size: 24px;
      margin-top: 50px;
    }
  </style>
</head>
<body>
  <div id="content">
    <h1>Suggested Sale</h1>
    <div>
      <h3>Current Crowd</h3>
      <img id="currentCrowdImage" alt="Current Crowd">
      <p id="numberOfPeople">Number of people detected: </p>
    </div>
    <form action="/admin/confirm" method="post">
      <label for="salePercentage">Percentage amount of sale:</label>
      <input type="number" id="salePercentage" name="salePercentage" value="" min="0" max="100" required>
      <button type="submit">Confirm Sale</button>
      <button type="button" onclick="window.location.href='/admin/cancel';">Cancel Sale</button>
    </form>
  </div>
  <div id="noSaleMessage" style="display: none;">
    <p>Sales not recommended</p>
    <button onclick="location.reload()">Reload Page</button>
  </div>
  <script>
    document.addEventListener('DOMContentLoaded', () => {
        fetch('/admin/saleInfo')
        .then(response => {
            if (!response.ok) {
                throw new Error('Sale not found');
            }
            return response.json();
        })
        .then(data => {
            document.getElementById('currentCrowdImage').src = data.imageURI;
            document.getElementById('numberOfPeople').innerText += data.numPeople;
            document.getElementById('salePercentage').value = data.salePercentage;
        })
        .catch(error => {
            console.log('Error:', error.message);
            document.getElementById('content').style.display = 'none';
            document.getElementById('noSaleMessage').style.display = 'block';
        });
    });
  </script>
</body>
</html>
::page{title="Implementing Admin Routes"}
Now, let's create the backend routes to handle admin actions:
Create a new file src/routes/adminRoutes.ts:
::openFile{path="example-project/src/routes/adminRoutes.ts"}
Add the following content:
import express from 'express';
import { admin, saleInfo, confirmSale, cancelSale } from '../controllers/adminController';

const router = express.Router();

router.get('/', admin);

router.post('/confirm', confirmSale);
router.get('/cancel', cancelSale);
router.get('/saleInfo', saleInfo);

export default router;
Create a new file src/controllers/adminController.ts:
::openFile{path="example-project/src/controllers/adminController.ts"}
Add the following content:
import path from 'path';
import { Request, Response } from 'express';
import { getScanImageGraphState, updateScanImageGraphState, runScanImageGraphState } from '../graph';

export const admin = async (req: Request, res: Response) => {
  res.sendFile(path.join(__dirname, '..', 'public', 'admin.html'));
};

export const confirmSale = async (req: Request, res: Response) => {
  const { salePercentage } = req.body;
  const actualSalePercentage = 1 - (salePercentage/100);
  await updateScanImageGraphState({ salePercentage: actualSalePercentage });
  await runScanImageGraphState();

  console.log('SALE ON');

  // Render the main application to see the changes applied
  res.sendFile(path.join(__dirname, '..', 'public', 'index.html'));
};

export const cancelSale = async (req: Request, res: Response) => {
  await updateScanImageGraphState({ salePercentage: 0 });
  await runScanImageGraphState();

  console.log('SALE OFF');
  res.sendFile(path.join(__dirname, '..', 'public', 'admin.html'));
};

export const saleInfo = async (req: Request, res: Response) => {
  const currState = await getScanImageGraphState();

  if (currState.createdAt && currState.next.includes('stepStartSale')) {
    res.status(200).json(currState.values);
  } else {
    res.status(404).json({message: 'no sale found'});
  }
};
Update src/server.ts to include the new admin routes:
::openFile{path="example-project/src/server.ts"}
First import the adminRoutes and runScanImageGraphState by adding the following to the top of the file:
import adminRoutes from './routes/adminRoutes';
import { runScanImageGraphState } from './graph';
Then use these routes in our application by adding this code after /api/coffees is defined:
// Admin Routes
app.use('/admin', adminRoutes);
Finally replace the cronjob at the bottom of the file with:
const checkSale = async () => {
  console.log('Task is running every minute');
  const initialInput = {};
  await runScanImageGraphState(initialInput);
}

// Schedule a task to run every minute
cron.schedule('* * * * *', checkSale);
::page{title="Testing the HITL Implementation"}
Now that we have implemented the Human in the Loop functionality, let's test it:
Start your server:
npm run devClick the button below to open your app:
::startApplication{port="3000" display="internal" name="Open Tech Cafe App - Admin Page" route="/admin"}
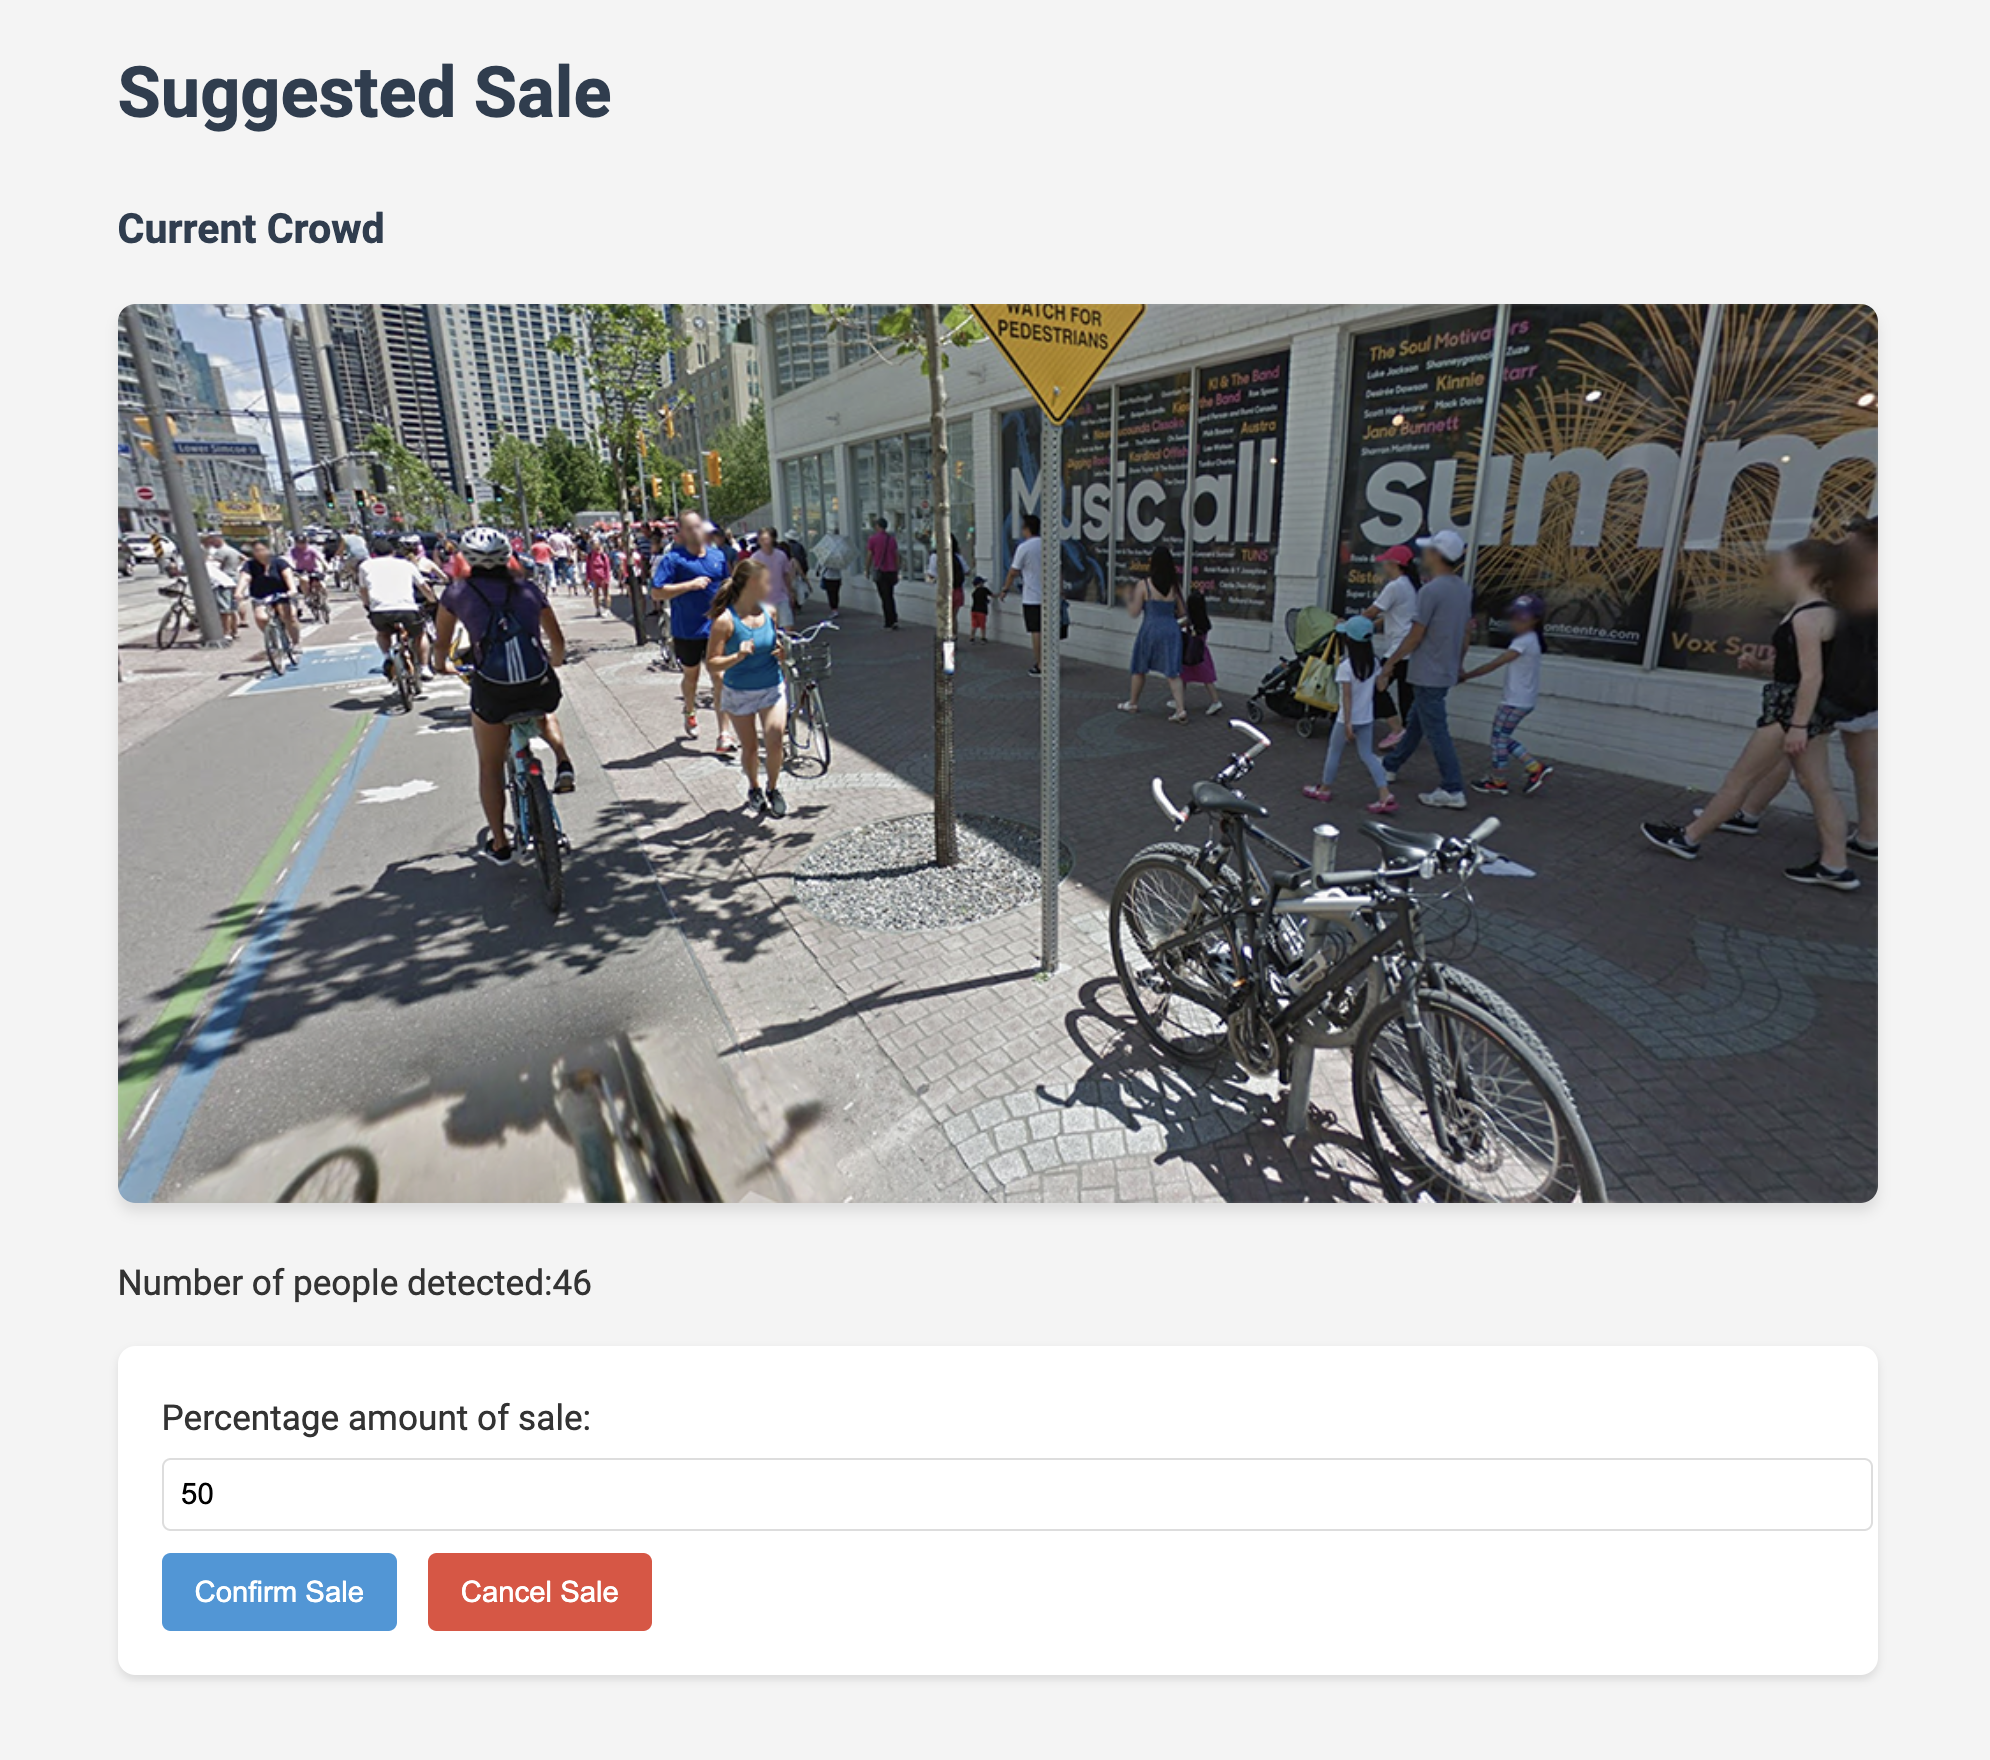
You should see the Admin Dashboard with the current sale suggestion.
Remember: More than 20 people need to be detected in the image in order to initiate a potential sale - you should see this in the terminal. You can run the following in a separate terminal window to accomplish this:
# Simulate a populated street webcam image
cp -f ./src/images/street2.png ./src/images/street.png
Try approving, modifying, and rejecting sales. Verify that the actions are reflected in the system.
Open another browser tab. Check if the coffee prices are updated when you approve a sale.
::startApplication{port="3000" display="internal" name="Open Another Tech Cafe App" route="/"}
Congratulations! You have successfully implemented Human in the Loop functionality in Tech Cafe. This addition allows for more accurate and controlled dynamic pricing, combining the power of AI with human expertise.
::page{title=“Conclusion and Next Steps”}
Congratulations on completing this Guided Project! Throughout this journey, you’ve explored the practical applications of Large Language Models (LLMs) and LangGraph to solve real-world problems. Let’s recap what you’ve accomplished:
- Integrated LLMs into a Node.js Application: You learned how to incorporate powerful language models into your application, enabling advanced text generation and processing capabilities.
- Implemented LangGraph Workflows: You explored how to use LangGraph to create modular, flexible, and maintainable workflows, handling complex logic with ease.
- Processed Images with LLMs: By leveraging the Llama 3.2 Vision model, you extended AI capabilities to include image analysis, demonstrating the versatility of LLMs beyond text.
- Set Up Periodic Tasks with Cron Jobs: You automated processes by scheduling tasks, such as updating system states and analyzing data at regular intervals.
- Implemented Dynamic Pricing Based on AI Insights: Using real-time data and AI analysis, you created a dynamic pricing system that adjusts based on foot traffic, showcasing how AI can drive business decisions.
- Incorporated Human-In-The-Loop (HITL): You enhanced your application with HITL mechanisms, allowing human oversight and intervention to improve AI decision-making processes.
Throughout these steps, you transformed Tech Cafe into an intelligent, AI-enhanced application that not only improves customer experience but also optimizes operations and drives profitability.
Your journey doesn’t have to end here. Here are some suggestions for further exploration and development:
- Expand AI Capabilities: Explore other use cases where AI can add value, such as personalized marketing, supply chain optimization, or predictive analytics.
- Integrate Additional Data Sources: Incorporate other real-time data, such as weather conditions or social media trends, to refine your dynamic pricing model.
- Security and Compliance: Implement security best practices to protect user data and ensure compliance with relevant regulations.
- Deploy and Scale: Consider deploying your application to a cloud platform and explore scaling options to handle increased load and traffic.
- Experiment with Other Models: Try integrating different LLMs or AI models to compare performance and capabilities.
- Community Engagement: Share your project with the developer community, gather feedback, and collaborate on further improvements.
The field of AI is rapidly evolving, and the possibilities are virtually limitless. By mastering the integration of LLMs and tools like LangGraph, you’re well-equipped to innovate and contribute to this exciting domain. Keep experimenting, stay curious, and continue pushing the boundaries of what’s possible with AI.
Thank you for participating in this Guided Project. We hope it has been an enlightening and rewarding experience.
Happy coding!
