关于View的clipToBounds方法的注意事项
clipToBounds的含义:子View是否在父View的边界内进行绘制,如果设置为true,则子View超出父View的部分会被切割,如果设置为false,则不会被切割。
- iOS端为了提升性能,clipToBounds默认为false,Android端clipToBounds默认为true(LinearLayout作为父视图的父视图除外);
- Android端父视图会遍历子视图,让所有子视图都统一clipToBounds,ios端则不会;
- 如果父View设置了圆角,iOS端提供了CornerManager方法来强制切割子View;
- LinearLayout作为父视图,不切割其子视图的子视图;
- 如果LinearLayout和View有共同的父视图,则View:clipToBounds(false)后,LinearLayout也不会切割其子视图;
下面对于上述五个注意事项举例说明。
子视图为subView1,subView1的父视图为fatherView1,fatherView1的父视图为fatherView(fatherView为非LinearLayout),示例代码如下:
--- 父视图的父视图
local fatherView = View()
        :width(MeasurementType.MATCH_PARENT)
        :height(50)
        :marginTop(80)
        :bgColor(Color(0,0,0,0.3))
window:addView(fatherView)
--- 父视图
local fatherView1 = View()
        :width(200)
        :height(80)
        :marginLeft(50)
        :bgColor(Color(255,0,0,1))
fatherView:addView(fatherView1)
--- 子视图
local subView1 = View()
        :width(250)
        :height(100)
        :bgColor(Color(0,0,255,0.3))
fatherView1:addView(subView1)
运行结果如下:
其中,紫色区域为子视图subView1,红色区域为subView1的父视图fatherView1,灰色区域为fatherView1的父视图fatherView,Android端所有子视图都被切割了,iOS端未被切割。

上述代码中,设置fatherView:clipToBounds(false) 后,Android端会遍历fatherView的所有子视图,因此,fatherView不仅切割了fatherView1,fatherView1还切割了subView1。
保持两端一致的方法: 设置fatherView:clipToBounds(true)和fatherView1:clipToBounds(true)后两端都被切割,只设置fatherView:clipToBounds(false)后两端都不切割。
CornerManager: openDefaultClip(true/false),设置为true并且设置圆角后,两端都默认切割,不需要再调用clipToBounds;设置为false,需要用户自行控制是否clipToBounds。
使用步骤如下:
1)新建a.lua文件和b.lua文件(注意:两个文件都在src目录下);
2)在a.lua文件中编写:CornerManager:openDefaultClip(true) ;
3)在b.lua文件中引入a.lua:require('a'),并编写如下代码:
--- 父View
local bgView = View()
        :width(100)
        :height(50)
        :bgColor(Color(255,0,0,0.3))
        :setGravity(Gravity.CENTER)
        :cornerRadius(18)
window:addView(bgView)

--- 子View
local subView = View()
        :width(100)
        :height(100)
        :bgColor(Color(0,255,0,0.3))
bgView:addView(subView)

bgView:clipToBounds(false) -- CornerManager的openDefaultClip设置为false后,自行设置是否切割
4)查看运行结果:两端的子视图都被切割。如果openDefaultClip设置为false,需要用户自行控制是否clipToBounds。
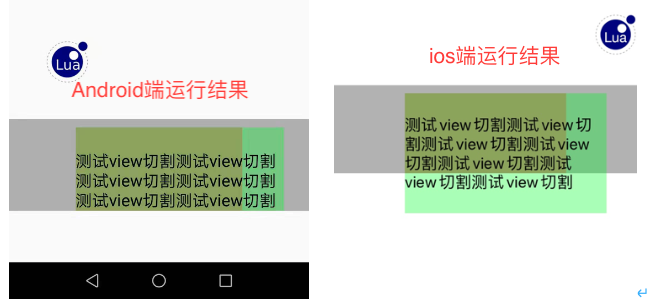
例如,linear为父视图,bgView2为linear的子视图,subLabel为bgView2的子视图,代码如下:
--- 父视图linear
local linear = LinearLayout(LinearType.VERTICAL)
        :width(MeasurementType.MATCH_PARENT)
        :height(80)
        :marginTop(400)
        :bgColor(Color(0,0,0,0.3))
        --:clipToBounds(true) -- android仅对parent的parent有效
window:addView(linear)

--- 父视图bgView2
local bgView2 = View()
        :width(200)
        :height(100)
        :marginTop(10)
        :bgColor(Color(255,0,0,0.3))
        :setGravity(Gravity.CENTER)
        --:clipToBounds(true)
linear:addView(bgView2)

--- 子视图subLabel
local subLabel = Label()
        :width(250)
        :height(150)
        :bgColor(Color(0,255,0,0.3))
        :text("测试view切割测试view切割测试view切割测试view切割测试view切割测试view切割测试view切割")
        :textColor(Color(0,0,0,1))
        :fontSize(20)
        :lines(0)
bgView2:addView(subLabel)
运行后可以看出,android端linear只切割了其子视图bgView2,并没有切割bgView2的子视图subLabel。
保持两端一致的方案: 如果想要linear不切割subLabel,需要对linear的父视图window设置window:clipToBounds(false);如果想要linear切割subLabel,需要对linear设置linear:clipToBounds(true),由于iOS端并不会遍历子视图,所以还得设置bgView2:clipToBounds(true),两端才能实现均切割子视图的目的。