In VSCode, open the folder containing the project you want to deploy.
Open the Posit Publisher UI by clicking the icon in the activity bar.
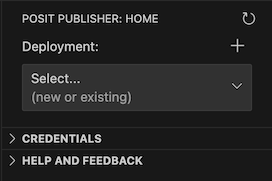
The Home view shows information about the selected deployment destination.
To create your first deployment, click the Add Deployment button.
This will take you through the process of creating a new deployment, which includes a credential, configuration, and content record.
- A credential defines the server you will deploy to and the API key that will be used to authenticate you. Once you have created a credential, you can use it for all of your deployments to that server.
- A configuration file describes how your project will be deployed. If the extension detects more than one possible project type, you will be asked which one to use when creating the configuration file.
- A content record describes where your project is going to be deployed, and records the settings used for that deployment and the result.
Tip
If you have the Even Better TOML extension installed, VSCode will show tooltips for the fields. It will also validate the structure and contents of the configuration file using the provided schema.

Before you can deploy a Python project, you must set up the requirements file
for your project. If you don't already have a requirements.txt you can open
the Requirements view and click the Scan button to generate one. Review
the generated requirements file to ensure it includes all the packages your
project needs.

For R projects, you need an renv.lock file that captures the R package dependencies
for your project. You also need an active renv library with those packages installed
so the extension can gather details about them. See the
renv documentation for more details.
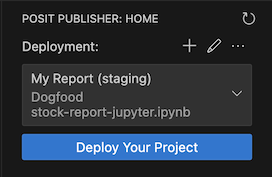
You are all set to Deploy!
Click the Deploy Your Project button in the Home view to start the deployment
process. 🎉
During deployment, the extension will show a progress window with the status of the deployment. Once the deployment completes, the result will be displayed in the Home view.

You can deploy or create a new deployment directly from an open file. If it is a valid entrypoint a Posit Publisher button will appear in the editor menu.

You can create multiple deployments for different purposes. For example, you can use a staging deployment for testing before creating or updating a production deployment that is shared with your users.
Clicking the Deployment dropdown lets you choose which deployment to target.
Then choose from the displayed list.

If you have previously deployed content on Connect that you want to update, but you don't already have a Deployment and Configuration file setup, you can use a prompt in the Home View to allow for this.

After creating a new deployment in the extension pressing "update that previous deployment" will prompt you with the content URL. Once provided your new deployment will be setup to update that content URL, rather than creating a new deployment entirely.
This view shows the files in your workspace:
- Included files show as checked and will be included in your deployment. They are sent to the server as part of the uploaded content.
- Excluded files show as unchecked and will not be included in your deployment. The tooltip on an excluded file will indicate the reason it is excluded. Some files are excluded by the publisher and cannot be added.

The files included in your project are controlled by the files list in
the deployment configuration file. The buttons in the UI update that list.
If you have more than one destination with different configuration files,
they can have different sets of included and excluded files.
The files list accepts wildcards in .gitignore format.
For example, to include all Python source files from your project directory, you can use
*.py. Exclude files (or wildcard patterns) by prefixing them with !. If a file
matches multiple entries, the last match wins. For example, you can exclude all
CSV files except data.csv with the configuration entry:
files = [
  "*",
  "!*.csv",
  "data.csv"
]You can setup Secrets for your project in the Secrets view.
Secrets are name-value pairs that you want to be available at runtime for content on the server. However, unlike environment variables, the value associated with a secret is considered “sensitive”, and should not be stored in the configuration file itself.
Secret names are defined in the Configuration file using the secrets field.
They can be added by clicking the + button in the Secrets view or by directly
editing the configuration file.
secrets = ['API_KEY', '_DB_PASSWORD']The names indicate what Secrets are required for the deployment. When they are sent up to the Connect server they become Environment Variables.

Secrets are sent to the Connect server only when a value is supplied to avoid overwriting any values already set.
To set a Secret click the Edit Value button (the pencil icon) for the Secret
you'd like to set and enter the value. The value is stored in the extension and
is sent up during your next deploy.
A badge indicates how many Secrets are set to send in your next deploy.
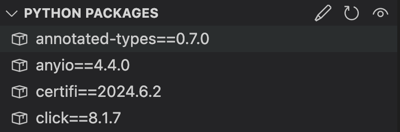
This view shows the contents of the requirements file in your
project directory. It's required when deploying a Python project.
By default, the filename is requirements.txt. You can specify an alternate
name in the deployment configuration file using the package_file
field under the [python] section.
If you don't have a requirements file yet, you'll see a message prompting you to scan it. Clicking Scan will scan your project code for imports and attempt to map those to package names and versions using the package metadata from your local Python installation. After scanning, verify the contents of the generated requirements file and make any changes needed.
If you already have a requirements file, you can scan your code again using the eye icon in the Requirements view.
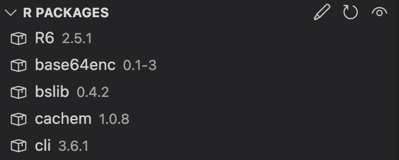
This view shows the contents of the renv.lock file in your project directory.
It's required when deploying an R project. By default, the filename is renv.lock.
You can specify an alternate name in the deployment configuration file using the
package_file field under the [r] section.
If your renv.lock file and library are out of sync, run renv::snapshot()
or renv::restore() to update the lockfile or library, respectively. Clicking
the "eye" icon in the R Packages view will run renv::snapshot() for you.
This view lists the credentials you have defined. You need a credential for each Connect server you want to deploy to; each credential includes the server URL and an API key. Credentials are securely stored in the OS keychain.
To add a credential for a new server, click the + button.
To remove a credential, right-click on it and select Delete.

For instructions on how to create a Connect API key, see the Connect documentation.
If your OS does not have a keychain the extension will manage your credentials
in a file in your home directory - .connect-credentials.
This view contains links to this documentation and other resources.
The Posit Publisher logs are available in the VSCode bottom panel.

There are a few ways to easily get to them:
- Run
Posit Publisher Logs: Focus on Logs Viewfrom the command palette. - Click the
Show Logsbutton in the error notification that appears on a deployment failure. - Select
Go to Publishing Login the status area ellipsis menu.
Clicking the ellipsis menu in the status area provides options to view additional options which may be helpful when troubleshooting.

Browse Deployment Serveropens a browser window showing the content list on the Connect server.Show Content Logopens a browser window showing the most recent log for your content on the Connect server.Go to Debug Logopens the Posit Publisher debug logs in the VSCode output panel.Go to Publishing Logopens the Posit Publisher Logs panel.