Proxyee 是一个 JAVA 编写的 HTTP 代理服务器类库,支持 HTTP、HTTPS、Websocket 协议,并且支持 MITM(中间人攻击),可以对 HTTP、HTTPS 协议的报文进行捕获和篡改。
<dependency>
    <groupId>com.github.monkeywie</groupId>
    <artifactId>proxyee</artifactId>
    <version>1.5.4</version>
</dependency>- 普通 HTTP 代理服务器
new HttpProxyServer().start(9999);- 中间人 HTTP 代理服务器
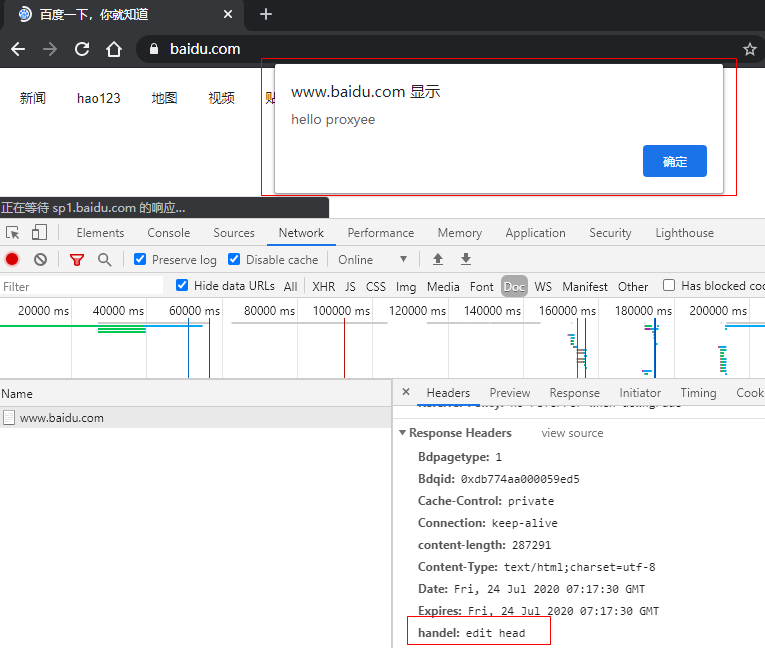
以下是一个中间人攻击演示,在访问百度首页时修改响应头和响应报文,如图所示:
代码实现:
HttpProxyServerConfig config =  new HttpProxyServerConfig();
//开启HTTPS支持
//不开启的话HTTPS不会被拦截,而是直接转发原始报文
config.setHandleSsl(true);
new HttpProxyServer()
    .serverConfig(config)
    .proxyInterceptInitializer(new HttpProxyInterceptInitializer() {
      @Override
      public void init(HttpProxyInterceptPipeline pipeline) {
        pipeline.addLast(new FullResponseIntercept() {

          @Override
          public boolean match(HttpRequest httpRequest, HttpResponse httpResponse, HttpProxyInterceptPipeline pipeline) {
            //在匹配到百度首页时插入js
            return HttpUtil.checkUrl(pipeline.getHttpRequest(), "^www.baidu.com$")
                && isHtml(httpRequest, httpResponse);
          }

          @Override
          public void handleResponse(HttpRequest httpRequest, FullHttpResponse httpResponse, HttpProxyInterceptPipeline pipeline) {
            //打印原始响应信息
            System.out.println(httpResponse.toString());
            System.out.println(httpResponse.content().toString(Charset.defaultCharset()));
            //修改响应头和响应体
            httpResponse.headers().set("handel", "edit head");
            httpResponse.content().writeBytes("<script>alert('hello proxyee')</script>".getBytes());
          }
        });
      }
    })
    .start(9999);
注:当开启了 https 支持时,需要安装 CA 证书(
src/resources/ca.crt)至受信任的根证书颁发机构。
更多 demo 代码在 test 包内可以找到,这里就不一一展示了
需要导入项目中的CA证书(src/resources/ca.crt)至受信任的根证书颁发机构。 可以使用CertDownIntercept拦截器,开启网页下载证书功能,访问http://serverIP:serverPort即可进入。
注1:安卓手机上安装证书若弹出键入凭据存储的密码,输入锁屏密码即可。
注2:Android 7以及以上,系统不再信任用户安装的证书,你需要root后,使用 cat ca.crt > $(openssl x509 -inform PEM -subject_hash_old -in ca.crt | head -1).0 命令生成 d1488b25.0 文件,然后把文件移动到 /system/etc/security/cacerts/ 并给与644权限
注3:在Android 7以及以上,即使你把证书添加进系统证书里,这个证书在chrome里也是不工作的。原因是chrome从2018年开始只信任有效期少于27个月的证书(https://www.entrustdatacard.com/blog/2018/february/chrome-requires-ct-after-april-2018)。所以你需要自行生成证书文件。
由于项目附带的根证书和私钥是公开的,所以只适用于本地开发调试使用,在正式环境使用时请自行生成根证书和私钥,否则会存在风险。
-
通过运行
com.github.monkeywie.proxyee.crt.CertUtil类的 main 方法生成 -
通过 openssl
#key的生成,这样是生成RSA密钥,openssl格式,2048位强度。ca.key是密钥文件名。
openssl genrsa -out ca.key 2048

#key的转换,转换成netty支持私钥编码格式
openssl pkcs8 -topk8 -nocrypt -inform PEM -outform DER -in ca.key -out ca_private.der

#crt的生成,通过-subj选项可以自定义证书的相关信息
openssl req -sha256 -new -x509 -days 365 -key ca.key -out ca.crt \
-subj "/C=CN/ST=GD/L=SZ/O=lee/OU=study/CN=testRoot"生成完之后把ca.crt和ca_private.der复制到项目的 src/resources/中,或者实现 HttpProxyCACertFactory 接口来自定义加载根证书和私钥
目前只支持基本身份验证方案。
- 基本验证
// curl -i -x 127.0.0.1:9999 -U admin:123456 http://www.baidu.com
HttpProxyServerConfig config = new HttpProxyServerConfig();
        config.setAuthenticationProvider(new BasicHttpProxyAuthenticationProvider() {
            @Override
            protected BasicHttpToken authenticate(String usr, String pwd) {
                if ("admin".equals(usr) && "123456".equals(pwd)) {
                    return new BasicHttpToken(usr, pwd);
                }
                return null;
            }
        });
new HttpProxyServer()
        .serverConfig(config)
.start(9999);- 自定义验证
通过实现HttpProxyAuthenticationProvider接口来自定义验证。
在授权通过之后,可以在后续的链路中获取到验证通过返回的token信息。
HttpToken token = HttpAuthContext.getToken(clientChannel);可设置前置代理,支持 http,socks4,socks5 协议
new HttpProxyServer()
    .proxyConfig(new ProxyConfig(ProxyType.SOCKS5, "127.0.0.1", 1085))  //使用socks5二级代理
.start(9999);HTTP 通讯


