A plugin for The Littlest JupyterHub (TLJH) to build and use Docker images as user environments. The Docker images are built using repo2docker.
This plugin has been adapted from tljh-repo2docker to serve Voila apps for neurolang_web.
Neurolang_gallery needs to be installed as a plugin for The Littlest JupyterHub:
During the TLJH installation process, use the following post-installation script:
#!/bin/bash

# install Docker
sudo apt update && sudo apt install -y apt-transport-https ca-certificates curl software-properties-common
curl -fsSL https://download.docker.com/linux/ubuntu/gpg | sudo apt-key add -
sudo add-apt-repository -y "deb [arch=amd64] https://download.docker.com/linux/ubuntu bionic stable"
sudo apt update && sudo apt install -y docker-ce

# pull the repo2docker image
sudo docker pull jupyter/repo2docker:master

# install TLJH
curl https://raw.githubusercontent.com/jupyterhub/the-littlest-jupyterhub/master/bootstrap/bootstrap.py \
  | sudo python3 - \
    --admin admin \
    --plugin git+https://github.com/NeuroLang/neurolang_gallery@master#"egg=neurolang-gallery"
Refer to The Littlest JupyterHub documentation for more info on installing TLJH plugins.
The first part of the script installs docker on the machine and pulls the repo2docker image which is used to run repo2docker in a docker container. The last part of the script installs TLJH with the neurolang_gallery plugin.
Once TLJH has been installed on a server with the neurolang_gallery plugin, to update neurolang_gallery when code changes, use:
sudo /opt/tljh/hub/bin/python3 -m pip install -U git+https://github.com/NeuroLang/neurolang_gallery@master#"egg=neurolang-gallery"The application installs TLJH which comes with traefik.service that runs a traefik reverse proxy.
repo2docker is used to create Docker images. repo2docker options are specified in docker.py file.
It takes advantage of JupyterHub Docker Spawner to spawn single user notebook servers in Docker containers. Additional configuration options can be set in __init__.py file.
The Environments page shows the list of built environments, as well as the ones currently being built:
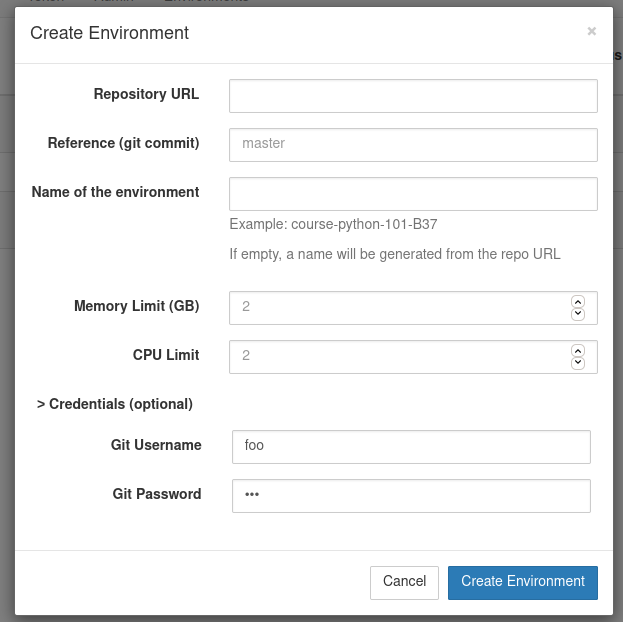
Just like on Binder, new environments can be added by clicking on the Add New button and providing a URL to the repository. Optional names, memory, and CPU limits can also be set for the environment:
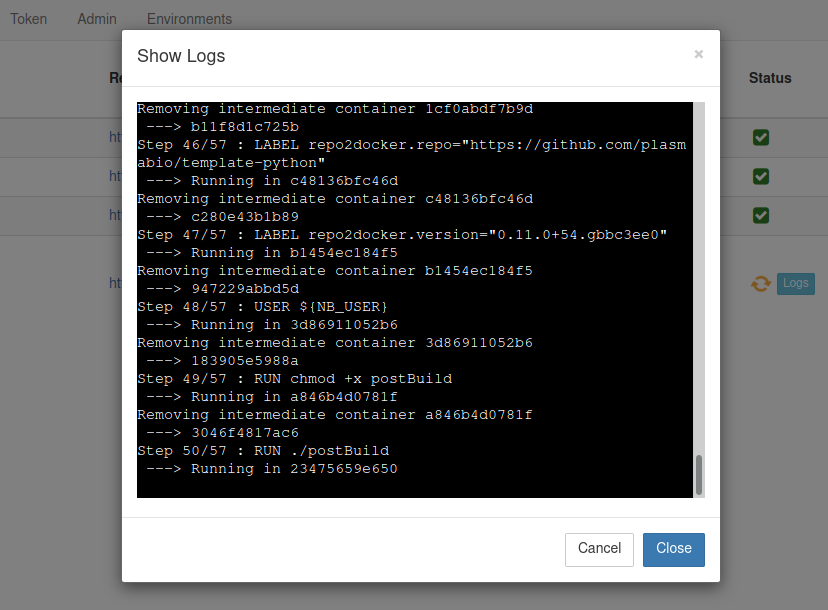
Clicking on the Logs button will open a new dialog with the build logs:
Once ready, the environments can be selected from the JupyterHub spawn page:
There is support for building environments from private repositories.
It is possible to provide the username and password in the Credentials section of the form:
On GitHub and GitLab, a user might have to first create an access token with read access to use as the password:
You can also build docker images by running repo2docker directly as a command line script, instead of from the web interface which runs repo2docker in a docker container :
build-image --ref=master --name=neurolangweb --repo=https://github.com/NeuroLang/neurolang_webThis lets you build images from a local repository by specifying a path to a local repo:
build-image --ref=master --name=dev_neuroweb --repo=/local/path/to/repositoryYou can also choose to build all the images listed in the gallery.yaml file by using the --file option:
build-image --fileSee: https://repo2docker.readthedocs.io/en/latest/howto/jupyterhub_images.html
Check out the instructions in CONTRIBUTING.md to setup a local environment.
The application is a jupyterhub server, which allows admins to create docker images (Environments) containing all the required environment to run the code in a specified repository. See the doc for repo2docker for details on what these images look like. Once an Environment has been created by an admin of the application, any user with an account on the jupyterhub application can start a docker container running its personal jupyter-notebook instance setup to execute the notebooks in the repository.
The neurolang_gallery application is setup to serve a single-page gallery by default. This is configured in the jupyterhub config in tljh_repo2docker/__init__.py.
This gallery page is served by the GalleryHandler in gallery.py.
The examples to display on the page are listed in the gallery.yaml page. Each example has a title, description, and the name of a docker image (which must be one of the Environments generated on the server by an admin).
When the user clicks on one of the examples in the gallery, the GalleryHandler will create a new jupyter-hub user and start a server for this user using the docker image that is specified for the example in the gallery.yaml file. The page is then redirected to the url of this running server, with the auth token to identify the temporary jupyter-hub user whose server is running.
The jupyterhub configuration and more specifically the DockerSpawner parameter can be used to configure how the notebook servers are created/run.
For example, in order to be able to use Voila in the example notebooks, the DockerSpawner starts the notebook servers with extra parameters:
args = [
    "--VoilaConfiguration.enable_nbextensions=True",
    '--VoilaConfiguration.extension_language_mapping={".py": "python"}',
]
We also mount a shared volume on the docker containers so that example data for the notebooks doesn't have to be downloaded each time a new container is created:
c.DockerSpawner.volumes = {
    "neurolang_volume": os.path.join(
        notebook_dir, "gallery/neurolang_data"
    )
}


