There is nothing so complicated that it can't be made simple. JSonly is an advanced, yet minimalistic WebComponents framework featuring most of the functionality of popular JavaScript frameworks, but in a fraction of their complexity and therefore minimizing the effort of refactoring your code.
JSonly is built on and
.
- vanilla JavaScript
- built for SinglePageApplications (SPAs)
- following W3C standards and MDN-recommended best practices with just a few hacks to accomplish things where people claim: "This is impossible with WebComponents"
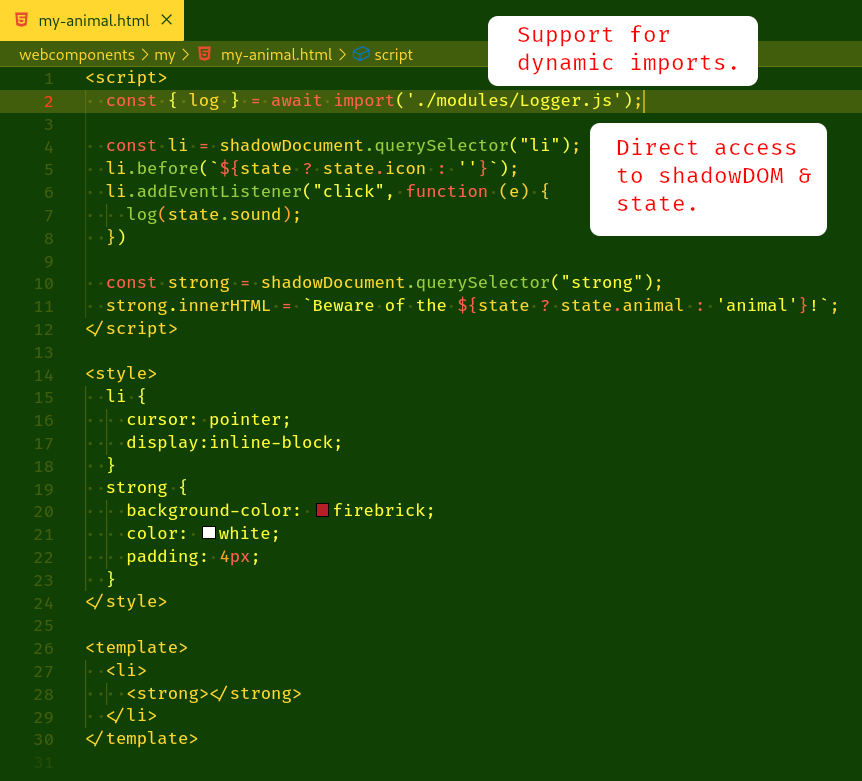
- support for SingleFileComponents (SFCs) in dedicated .html files
- full reactivity support for store-access and conditionals in templates (compiler API)
- support for use of publicAPI (script-returned) functions in the templates (script API)
- support for nesting WebComponents
- ShadowDOM with support for template, script and style tags
- support for reactive state changes
- support for dynamic imports
- offline capabilities
- pluggable navigation module using history-driven Component Router
- support for inter-component event handling using BroadcastChannels
- SQLite WebAssembly (WASM) for global state management
- support for OriginPrivateFileSystem (OPFS), your data stays private
- support for realtime P2P connections via WebRTC
- Vite with basicSsl plugin
- basic functionality in under <100LOC
Besides You need to have
installed. I recommend using
for development and
for testing. However, You can use any editor and browser of choice.
Running JSonly is as easy as cloning a repository.
  git clone https://github.com/ProphetsAI/jsonly
  cd jsonly
  npm install
and then
npm run devYou can then access the app via https://localhost:5173 in your browser.
Have you ever thought about creating standard SingleFile-WebComponents in dedicated HTML-files? Now it's possible to use script, style and template fragments and load them dynamically.
That's basically everything. Happy coding!
Examples can be found in the webcomponents folder. It is recommended to stick to that pattern to keep your code clean, but of course you are free to customize at your own will!
Here are some further guidelines. You can use the following pre-defined constants in a SFC. You have access to the following functions:
- use dynamic
await importto include your own modules shadowDocumentis the private scope DOM of the SFC to access inner-component elements. You can use it just like the default DOMdocument, for instanceshadowDocument.getElementById(...).$is a shorthand forquerySelectoron the shadowDocument. You can use it to get a HTMLElement likeconst animalform = $('#animalform');and then access underlying HTMLElements viaanimalform.$('#animal').value$$is a shorthand forquerySelectorAlland you can use it accordingly to$, standalone (on shadowDocument) or on a HTMLElement.refreshis refreshing the element when called on the HTMLElement and refreshing the uppermost HTMLElement when called standalone.- Use
getStateto get the component state as a JSON object setState(string)takes a string and modifies the component-state- You have access to ````this.script
in the template. You have access to all functions that are returned by the script-API withreturn {functionA, functionB}``` - You will have to check
if (getDOM(context)) {on WebComponents that are going to be deleted to prevent script execution of detached elements.
In case you want some deeper insights: This lifecycle-graph should help you understand how the component in JSonly are working:
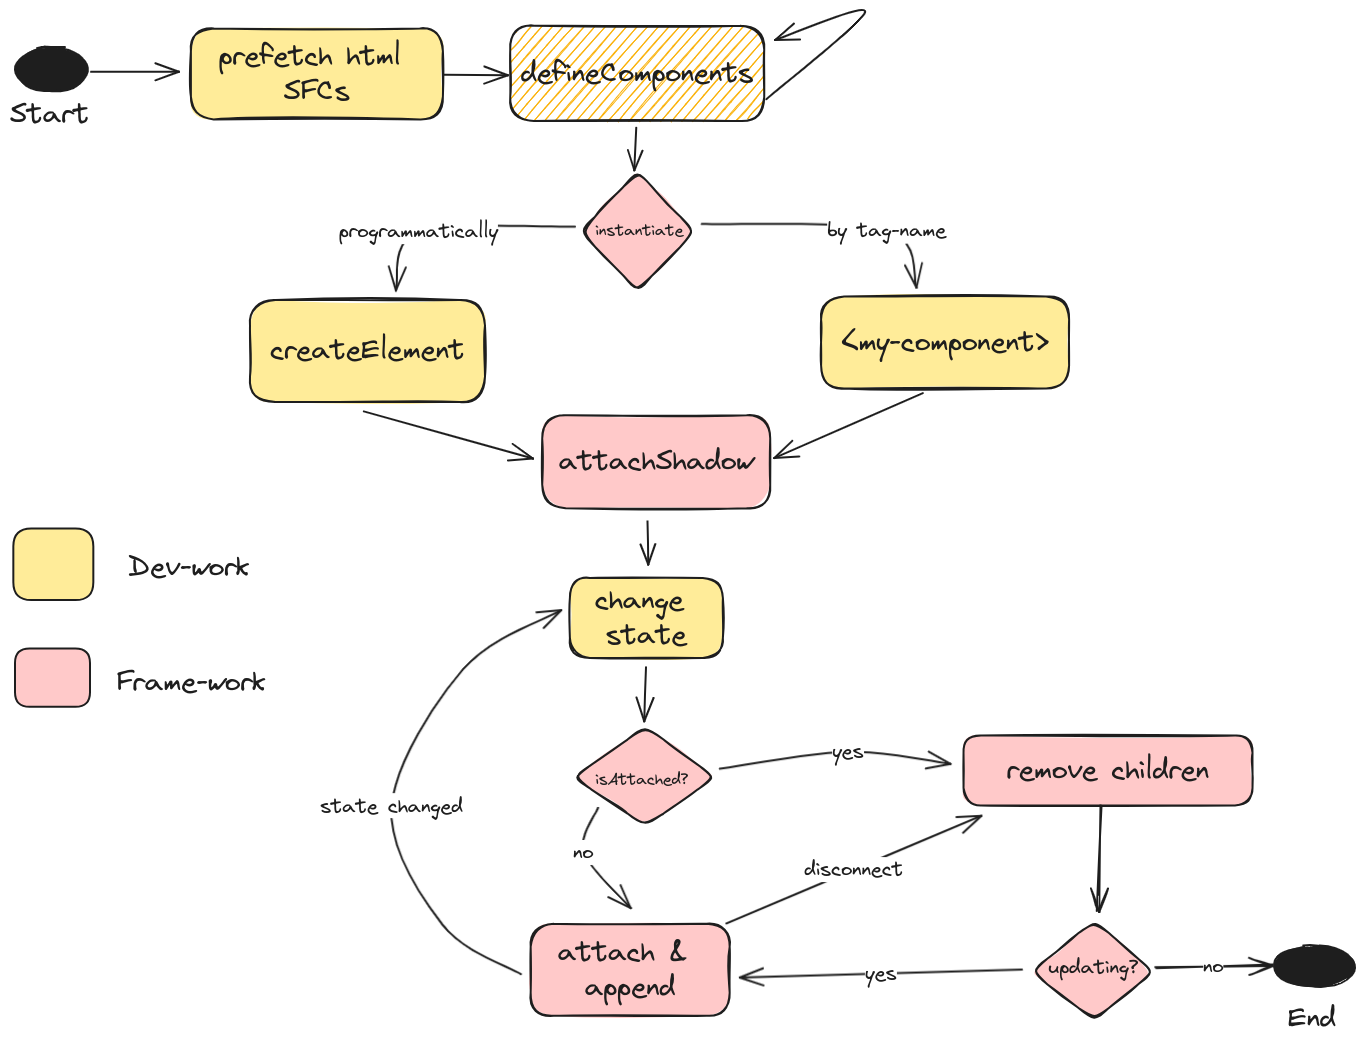
- prefetch html components in index.html
- declare your webcomponents in the ./webcomponents/index.js (this happens automatically when you run
npm run dev) - After having created your components you can instantiate them programmatically or by tag-name like in the animals-view.html Check out the other webcomponents to see variations.
- changing the state of a component is possible via the
stateconstant from inside or by changing the attributedata-stateof the host element.
Adding a navigation is very easy. You can have an entire navigation in one single html file defined as just another component. After having it integrated into your app

it could look like this:
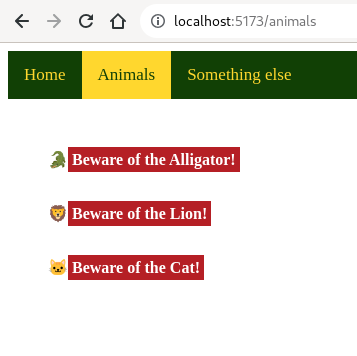
Of course you are completely free to customize the themes and make them awesome!
If you still have questions please let me know. Also what you think and share your improvements with me is higly appreciated. If you have any feedback, please reach out to me at @prophets_ai