- Introduction
- Requisites
- Step 1: Clone the Smart Contract Template
- Step 2: Set Up Development Environment
- Step 3: Implement the Smart Contract
- Step 4: Implement wasm file to compile your contract
- Step 5: Compile the Smart Contract
- Step 6: Interact with Your Contract on Vara Network
- Step 7: Upload Your Contract on Vara Network
- Step 8: Send a Message to a Program
Welcome to the tutorial on deploying your first "Sails Hello World" program on Vara Network. Vara Network is a decentralized platform for deploying smart contracts and decentralized applications (dApps). This tutorial will guide you through the process of setting up your development environment and deploying a simple smart contract that prints "Hello" on the Vara Network.
-
You need to install GCC and Clang.
sudo apt install -y build-essential clang cmake curl -
Rust: You need to have rust 1.80 or newer to be able to compile your contract
- In case that you dont have rust, you need to run the next commands one by one in your terminal:
curl --proto '=https' --tlsv1.2 -sSf https://sh.rustup.rs | sh
rustup target add wasm32-unknown-unknown
- If you have an outdated version of rust, use the following commands in your terminal:
rustup install 1.81
rustup default 1.81
-
Create a GitHub account if you don't have one already.
-
Sign in to Gitpod using your GitHub account.![Open in Gitpod]
-
Create a new workspace on Gitpod using the following repository URL:
https://github.com/Vara-Lab/Sails-Hello-World.git
Note: If you want to test the contract directly, enter the directory with the command:
cd hello-world-contract
Then, compile it with the command:
cargo build --release
Note: If you have an error like the following in your terminal "the
wasm32-unknown-unknowntarget may not be installed" you need to install the wasm32 target to compile your contract, run the following command in your terminal and recompile the contract:
rustup target add wasm32-unknown-unknown
Now, you can upload the contract in the Gear IDEA
-
Open your terminal and navigate to the directory where you want to store your project files and directories.
-
Create the necessary files for your project by running the following command:
touch Cargo.toml
-
Add the following code to the
Cargo.tomlfile:[workspace] resolver = "2" members = [] [workspace.package] version = "0.1.0" edition = "2021" [workspace.dependencies] sails-client-gen = "0.5.0" sails-idl-gen = "0.5.0" sails-rs = "0.5.0"
-
Now, in the directory that is your
Cargo.tomlfile, put the next commands in your terminal (this will create your app and wasm directories to create your contract):cargo new app --lib cargo new wasm --lib
-
Now, in the
app/Cargo.tomlfile, you need to edit it as follows:[package] name = "app" version.workspace = true edition.workspace = true [dependencies] sails-rs.workspace = true
-
Then, in your
wasm/Cargo.tomlfile, you will need to edit it as follows:[package] name = "wasm" version.workspace = true edition.workspace = true [dependencies] app = { path = "../app" } [build-dependencies] sails-rs = { workspace = true, features = ["wasm-builder"] } sails-client-gen.workspace = true sails-idl-gen.workspace = true app = { path = "../app" }
-
Now, you will create your smart contract, first you need to enter in the
app/srcdirectory:cd app/src -
You need to create a "services" directory (for better maintenance of services in the future), put the next commands in your terminal:
mkdir services
-
Create the "mod.rs" and "my_service.rs" files in the services directory:
touch services/{mod.rs,my_service.rs} -
Add the following code to the
service/my_service.rsfile:use sails_rs::prelude::*; #[derive(Default)] pub struct MyService; #[service] impl MyService { pub fn new() -> Self { Self } pub fn hello(&mut self) -> String { "Hello world!".to_string() } }
-
Next, add the following code to the
service/mod.rsfile:pub mod my_service;
-
With your new service already created, you will create your "program" for your contract, add the following code to the
app/src/lib.rsfile:#![no_std] use sails_rs::prelude::*; pub mod services; use services::my_service::MyService; #[derive(Default)] pub struct MyProgram; #[program] impl MyProgram { pub fn new() -> Self { Self } #[route("MyService")] pub fn my_service_svc(&self) -> MyService { MyService::new() } }
-
Now, access the
wasmdirectory:cd ../../wasm/ -
Replace the code inside the
src/lib.rswithe following code:#![no_std] #[cfg(target_arch = "wasm32")] pub use app::wasm::*;
-
Now, create the
build.rsfile:touch build.rs
-
And, add the next code in 'wasm/build.rs' that will "compile" and create the idl file and client for your contract:
use sails_idl_gen::program;
use std::{env, path::PathBuf};
use sails_client_gen::ClientGenerator;
use app::MyProgram;

fn main() {
    // Build contract to get .opt.wasm
    // gear_wasm_builder::build();
    sails_rs::build_wasm();

    // Path where the file "Cargo.toml" is located (points to the root of the project)
    // 'CARGO_MANIFEST_DIR' specifies this directory in en::var
    let cargo_toml_path = PathBuf::from(env::var("CARGO_MANIFEST_DIR").unwrap());

    // Path where the file "app.idl" will be created
    let idl_path = cargo_toml_path.clone().join("app.idl");

    // This generate the contract IDL
    program::generate_idl_to_file::<MyProgram>(idl_path.clone())
        .unwrap();

    // Generator of the clients of the contract
    ClientGenerator::from_idl_path(&idl_path)
        .with_mocks("with_mocks")
        .generate_to(cargo_toml_path.join("app_client.rs"))
        .unwrap();
}
-
Return to your terminal and navigate to the root directory of your workspace.
cd .. -
Compile the smart contract by running the following command:
cargo build --release
Note: If you have an error like the following in your terminal "the
wasm32-unknown-unknowntarget may not be installed" you need to install the wasm32 target to compile your contract, run the following command in your terminal and recompile the contract:
rustup target add wasm32-unknown-unknown
Once the compilation is complete, locate the app.idl file in wasm directory, and the wasm.opt.wasm fie in the target/wasm32-unknown-unknown/release directory.
- To interact with the Gear IDEA and deploy your contract, you will need to download a wallet extension such as Polkadot-JS, Talisman, or Subwallet to interact with Substrate-based chains.

- Access Gear IDEA using your web browser.
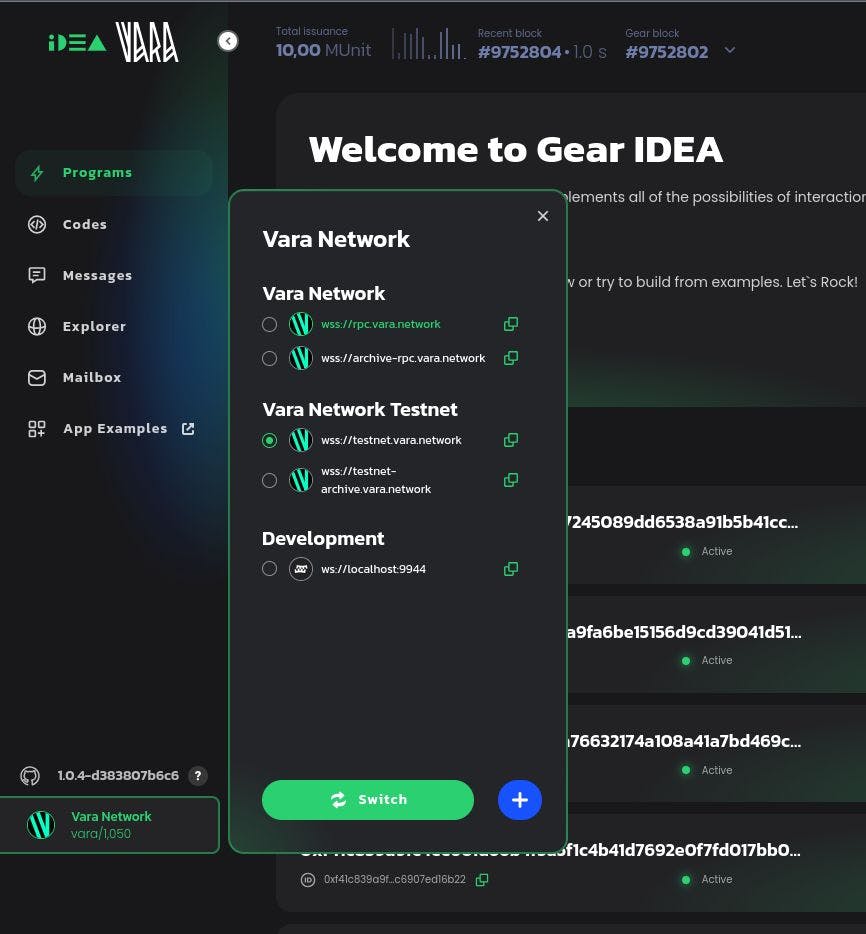
-
Connect your Substrate wallet to Gear IDEA by clicking the connect button.
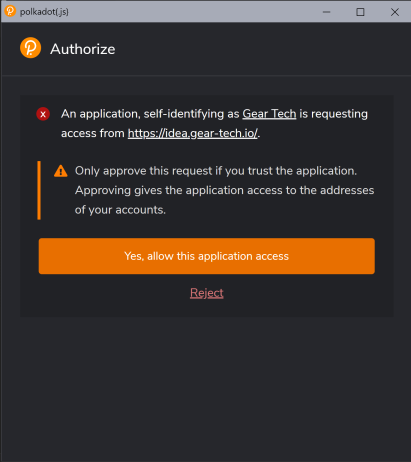
-
Navigate to Gear IDEA. You will be prompted to grant access to your account for the Gear Tech application. Click "Yes, allow this application access".
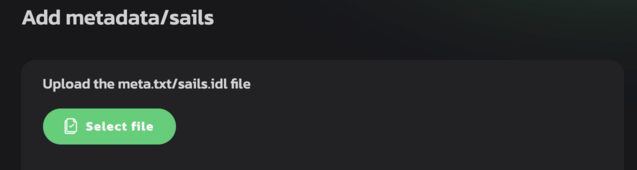
-
Upload the
wasm.opt.wasmfile by clicking the "Upload Program" button. -
After uploading the .opt.wasm file, you need to uploat the IDL file. Click the "Select files" button and search for the .idl file.
- Specify the contract name, click the
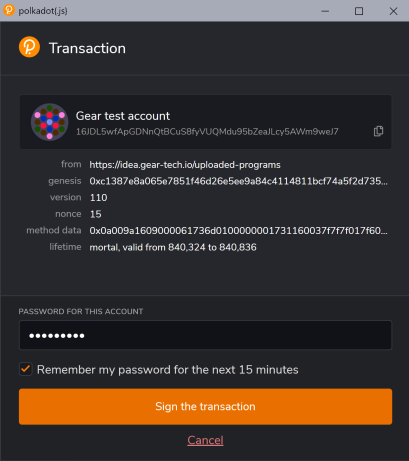
calculate gasbutton to set the gas limit automatically, and then press theSumbitbutton.

- Sign the program uploading the transaction to the Gear network. After your message has been successfully processed, you are to see correspondent log messages.
- Once your program is uploaded, head to the Programs section and find your program.
-
Now, try sending your newly uploaded program a message to see how it responds! Click the "Send message" button.
-
Select the service and and the function to be called in the contract, click the
Calculatebutton to set the gas limit automatically, then click theSend Messagebutton to interact with your first "Sails Hello World" program on Vara Network.

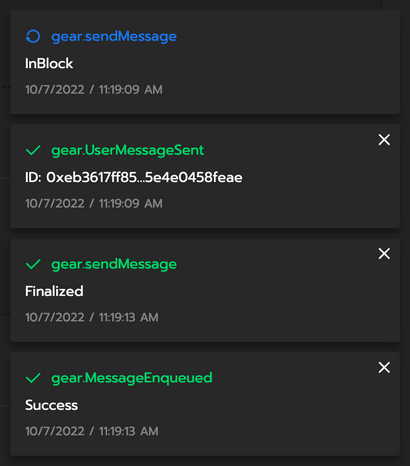
- Sign the message sending transaction.
Congratulations! You have successfully deployed your first smart contract on Vara Network. Explore further and experiment with more complex smart contracts and decentralized applications to harness the full potential of Vara Network.