dApps have grown rapidly, however, many users are not familiar with web3 concepts, or are unaware of the steps to have a wallet, which is why we have this abstraction of a dApp without a wallet (template) that works with the Vara network (a Substrate-based blockchain).
- Wallet-less service: The contract includes the wallet-less service to manage user accounts.
- SailsCalls: The frontend example contains this library to easy manage of vouchers, signless, queries, commands, etc. (It works using the sails-js library.)
- Custom hooks and context: Frontend contains hooks and context that helps to manage when SailsCalls is "busy" (is sending a message, etc), get the current voucher id from the user, get the keyring account of the user, etc.
- If the frontend does not have the user account, it will ask the user to enter their credentials (username and password).
- Once the frontend have the username and password, the frontend will encrypt the username (with sha256 algorithm) and search in the contract state the address of the keyring account from the user.
- If the user does not have an account, the form will ask him to create a new account. If the user accepts, it will create a new keyring account, lock it with the password and send it to the contract.
- If the user hace an account, the frontend will get the locked account, then it will unlock the keyring with the password.
- And, with the unlocked keyring account (or with the newly created one), the form will save the keyring in the context of the dApp (at application level).
- The frontend will use this keyring account to sign all extrinsics.
- Node.js (version 14.x or higher)
- npm or yarn for package management
- Vara Network RPC Endpoint: A WebSocket endpoint to connect to the Vara network. Example:
wss://rpc.vara.network. - Sponsor data: To sign vouchers for users, you need the mnemonic seed and a name from a wallet with tokens.
- Google client id: To connecto to the google services to be able to log in with an google account ( its optional )
In order to use the Google login, you must first create a Google client ID (is a unique identifier associated with an application that assists with client and server OAuth 2.0 authentication.), to do this, you must follow the following steps:
-
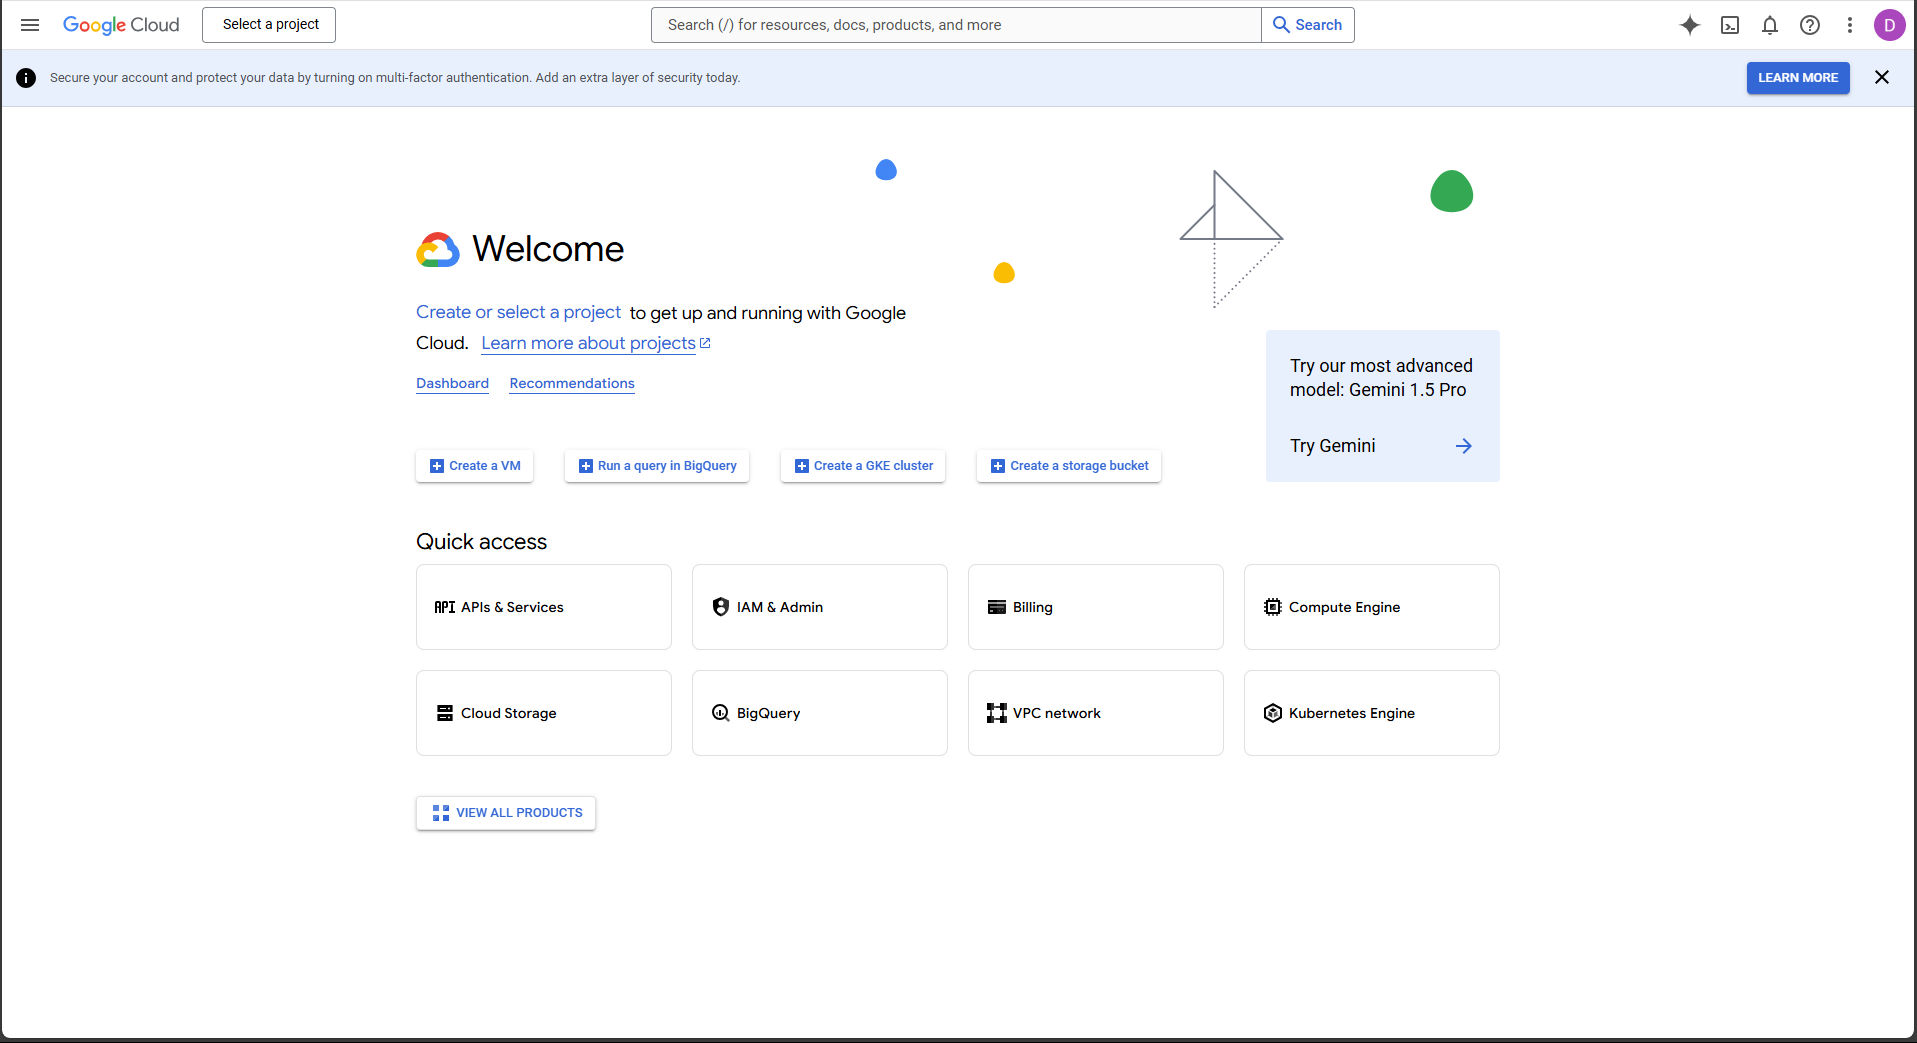
To get client ID from Google, you need to go to your Google Cloud Console:
-
Next, you need to create a new project:
-
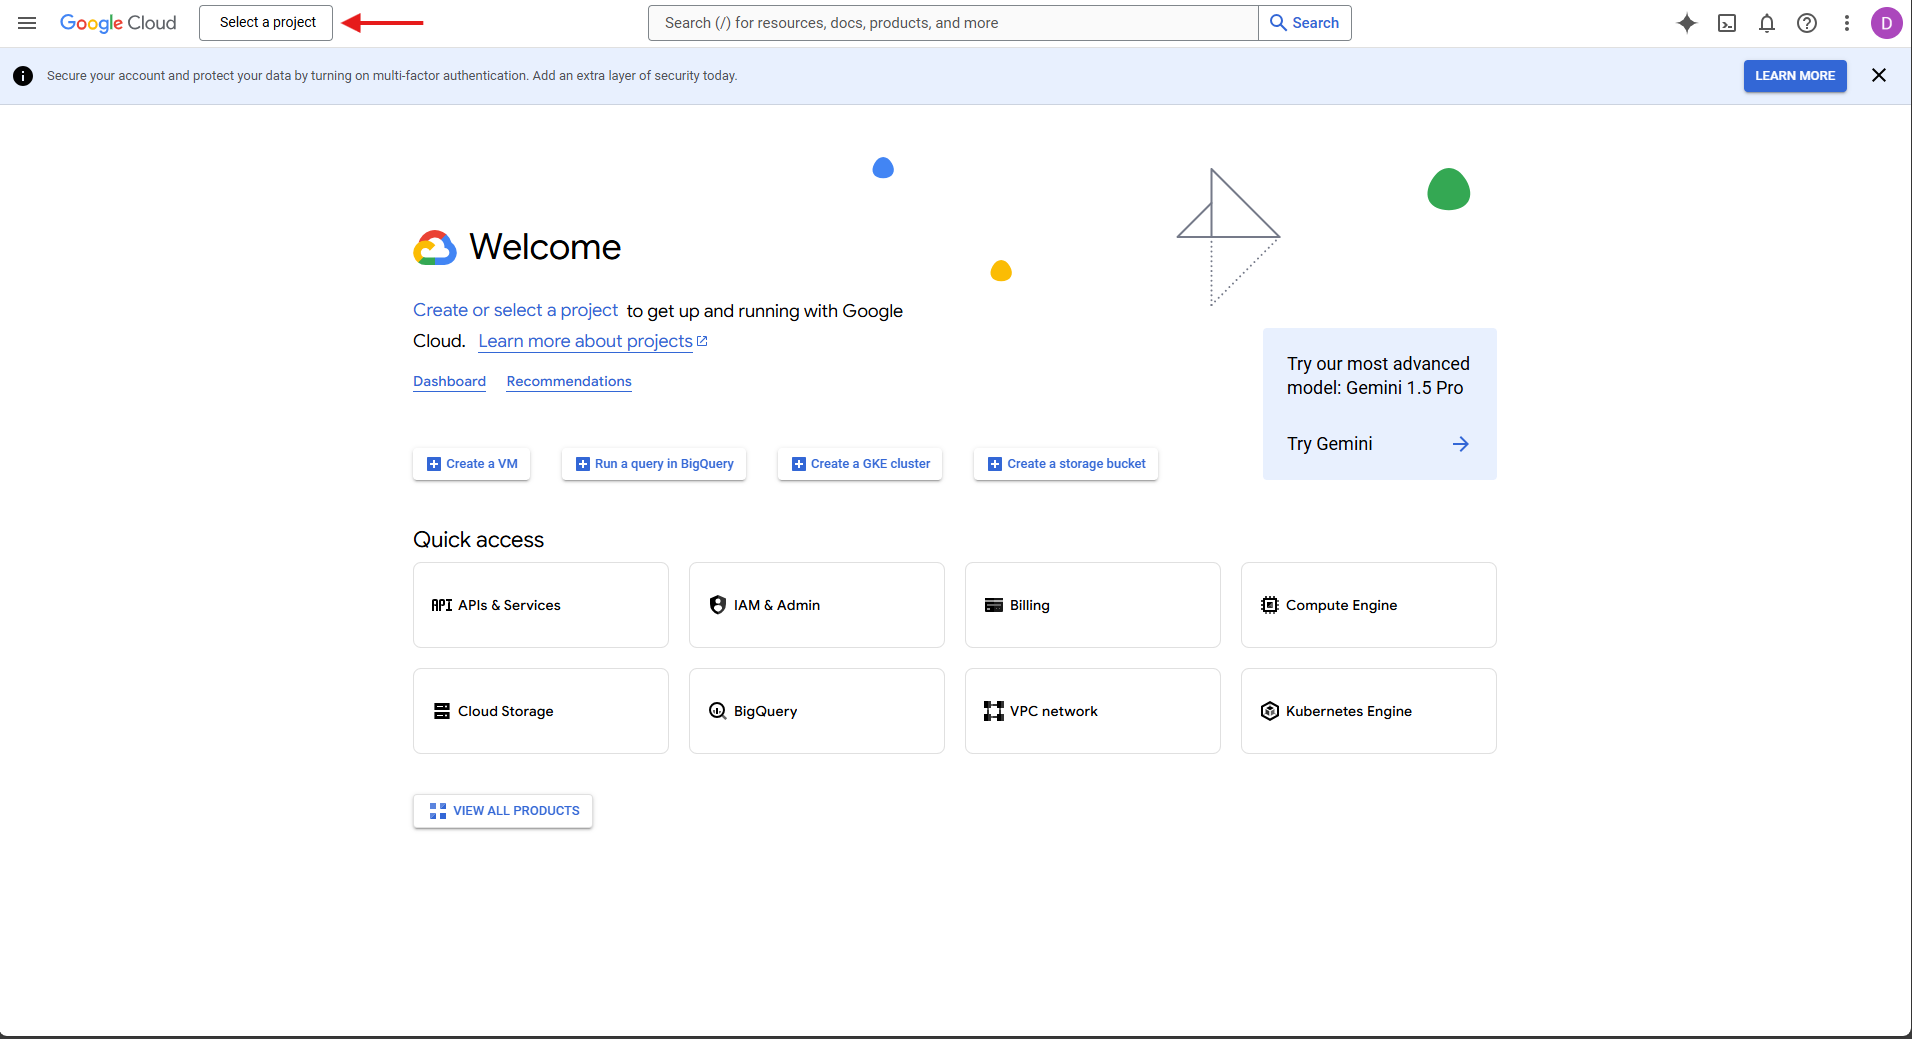
Click on the box next to the logo:
-
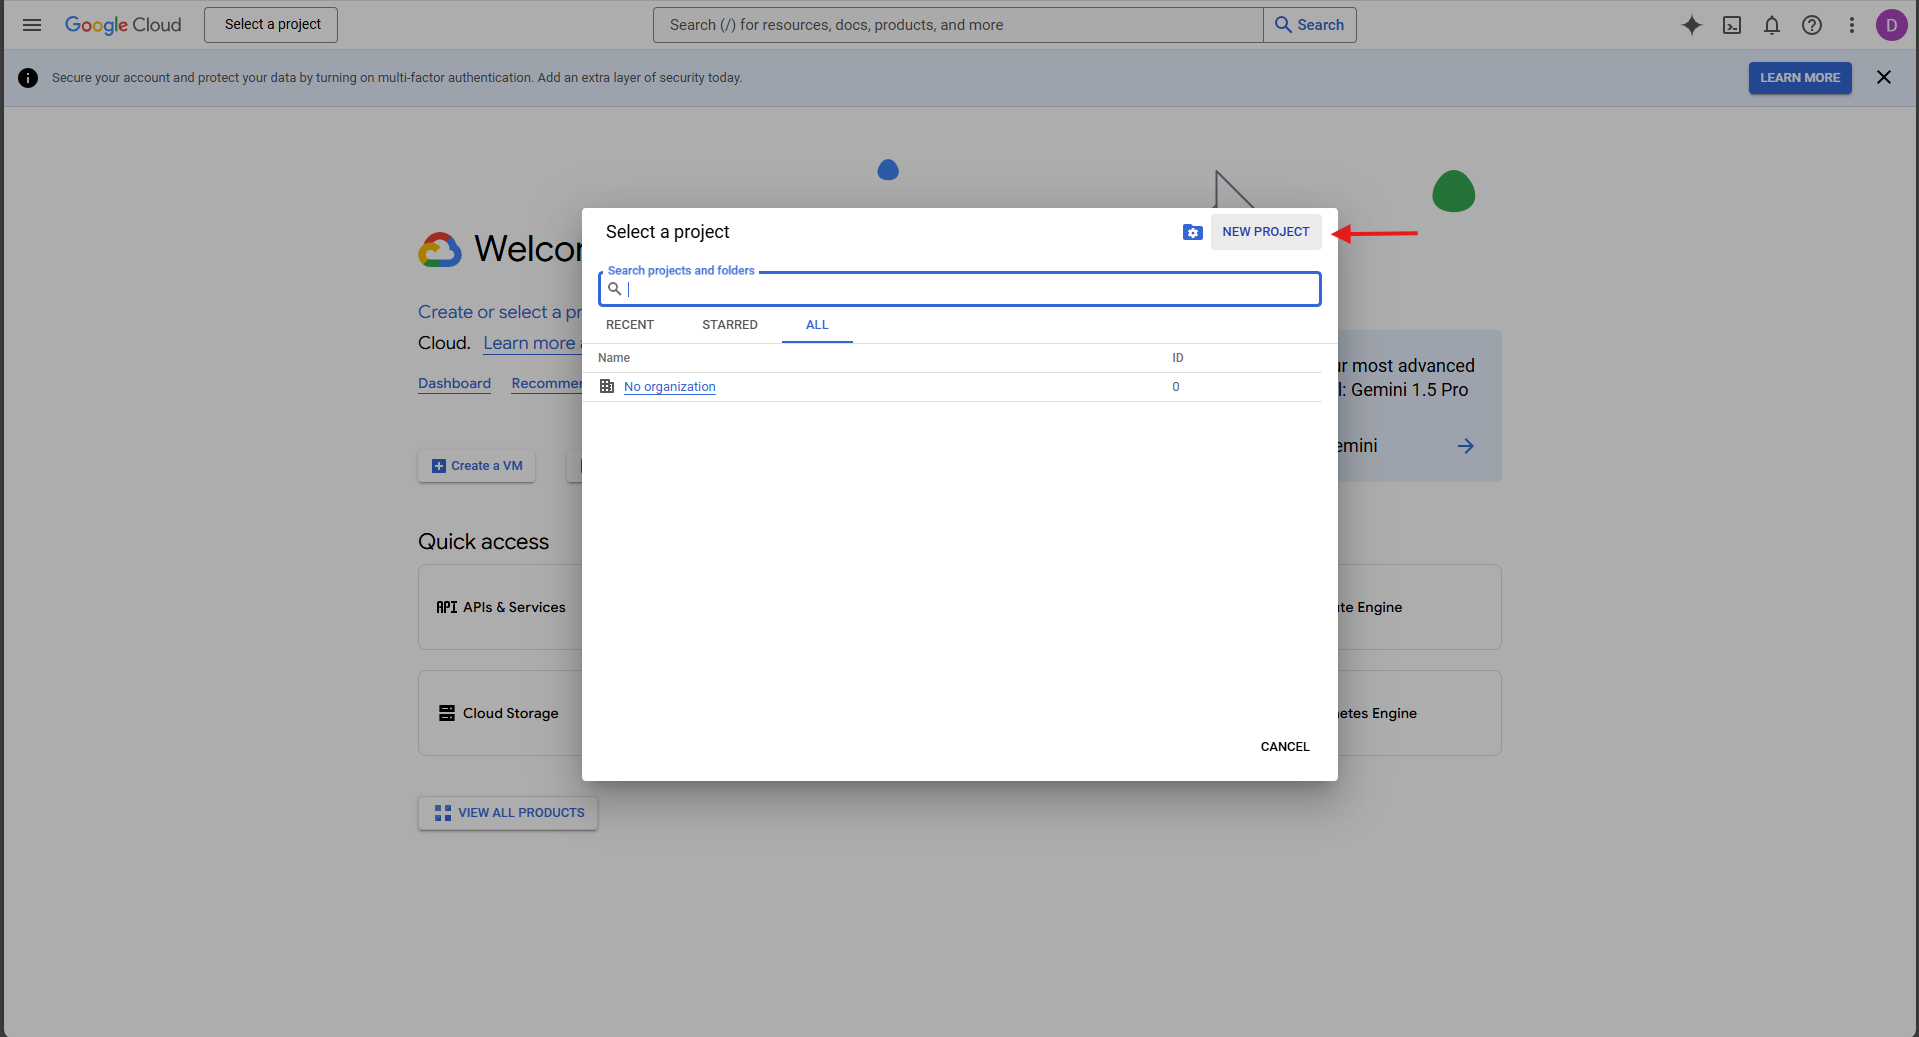
Click on the "New Project" button:
-
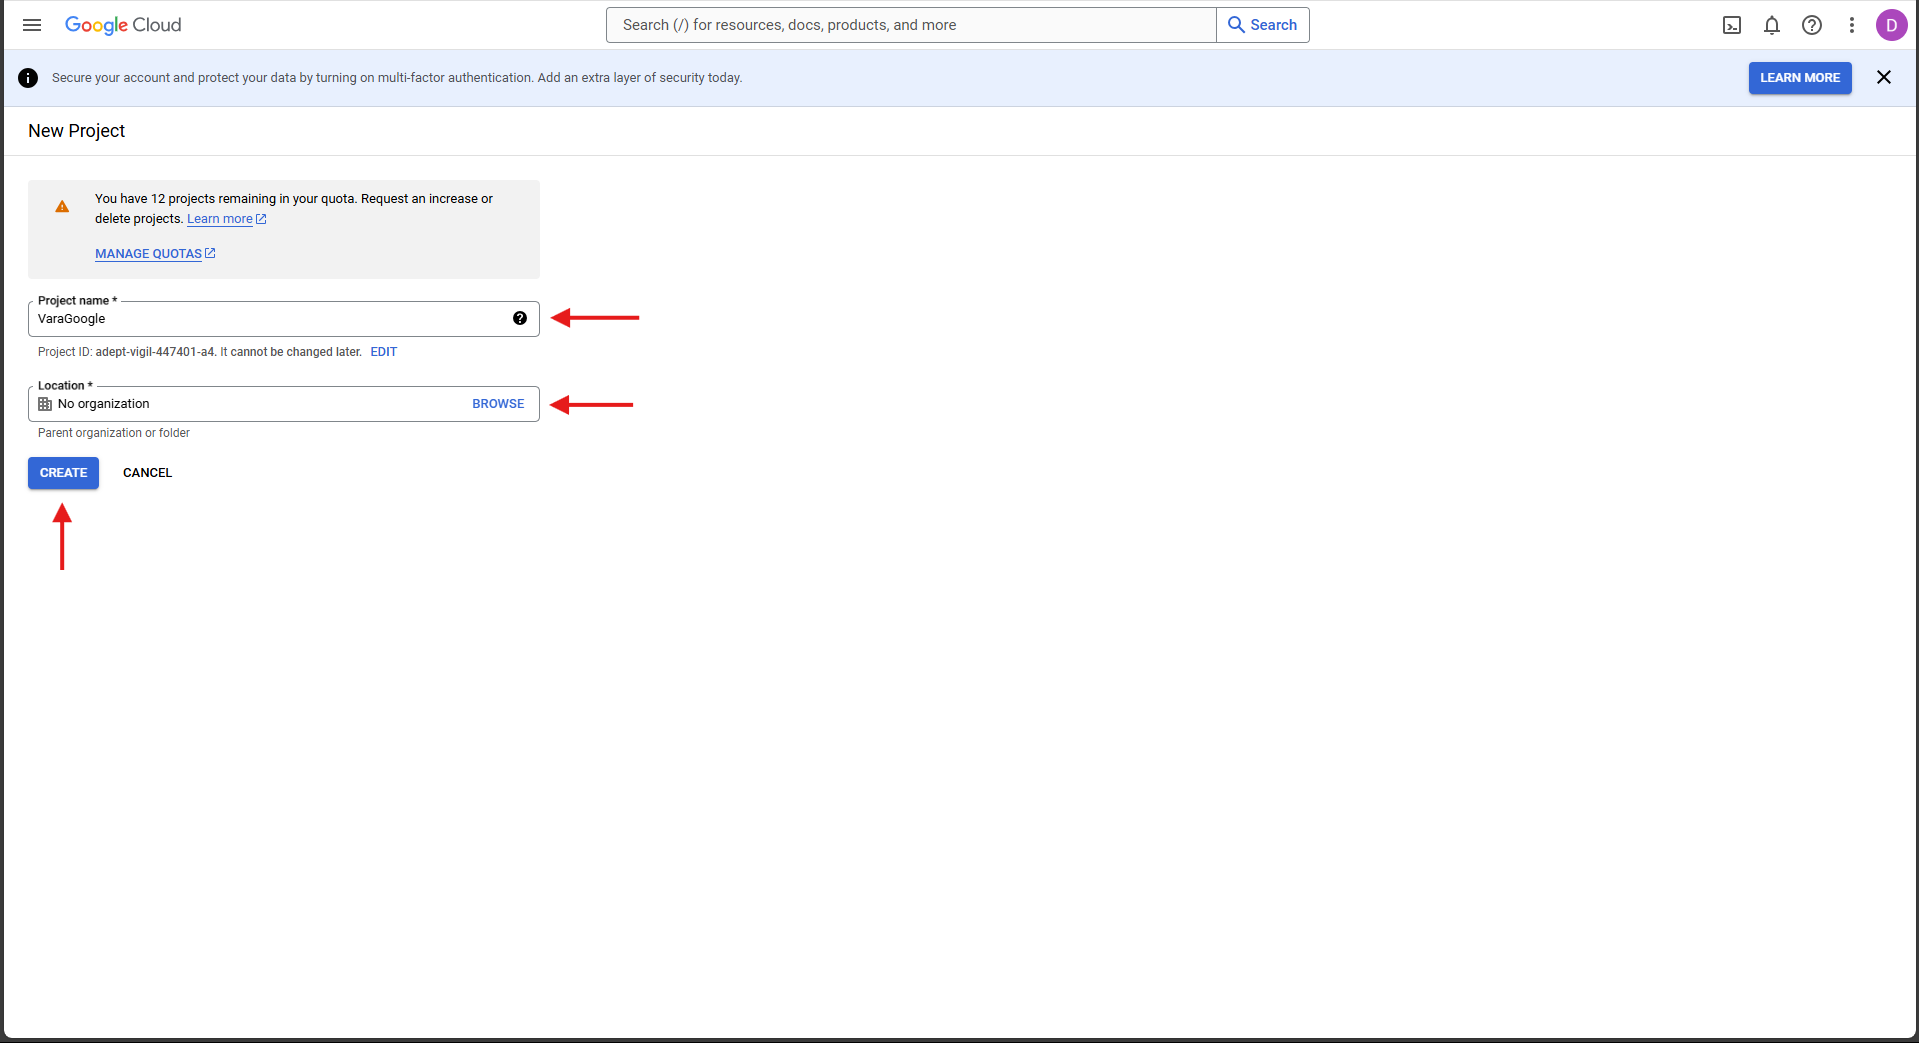
Set the name of your project (in my case it will be "VaraLogo") and the location (organization), you can leave this field as no organization if you don't have one, and then click "create":
-
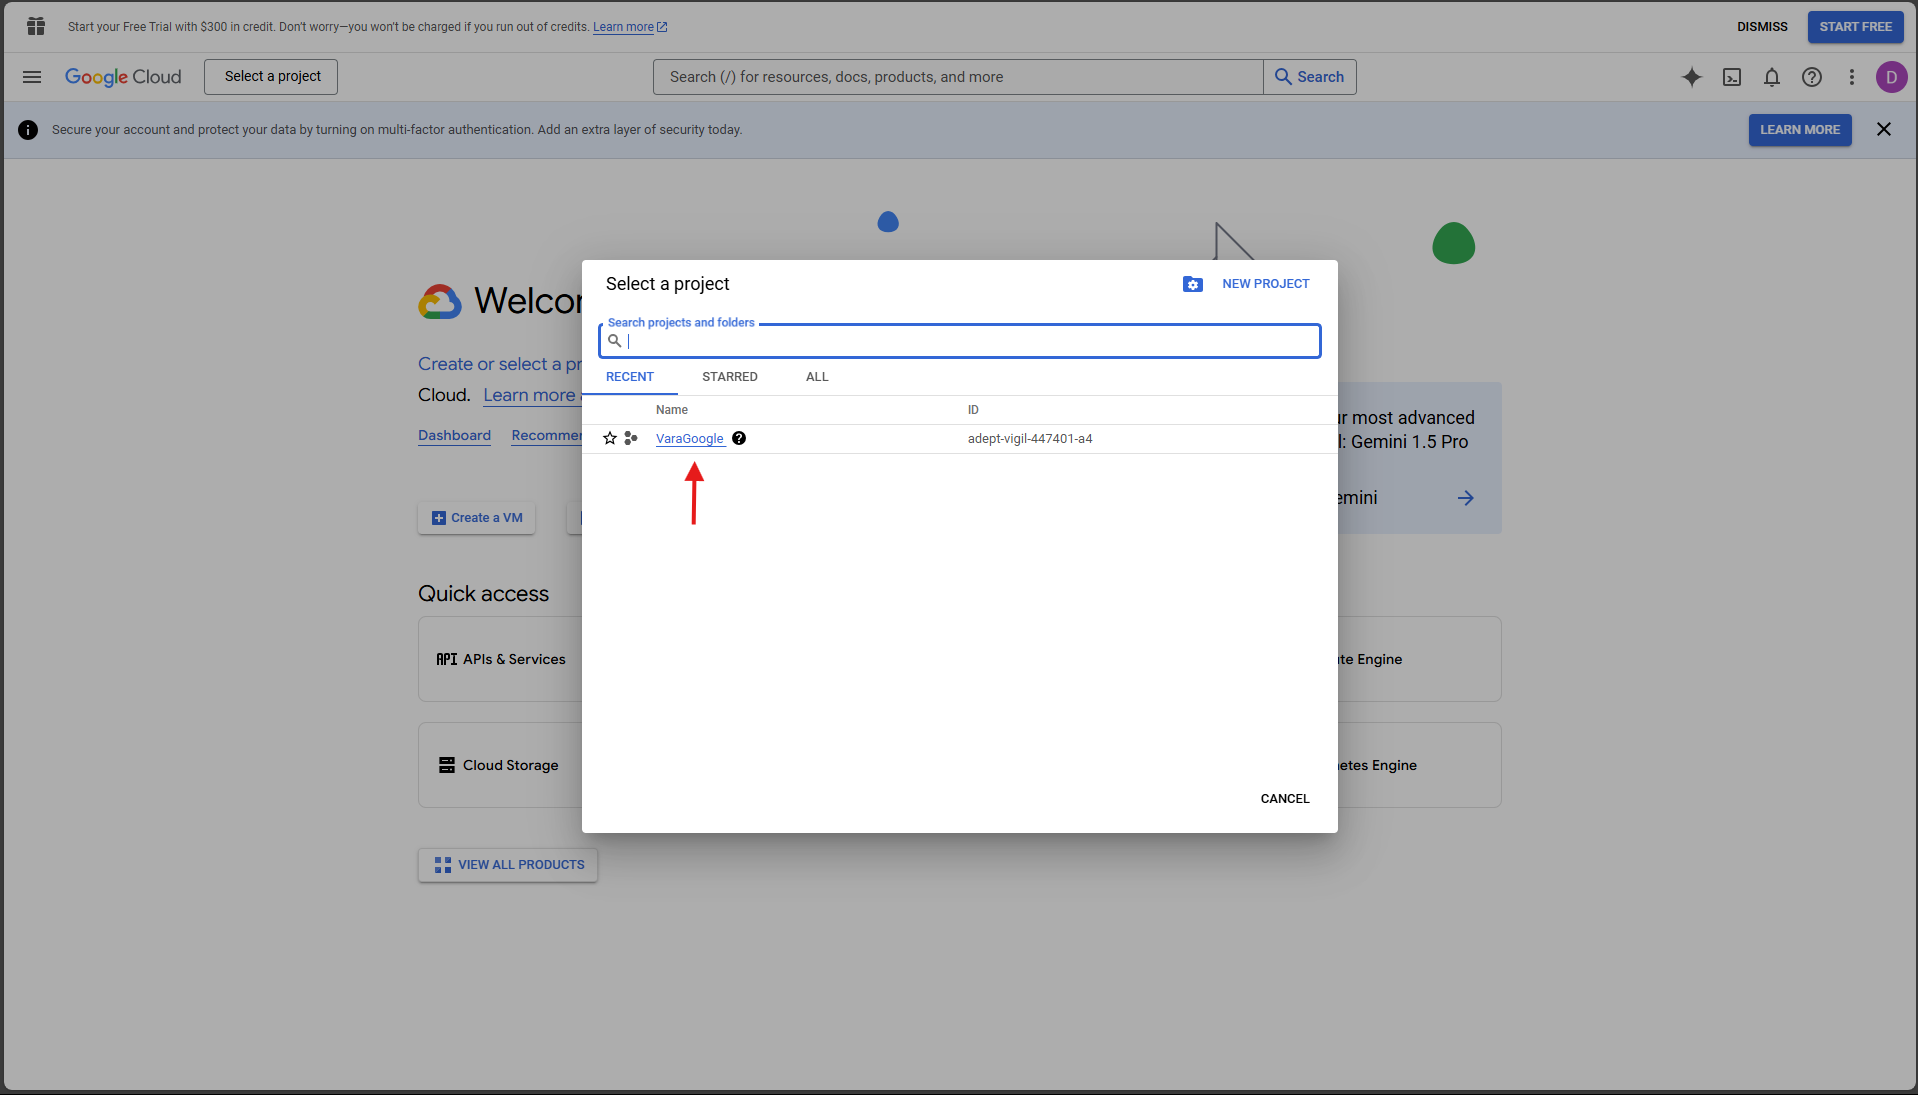
Once created, press the button next to the logo again (as in step 2.1), and select the newly created project:
-
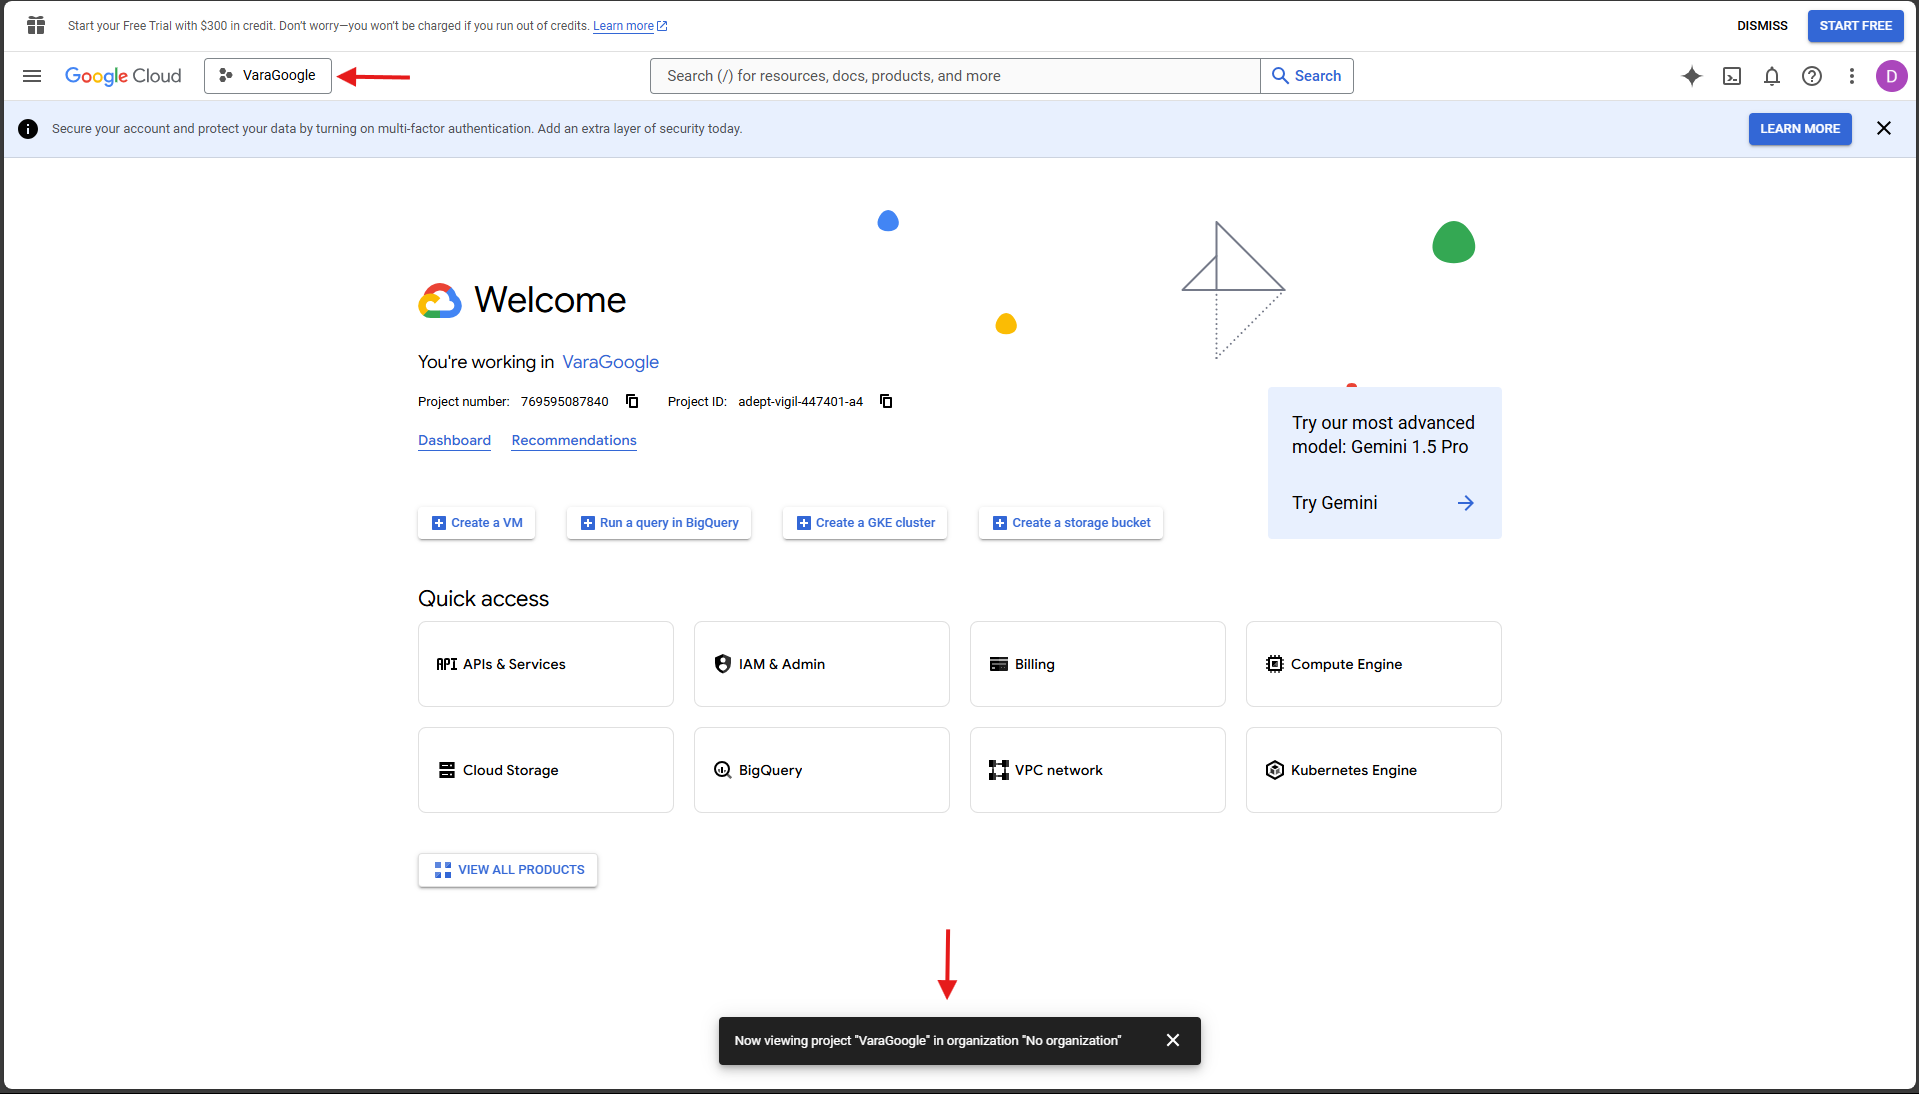
Finally, you should see in the upper left corner the name of your project along with a "notification" that you are viewing your project.
-
-
Creating a consent screen: a consent screen is a consent page that prompts the user to use an external or third-party library to log in. The Google login consent screen your app displays to the user may include a brief description of your project, its policies, and the requested scopes of access.
-
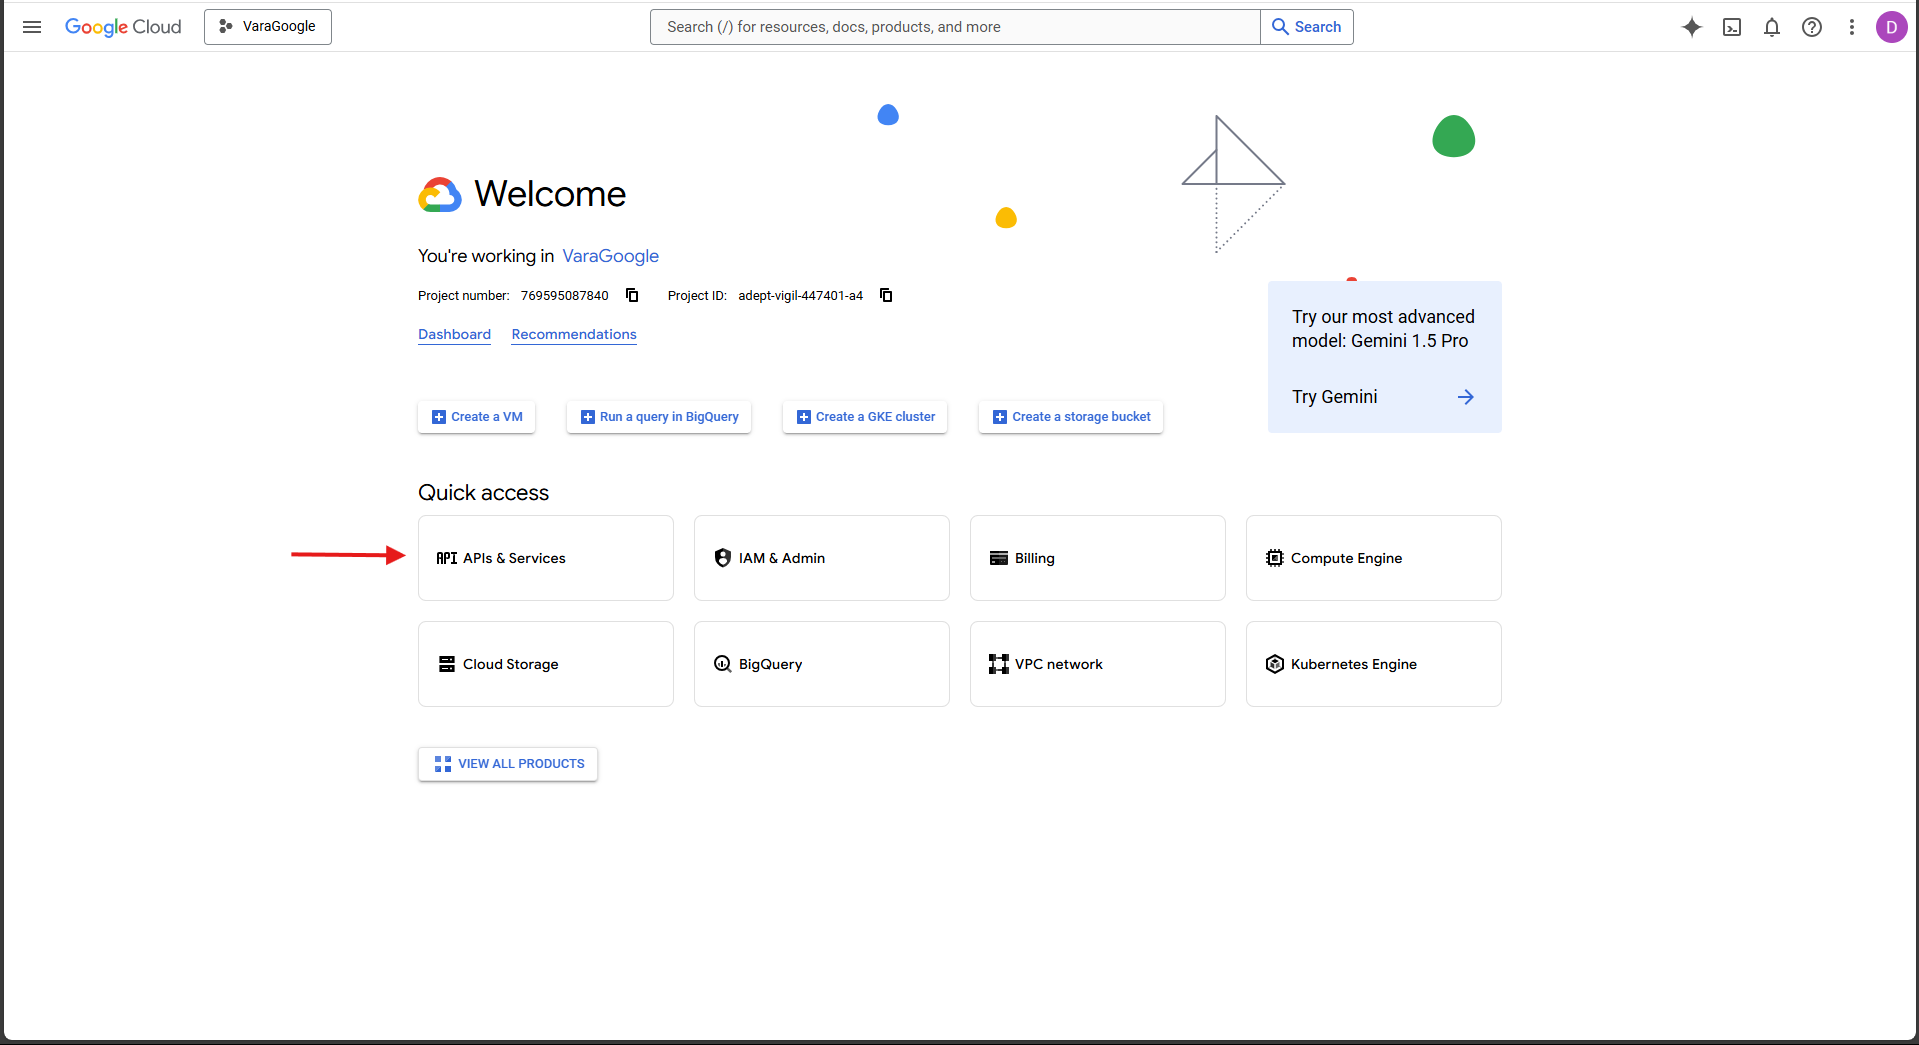
To configure the Google consent page, first, click the "APIs & Services" option:
-
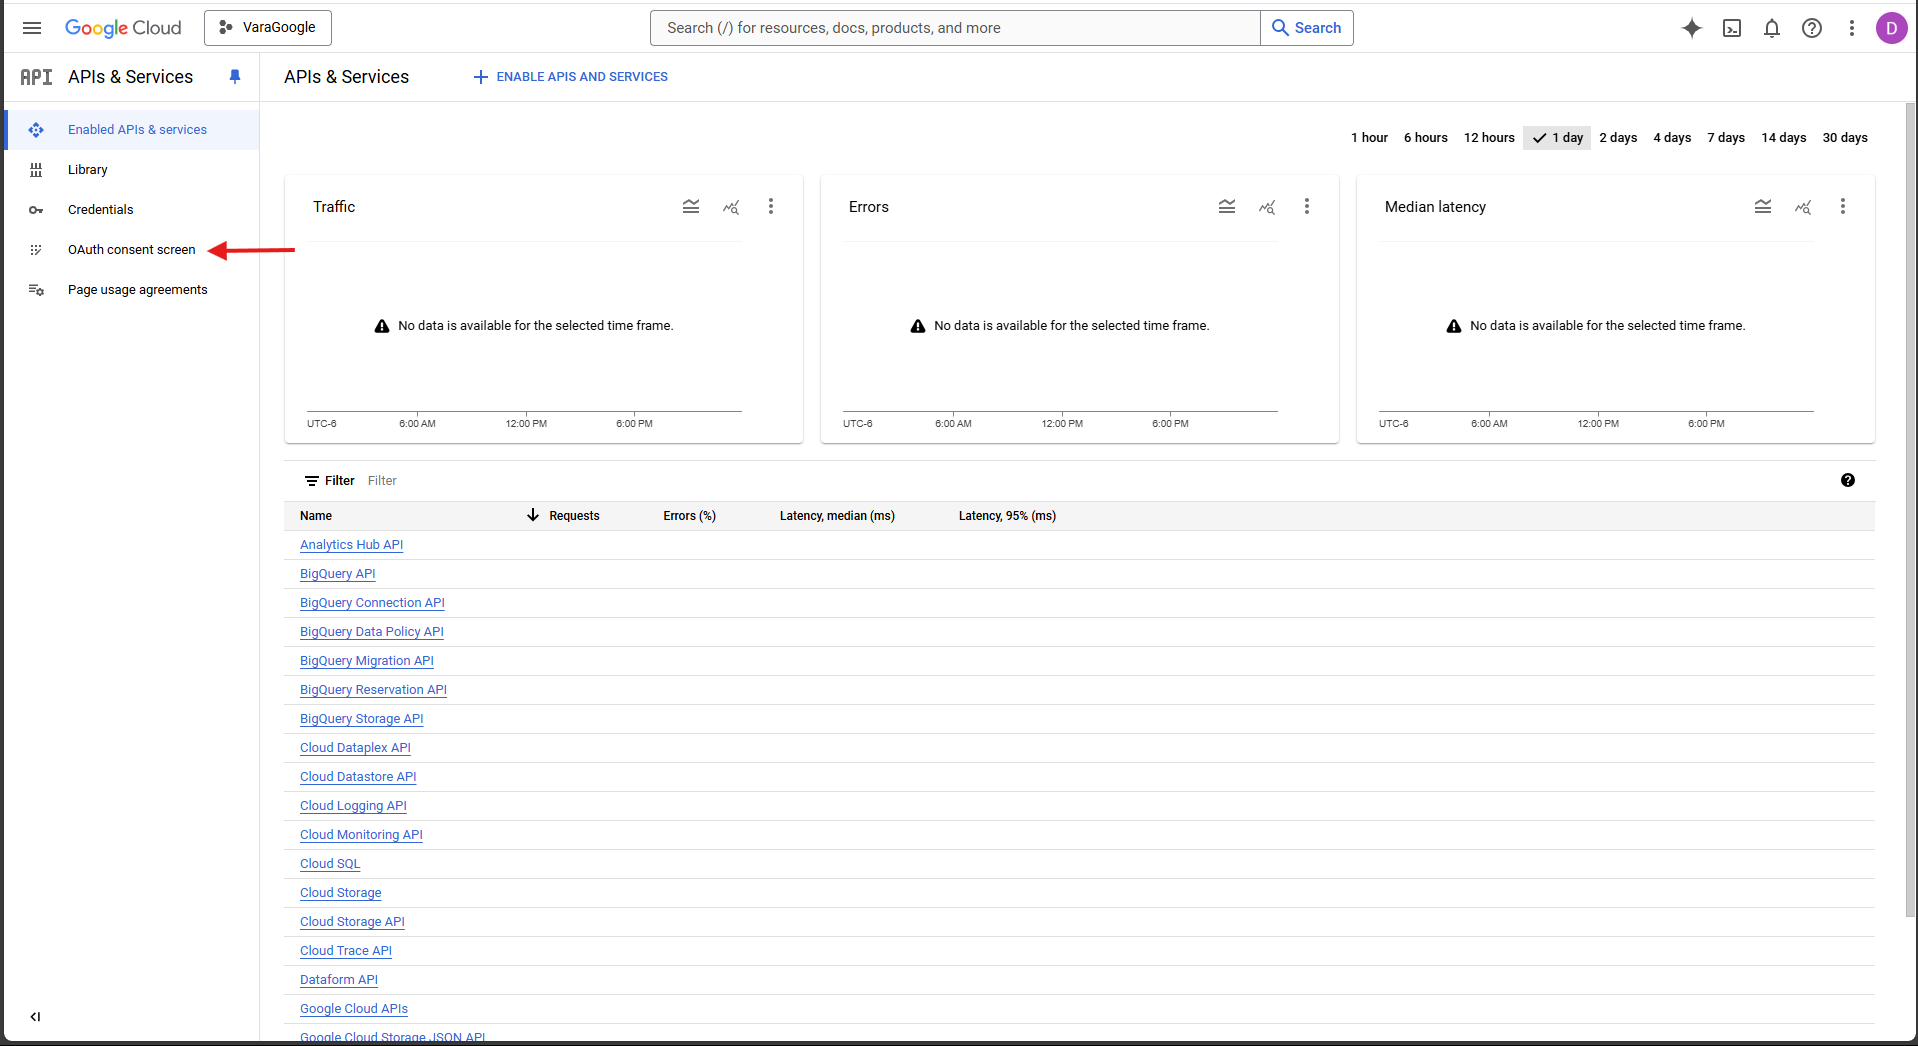
Next, press the
OAuth consent screenoption: -
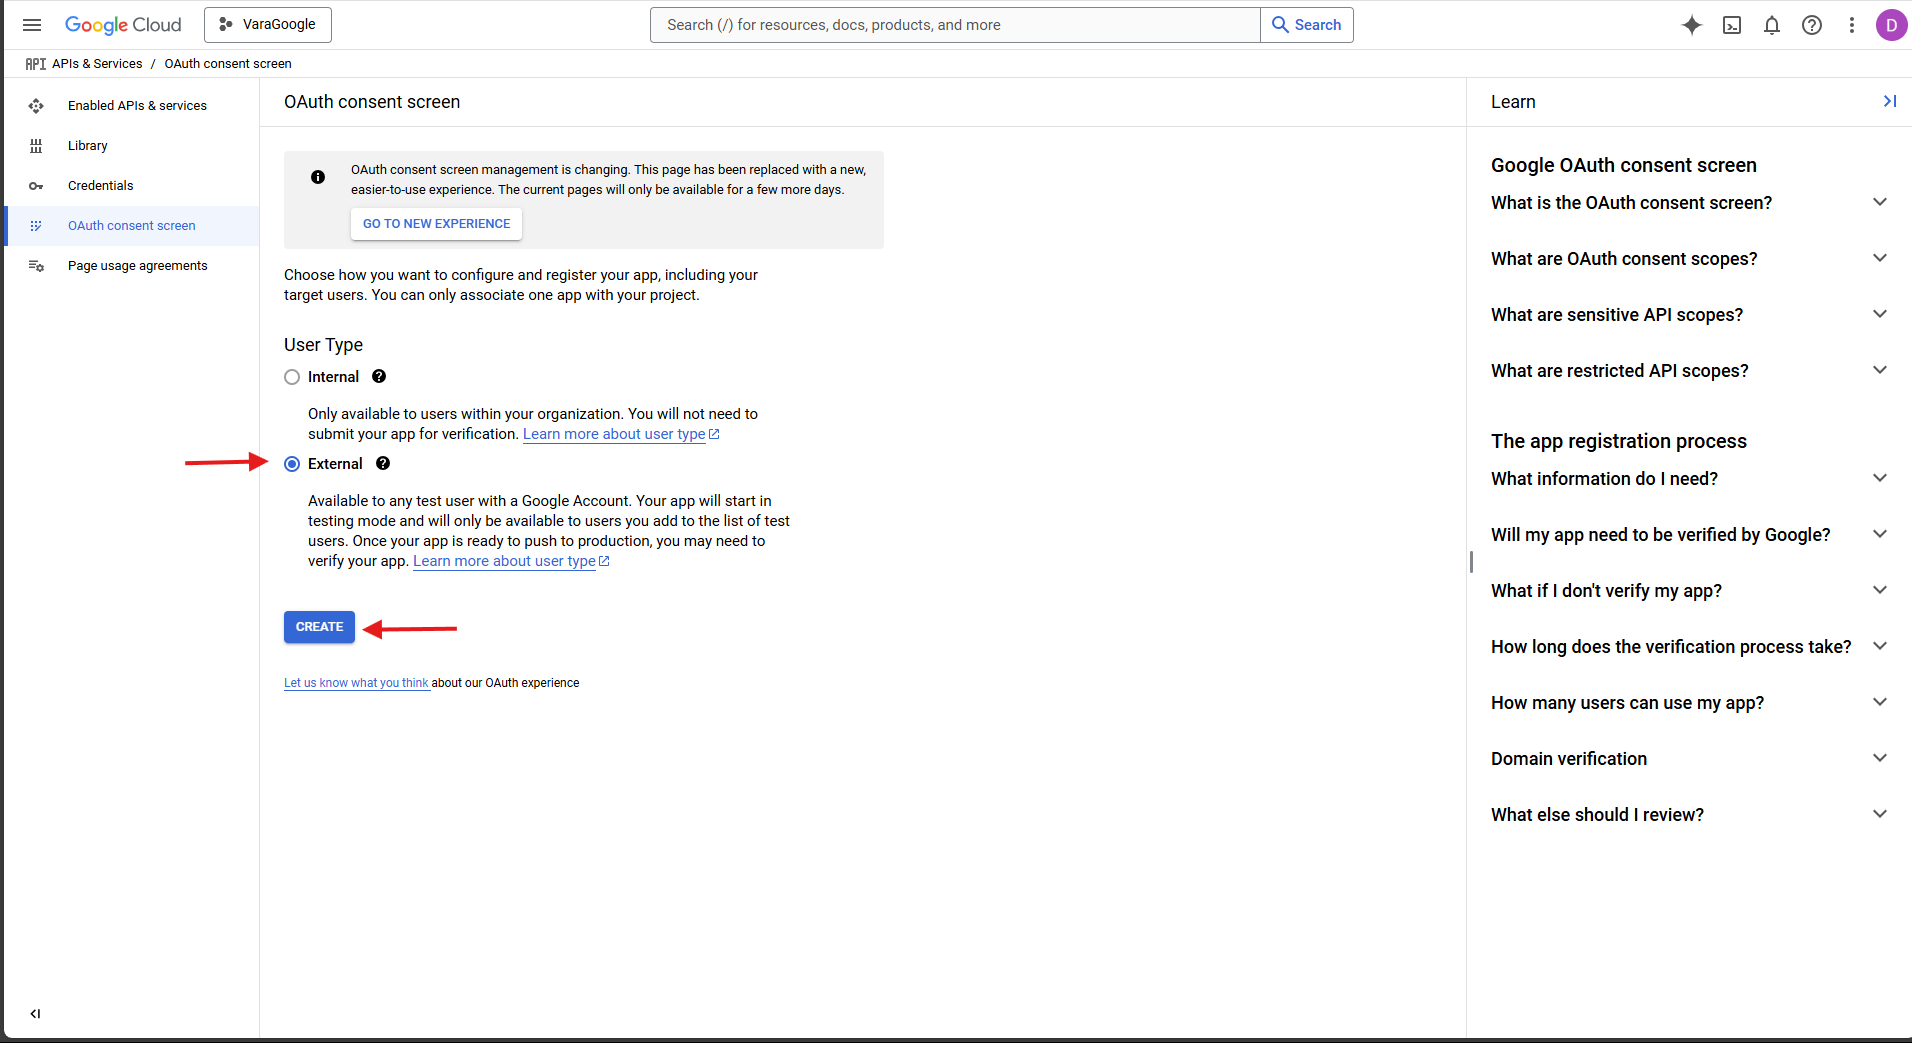
Once you are in this tab, choose external (which is the only option you can choose unless you are using a Google-verified organization or application), and click the Create button to create your consent screen:
-
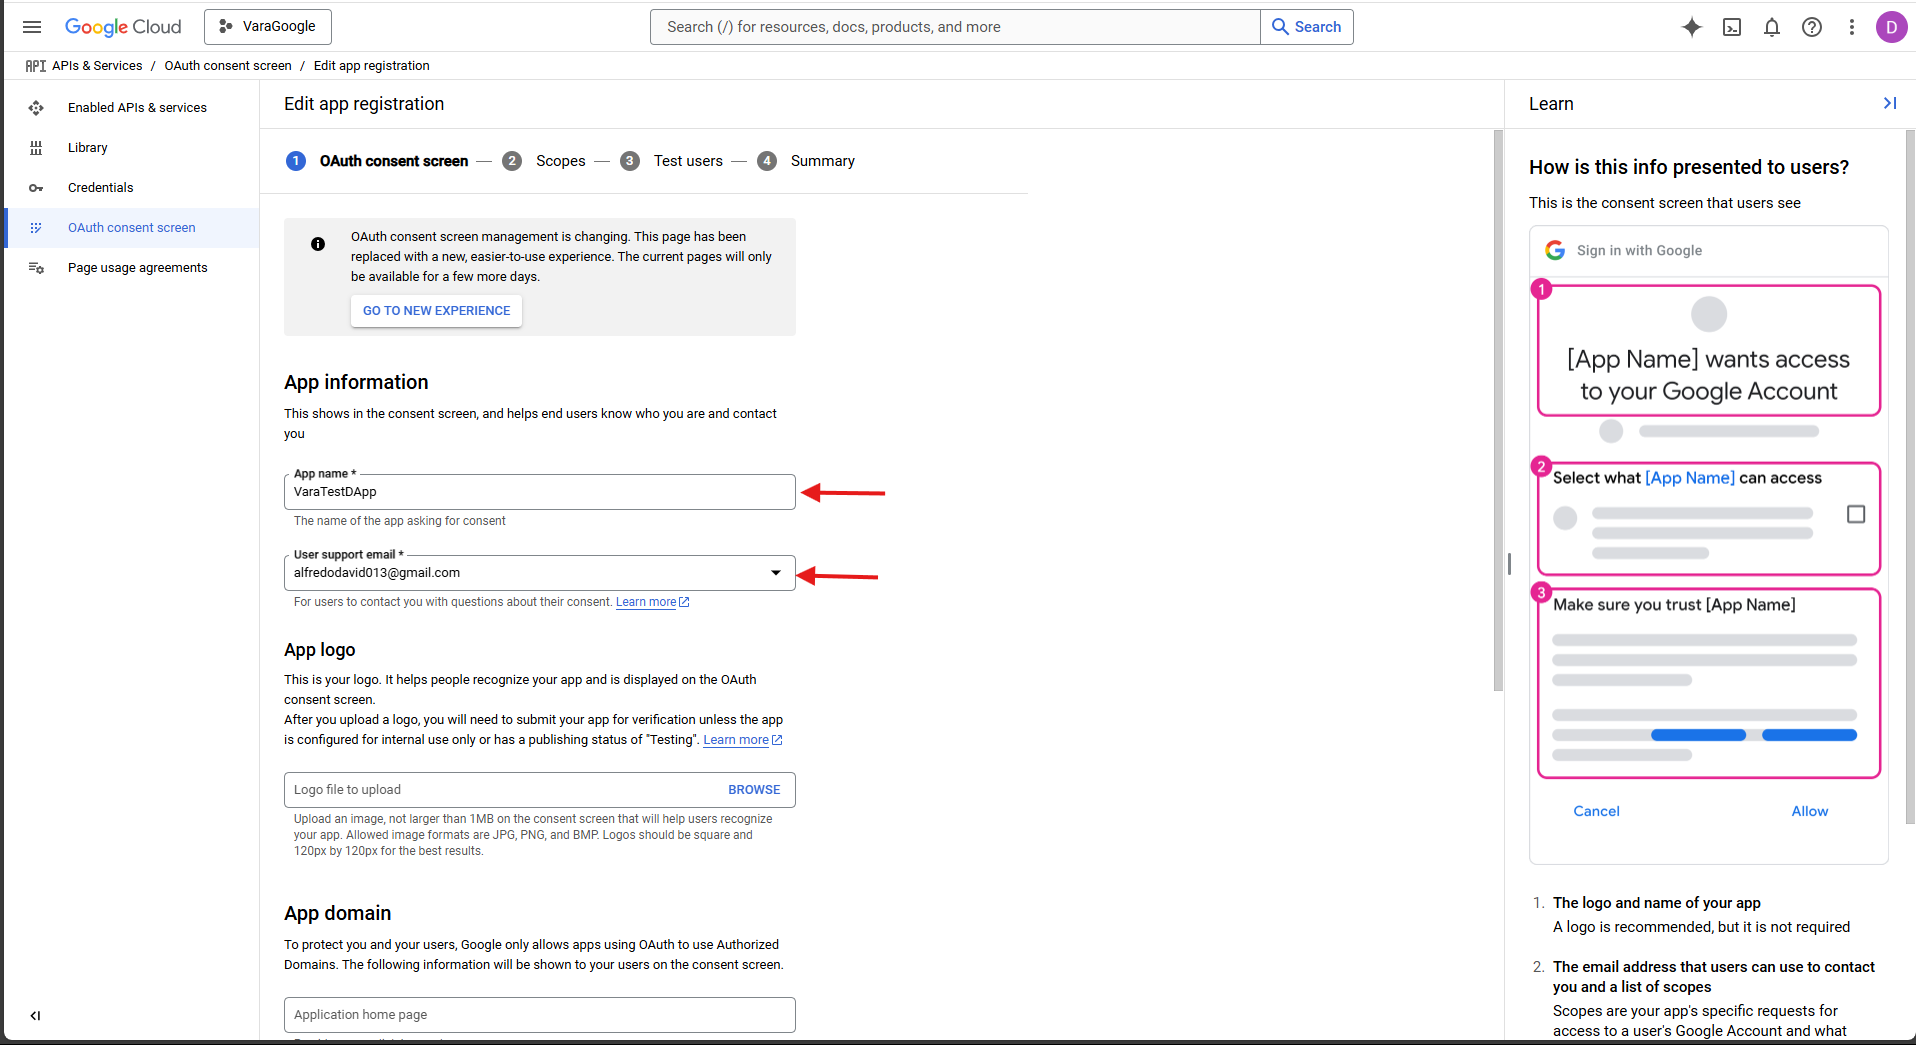
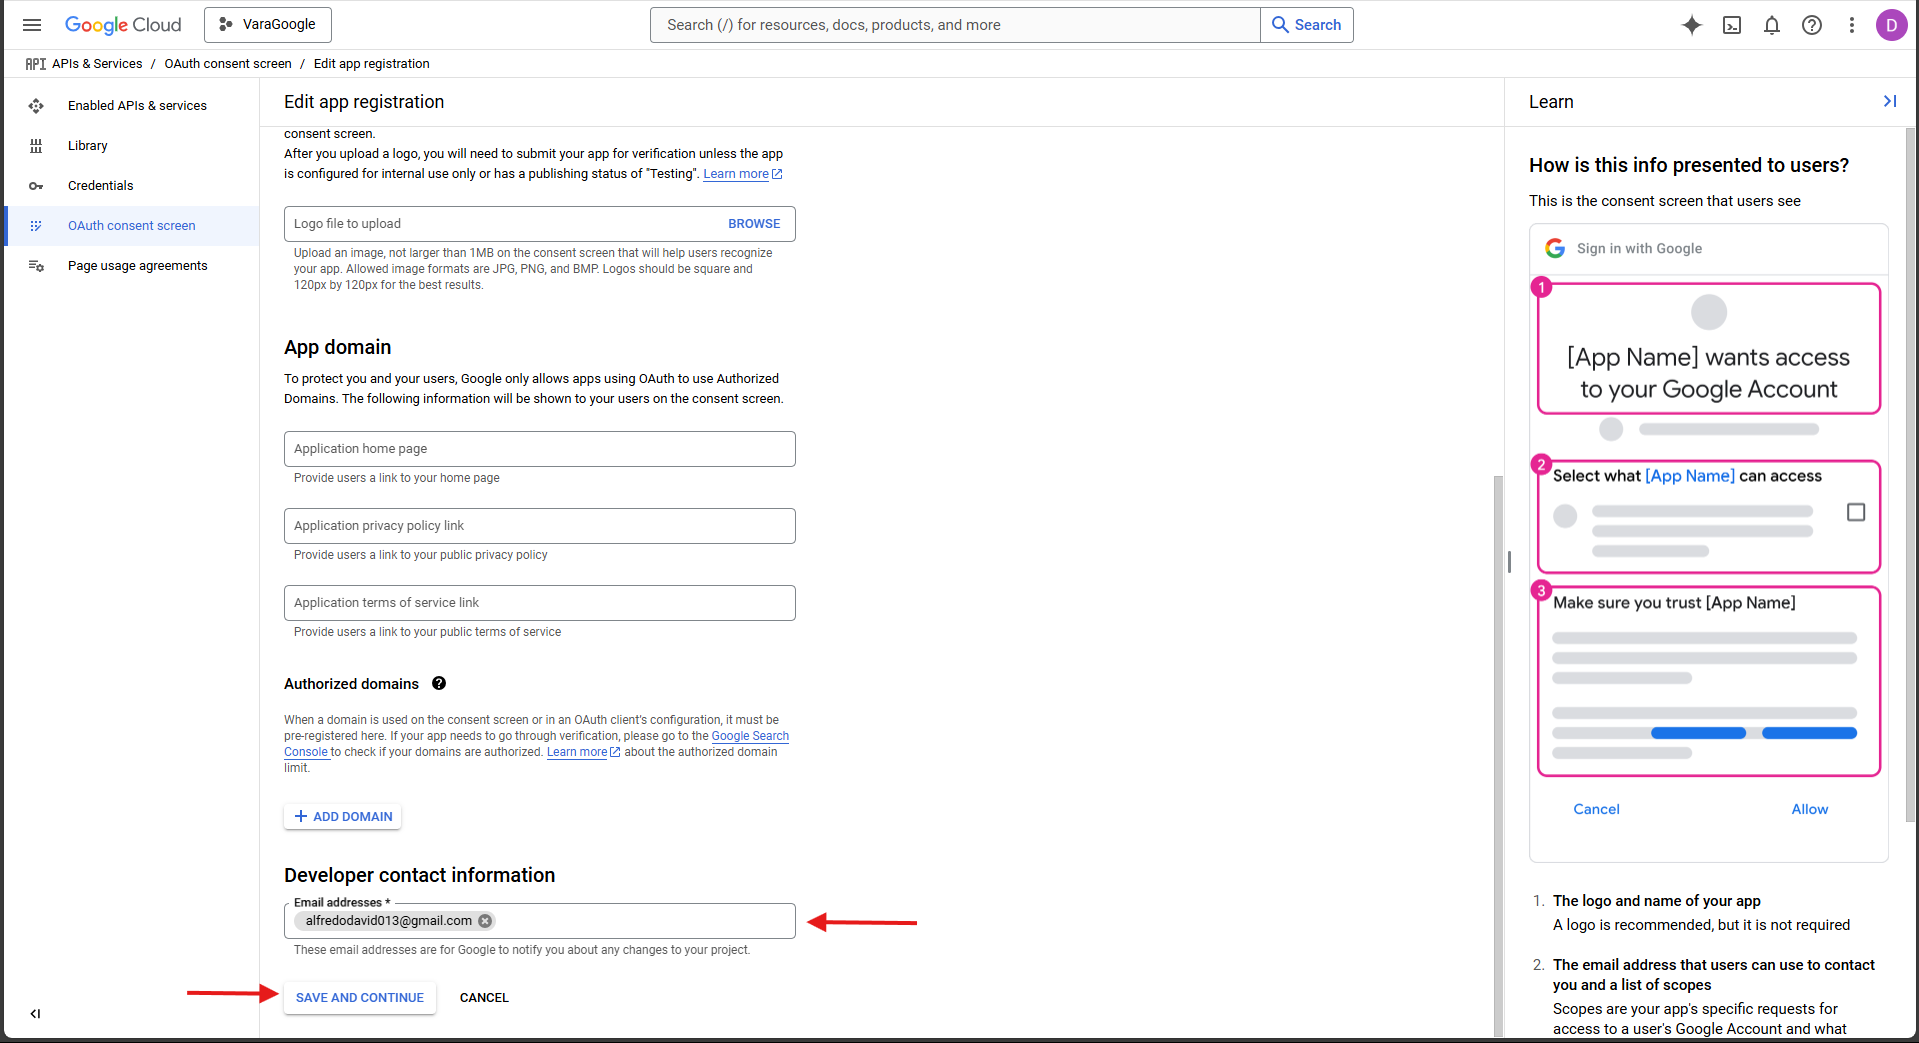
Next, choose a name for your application (for example VaraTestDApp), an email address to get notifications about any changes to your project and a developer email address contact (You can keep the other requirements and options empty for now but if you have the details ready, you can add them during this step), and click in the
save and continuebutton: -
In
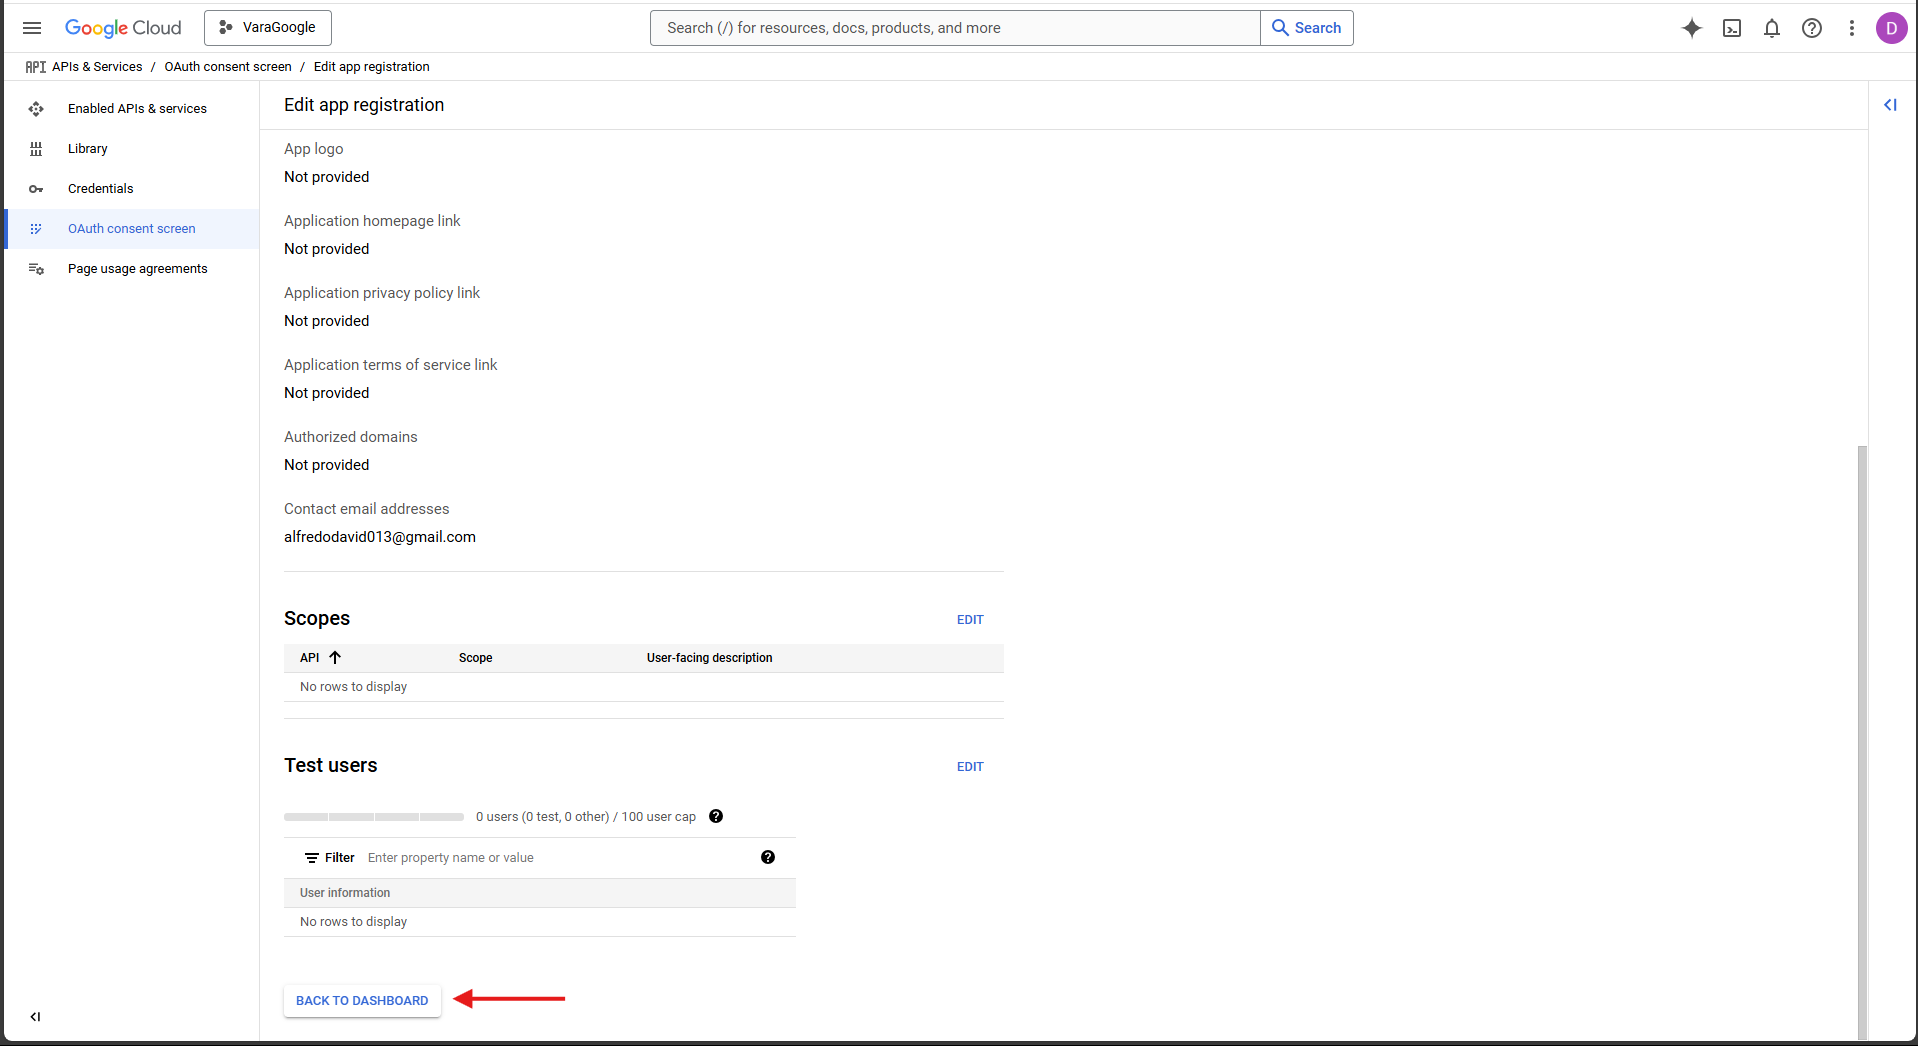
ScopesandTest users, click thesave and continuebutton. -
In
Summary, press theBACK TO DASHBOARDbutton: -
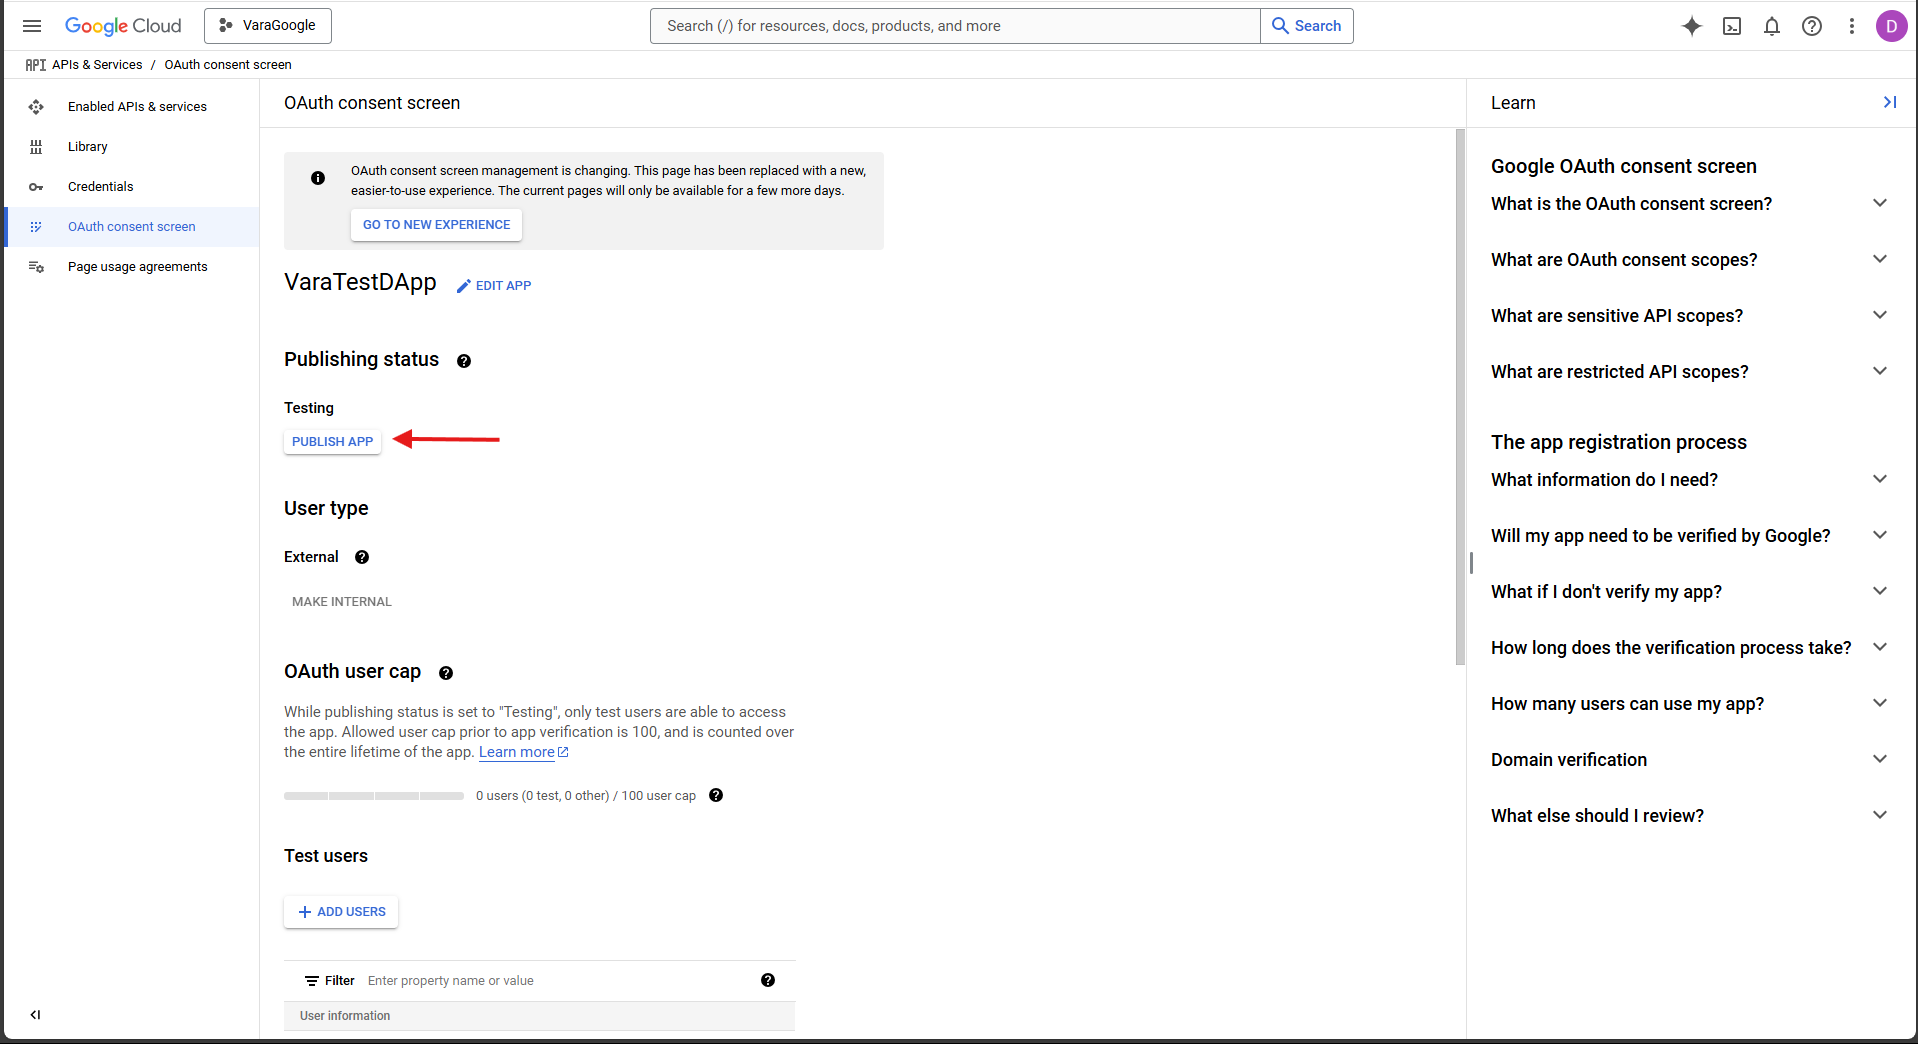
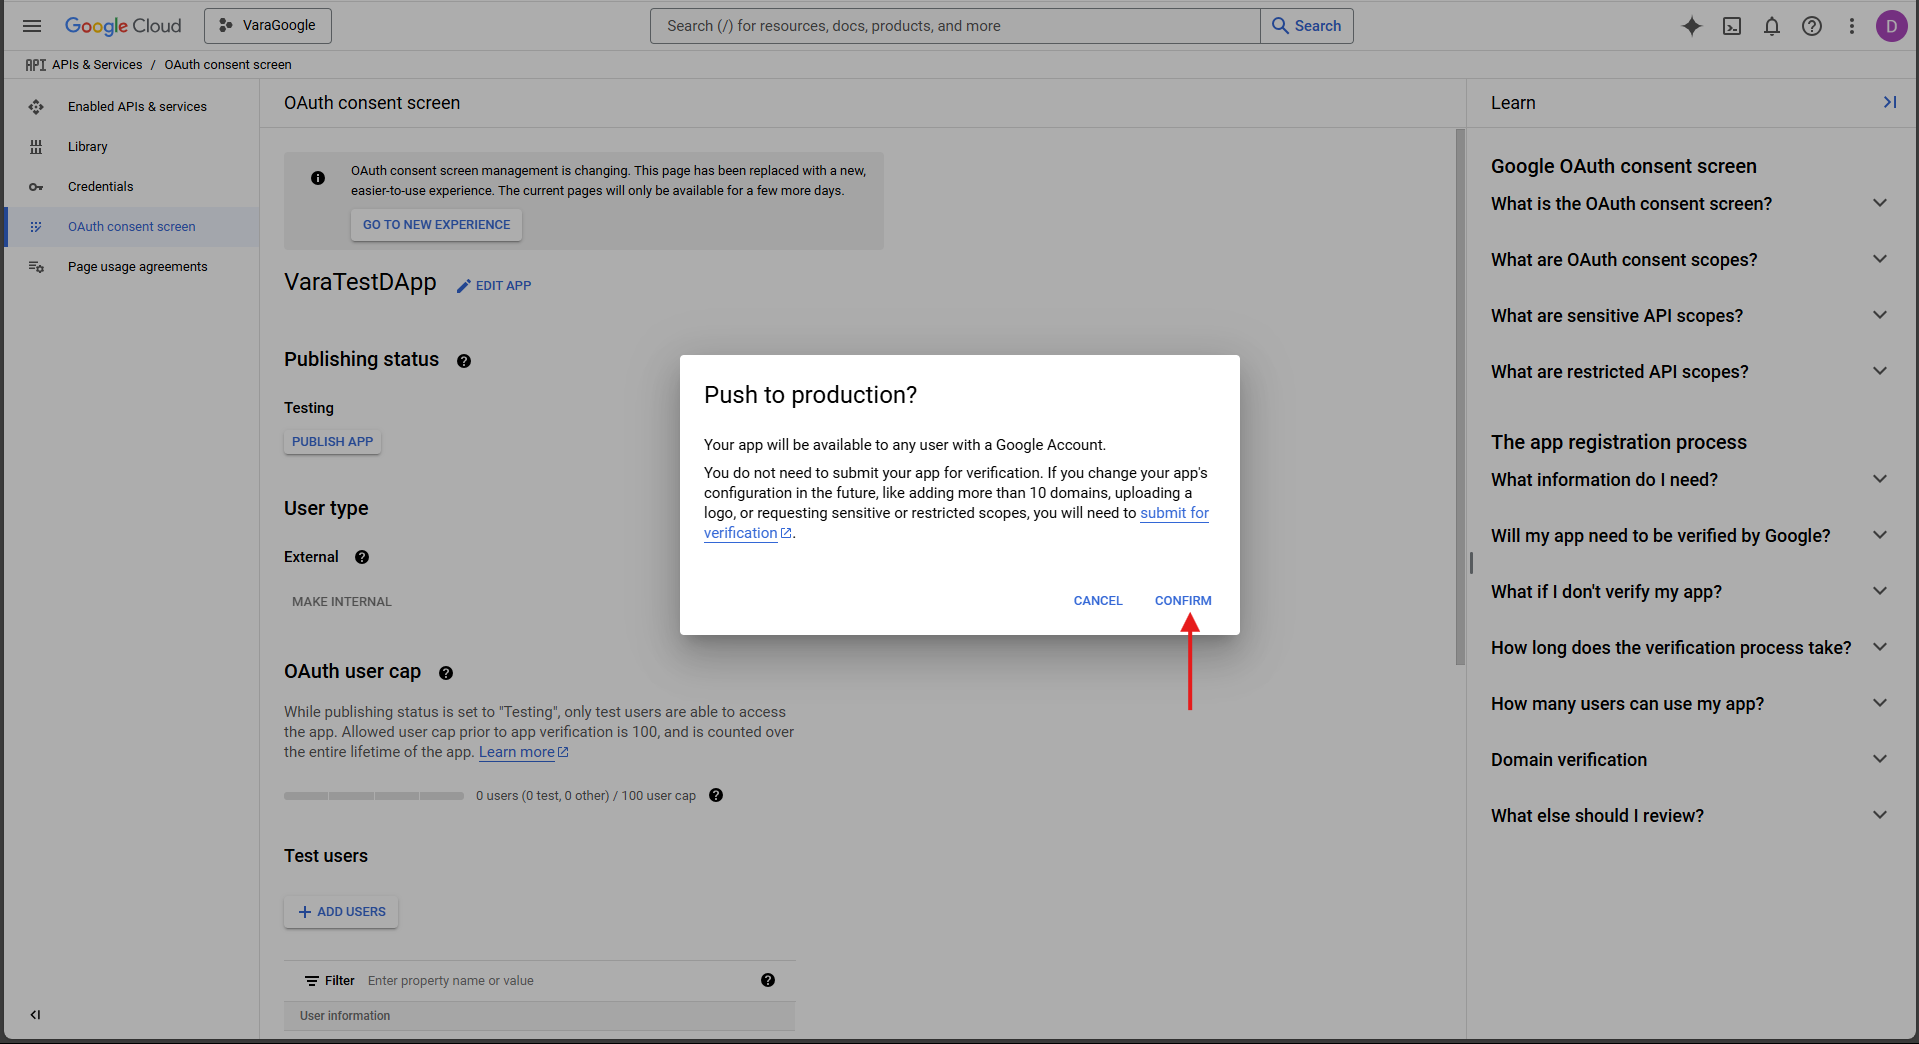
After creating the OAuth consent screen, you need to publish the app before we can test it or before the authentication works. By default, its status is Testing and after publishing, it gets pushed to Production, this by pressing the
PUBLISH APPbutton:
-
-
Creating your web client ID
-
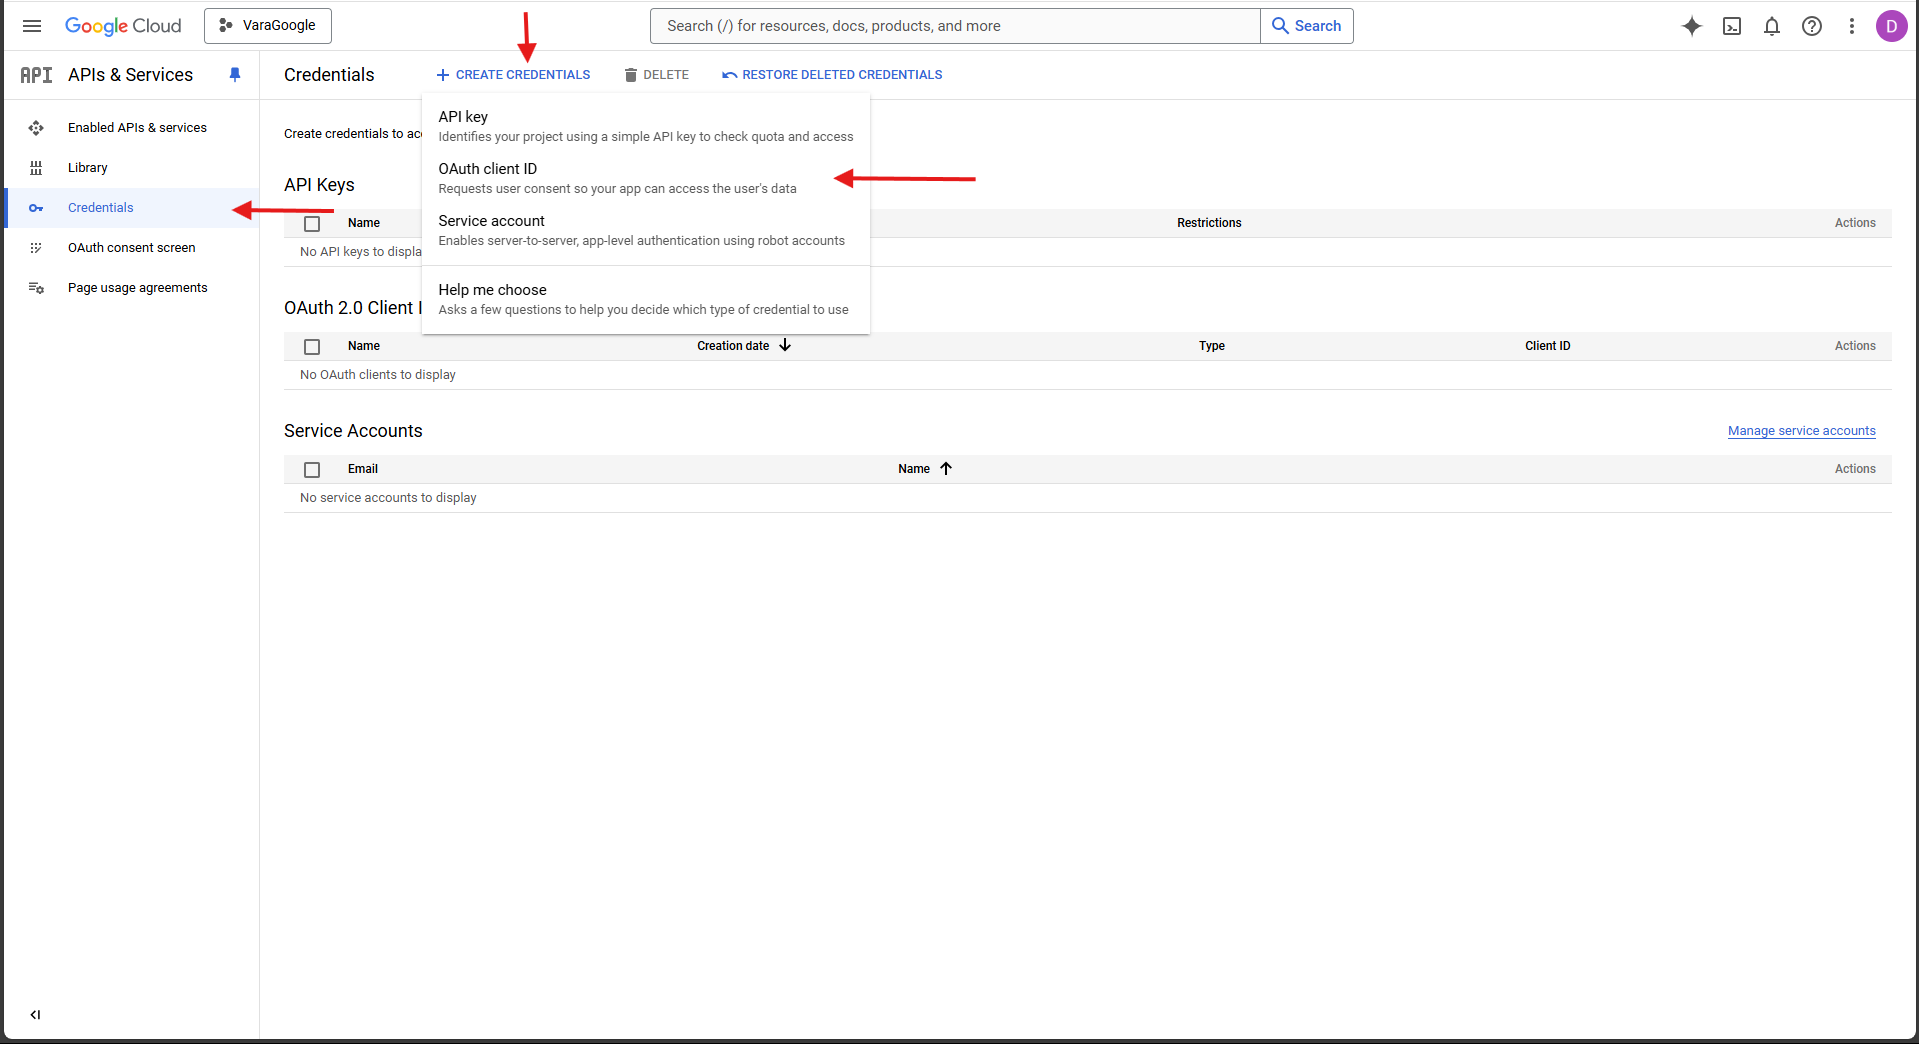
Click the Credentials tab to go to the page where you can create your web client ID and click on CREATE CREDENTIALS at the top of the page, and then select the OAuth client ID option:
-
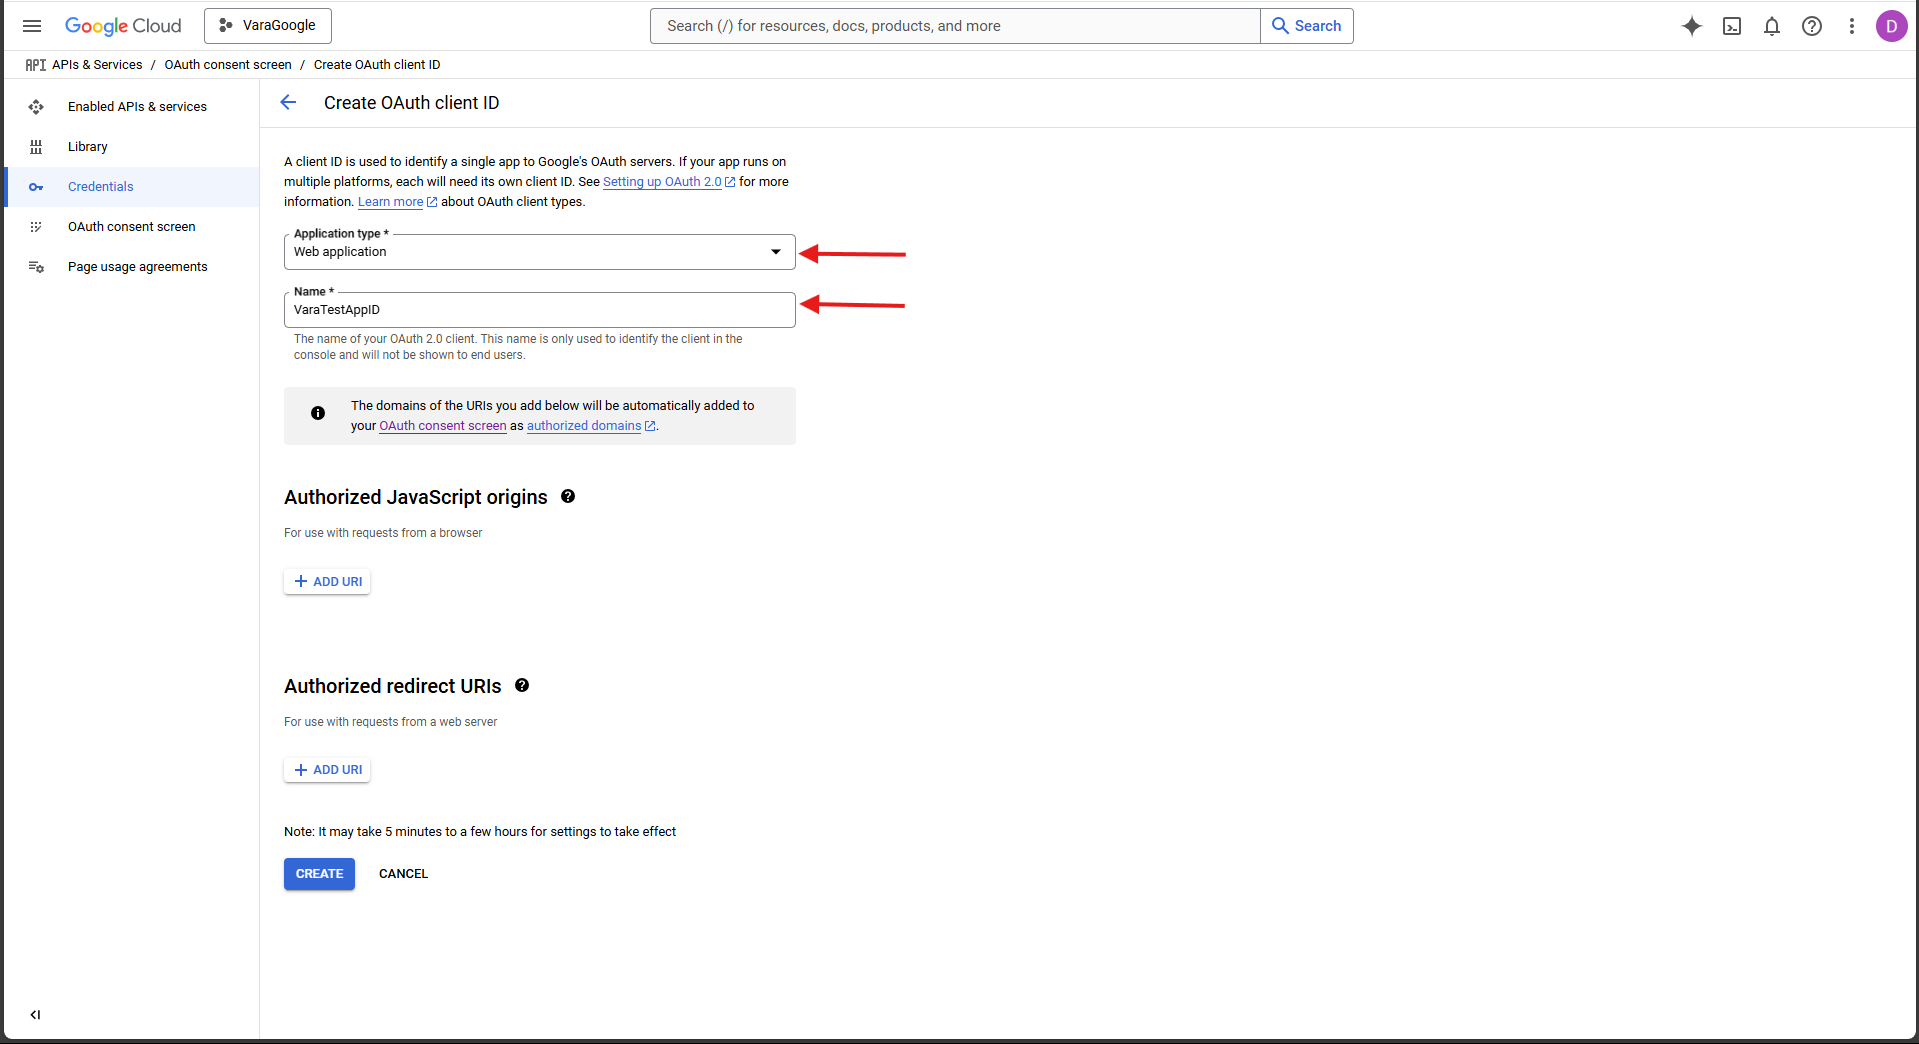
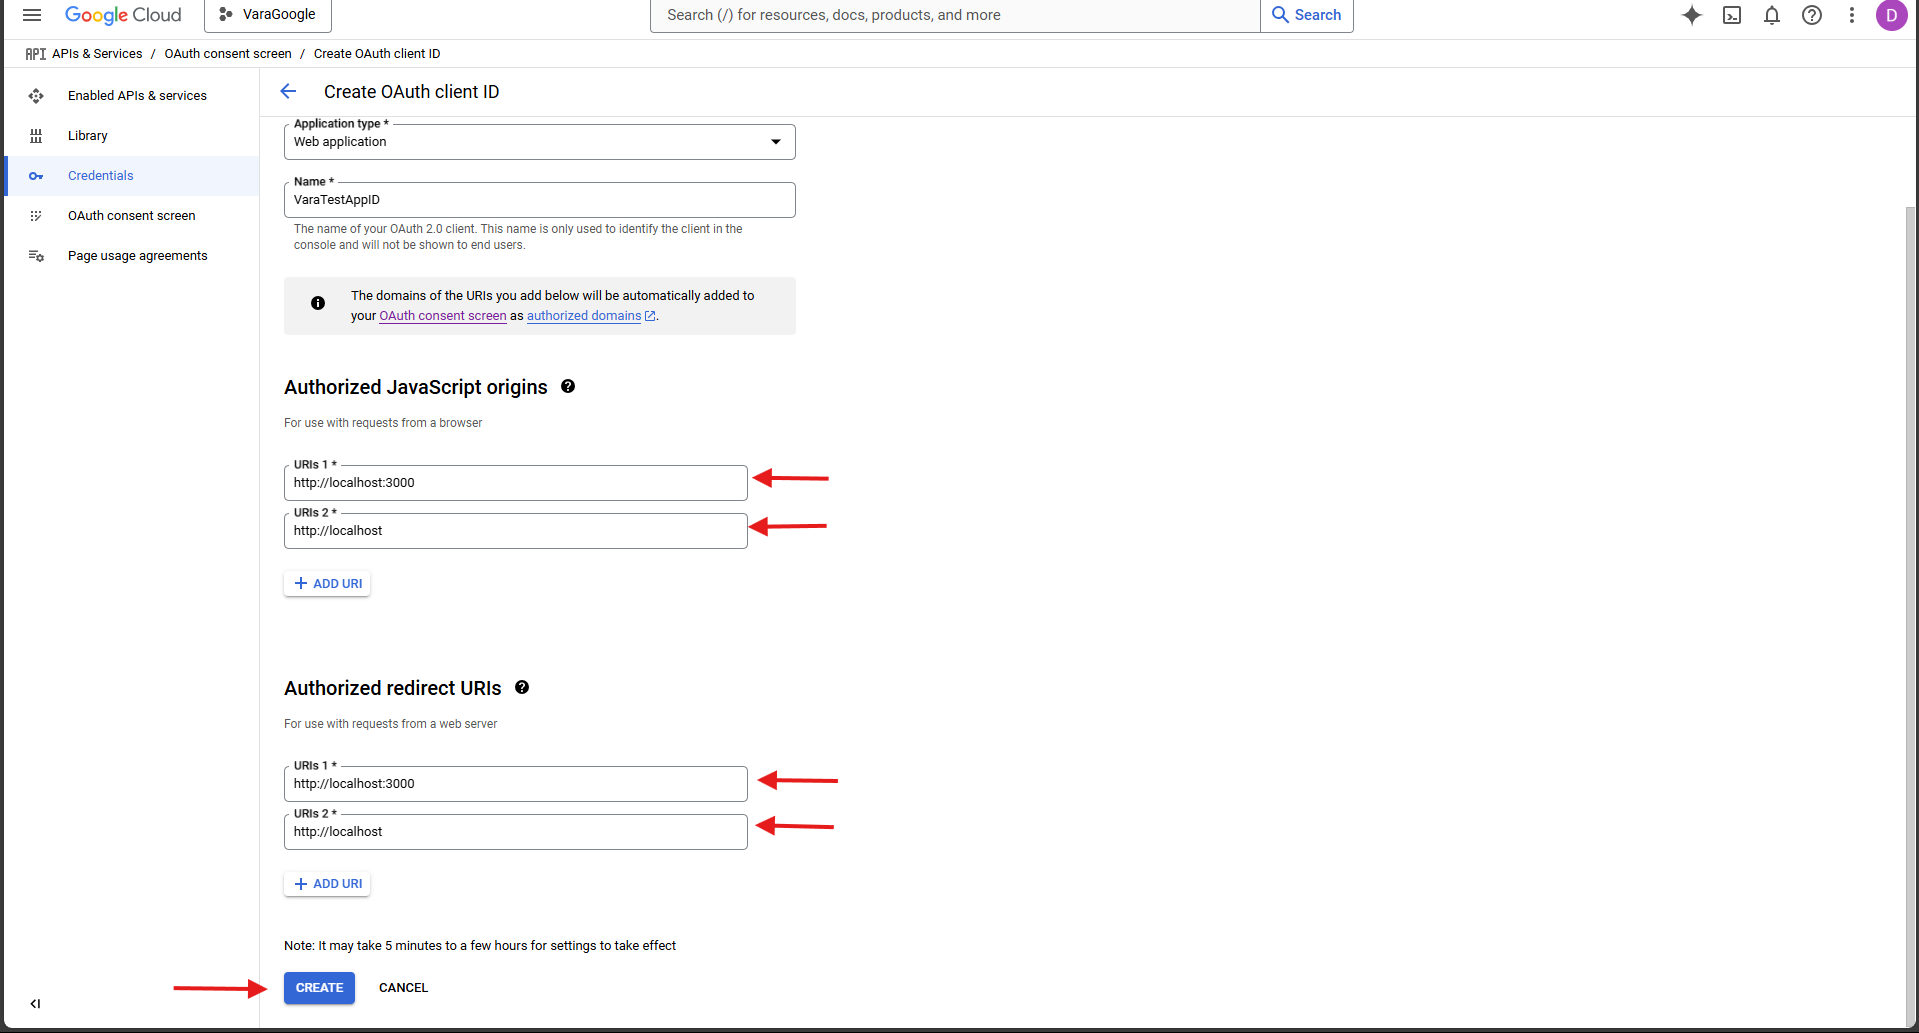
Then, you need to select the application type (Web application), and choose for your client ID:
-
Next, you'll also add two types of URLs: Authorized JavaScript origins and Authorized redirect URLs. The Authorized JavaScript origins URL is the URL from which your application is originating the login, and the Authorized redirect URL is the link that Google will redirect the user to after the successful login. For the Authorized JavaScript origins and Authorized redirect URLs, add the localhost URLs: http://localhost:3000 and http://localhost (for testing), and press the
savebutton, like so: -
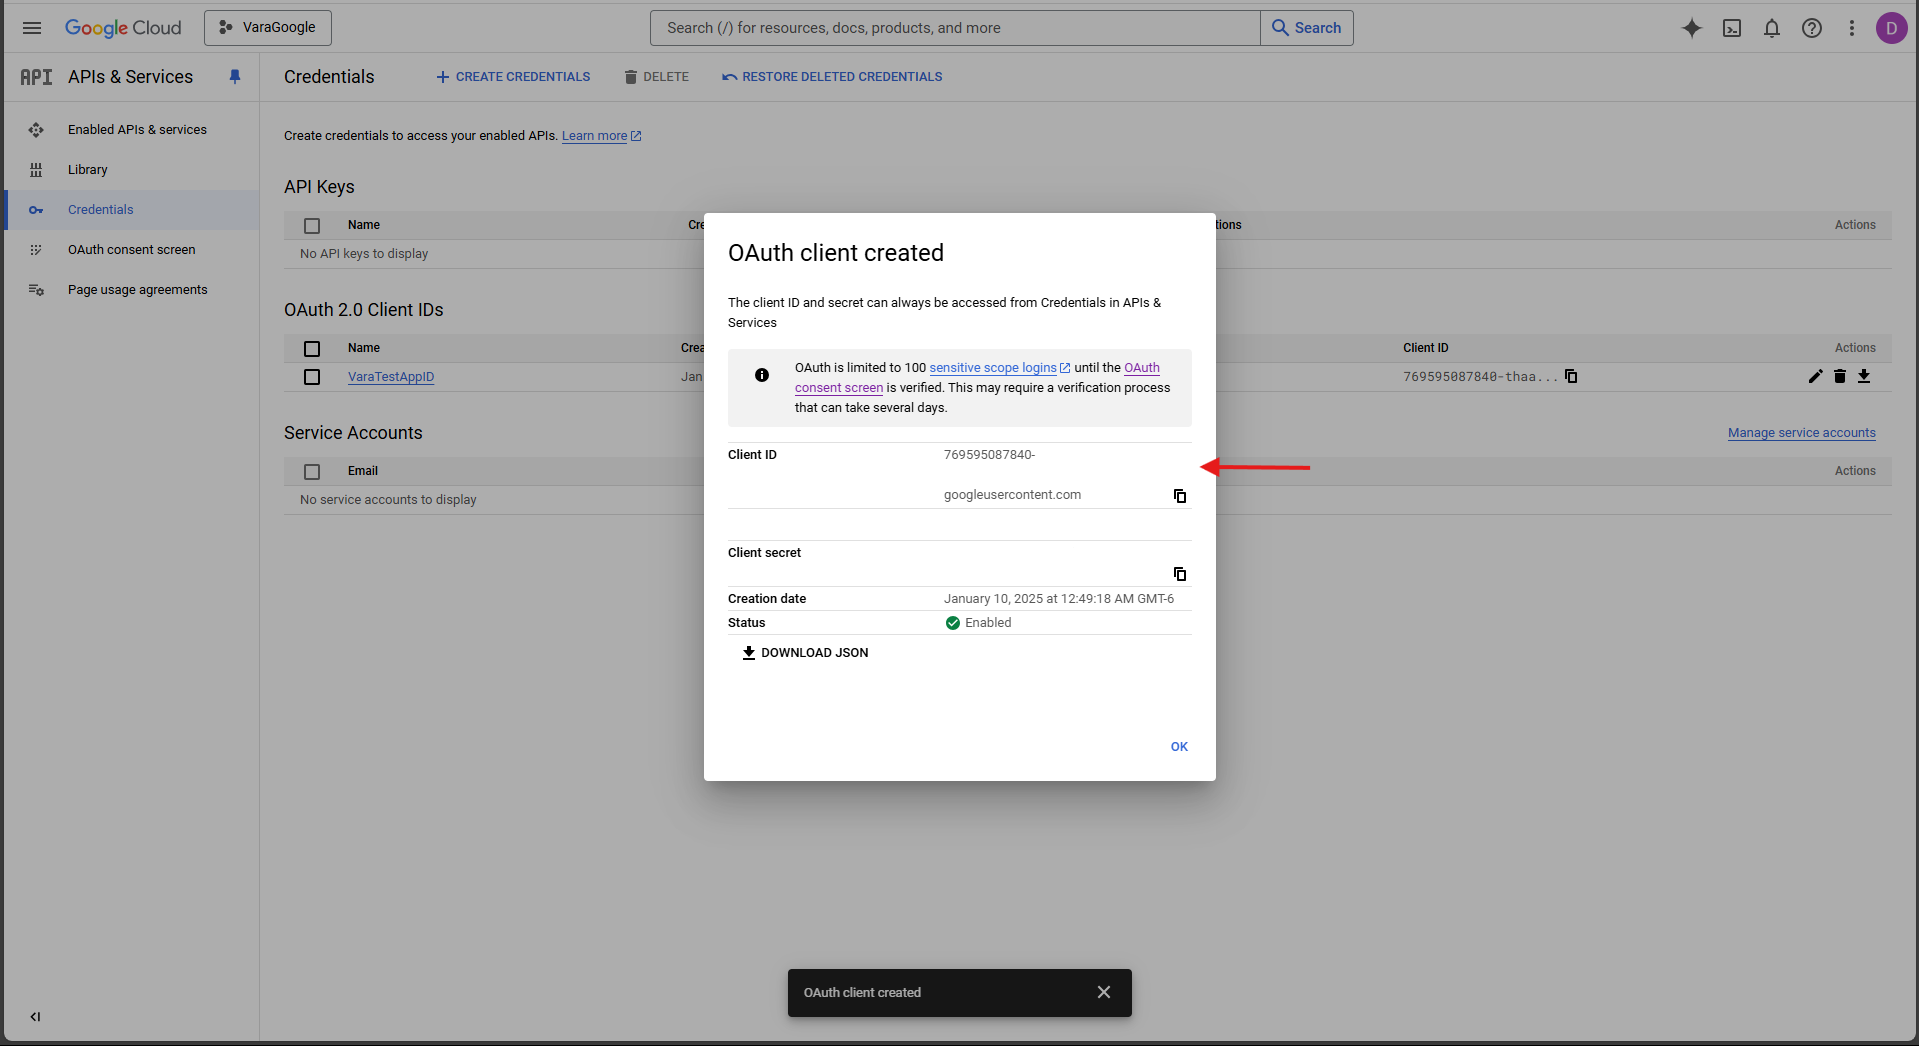
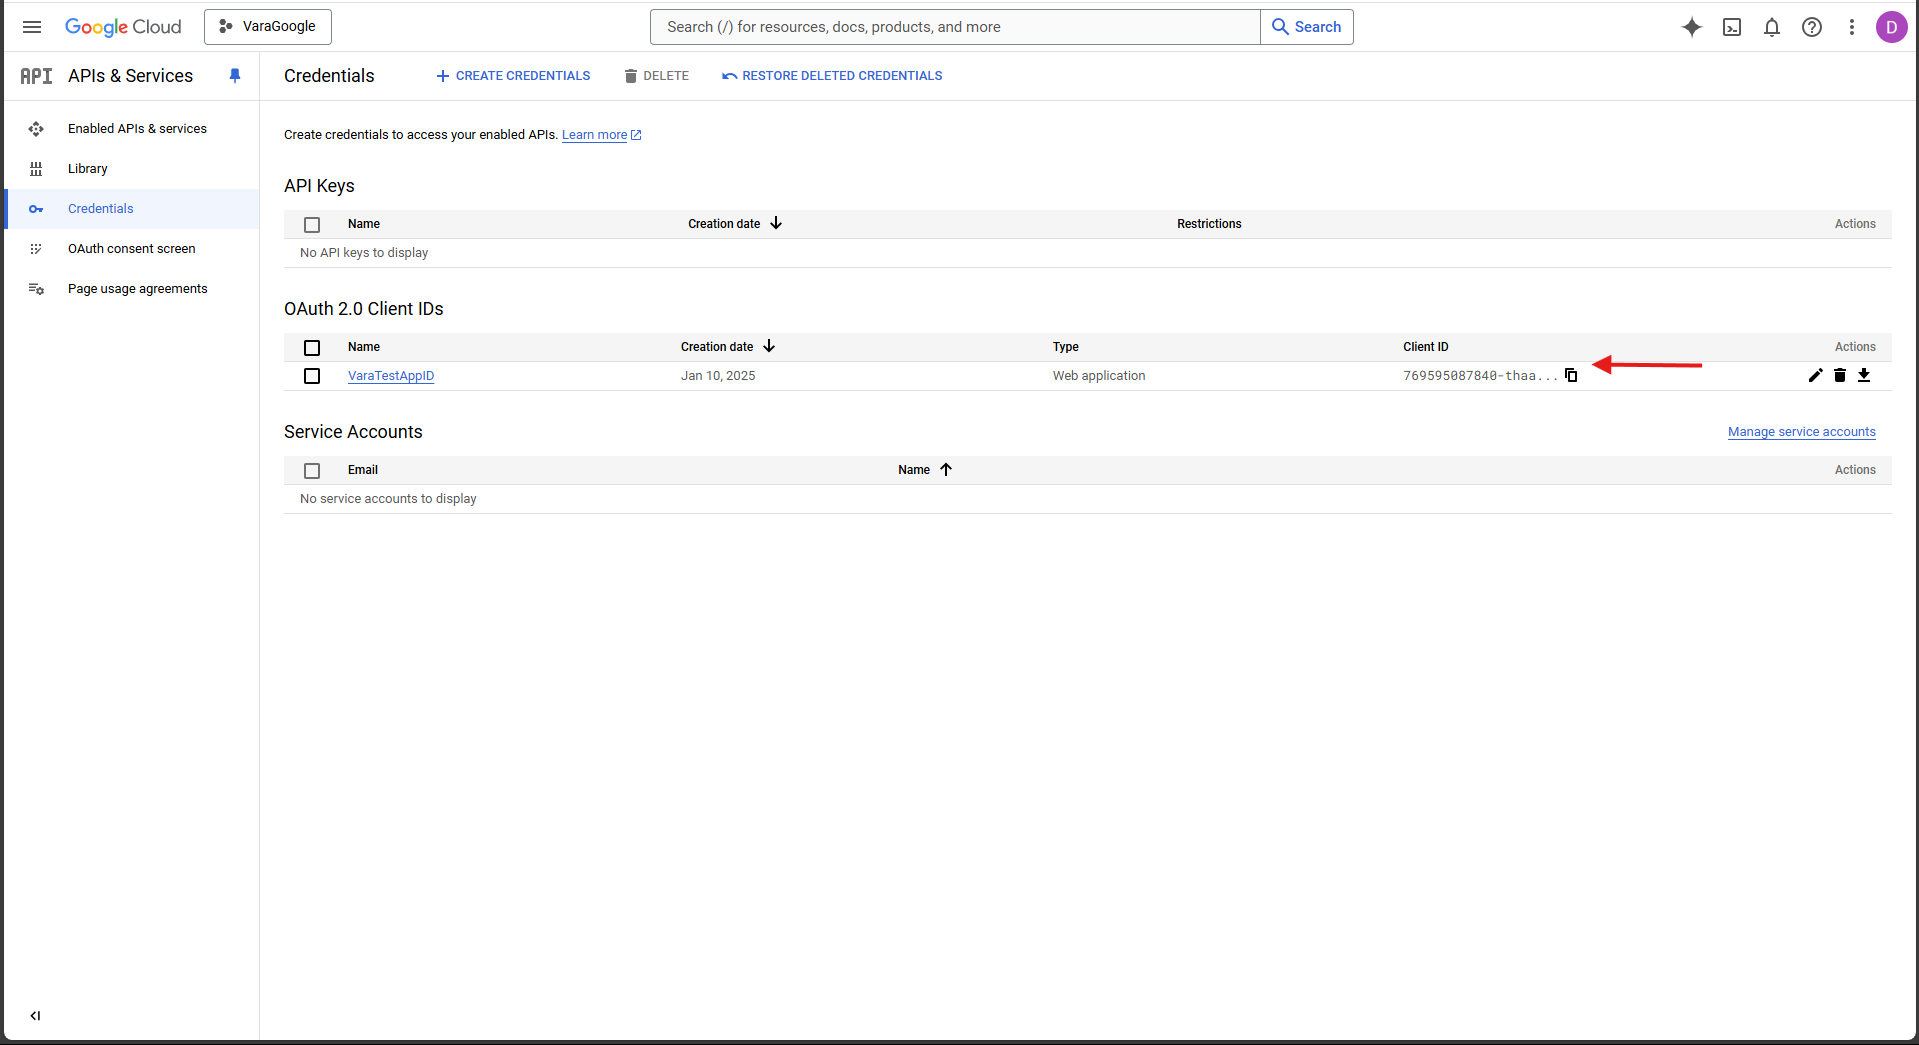
Congratulations! You can now copy your client ID to use Google login!, you need to copy the client id and paste it in the component to use it (in
frontend/src/app/hocs/index.tsx, there you can also see the client id created in the example):
-
First, clone this repository:
git clone https://github.com/Vara-Lab/Web3-Abstraction-Integration-Kit.git
cd vara-walletconnect-library- Install dependencies:
cd frontend
yarn- Run in dev mode:
yarn dev- Build project:
cd contract
cargo build --release- Upload the wasm and idl file in the Gear IDEA
Note: If your Rust compiler is older than the required version (1.83 or newer), you will need to update it as follows:
rustup install 1.83
rustup default 1.83
In case that the compiler does not have the target 'wasm32-unknown-unknown' or the component 'rust-src', you need to install both with:
rustup target add wasm32-unknown-unknown
rustup component add rust-src --toolchain 1.83-x86_64-unknown-linux-gnu
Finally, you need to install the wasm-opt (to optimize WebAssembly files):
sudo apt install binaryen- In the file src/app/consts you can find the const 'CONTRACT_DATA', where you have to put the contract id and IDL of the contract (It already contains a that fields of an existing contract):
export const CONTRACT_DATA: ContractSails = {
  programId: '',
  idl: ``
};- In the same file, you will find two consts 'sponsorName' and 'sponsorMnemonic', where you have to put a wallet name and the mnemonic seed of the wallet to sign the voucher for the users accounts.
export const sponsorName = "";
export const sponsorMnemonic = "";- Initiate SailsCalls with the ''useInitSails' hook: in the 'app.tsx' file that is in src directory, you will find the use of this hook, where you have to put the data required to initiate SaisCalls (tha data is in the 'consts' file, explained above):
import { useInitSails } from "./app/hooks";
import {
  CONTRACT_DATA,
  sponsorName,
  sponsorMnemonic
} from "./app/consts";

const App = () => {
  // code ...

  useInitSails({
    // Set network, in this case testnet (if not, it wil use localhost)
    network: 'wss://testnet.vara.network',
    // Contract id
    contractId: CONTRACT_DATA.programId,
    idl: CONTRACT_DATA.idl,
    // You need to put name and mnemonic sponsor if you
    // will use vouchers feature (vouchers are used for gasless,
    // and signless accounts)
    vouchersSigner: {
      sponsorName,
      sponsorMnemonic
    }
  });

  // code ...
}- Use of SailsCalls: Once you have initiated Sails Calls, you can use the 'useSailsCalls' hook (if is not initiate the hook will return 'null'):
import { useSailsCalls } from "@/app/hooks";

export const Component = () => {
  const sails = useSailsCalls();

  const singMessage = async () => {
    // Check if SaisCalls is started
    if (!sails) {
      console.error('SailsCalls is not ready!');
      return;
    }

    // code ..
  }

  // code ..
}- Sending a message with SailsCalls: you will need the 'signer' to sign the extrinsic (SailsCalls have its own documentation) and you need to import some helper functions that check for you the state of the user voucher:
import { useSailsCalls } from "@/app/hooks";
import { useDappContext } from "@/Context";
import { decodeAddress, HexString } from "@gear-js/api";
// Helper functions to check voucher
import { addTokensToVoucher, renewVoucher, encryptString } from "@/app/utils";
import { encryptString } from "@/app/utils";

export const Component = () => {
  const sails = useSailsCalls();
  const {
    signlessAccount,
    currentVoucherId ,
    noWalletSignlessAccountName,
  } = useDappContext();

  const singMessage = async () => {
    // Check if SaisCalls is started
    if (!sails) {
      console.error('SailsCalls is not ready!');
      return;
    }

    // Check if the user keyring account is not null
    if (!signlessAccount) {
      console.error('Signless account is not ready!');
      return;
    }

    try {
      // Checks if the voucher needs tokens
      await addTokensToVoucher(
        sails,
        decodedAddress,
        currentVoucherId,
        1, // On token to add
        2, // Min amount of tokens from voucher
        {
          onLoad() { console.log('Will add tokens to voucher!') },
          onSuccess() { console.log('Tokens added to voucher!') },
          onError() { console.log('Erro while adding tokens to voucher') }
        }
      );
    } catch (e) {
      console.error(e);
      return;
    }

    try {
      // Check if the voucher is expired
      await renewVoucher(
        sails,
        decodedAddress,
        currentVoucherId,
        1_200, // 1200 blocks (one hour)
        {
          onLoad() { console.log('Will renew voucher!') },
          onSuccess() { aconsole.log('Voucher renewed!') },
          onError() { console.log('Error while renewing voucher') }
        }
      )
    } catch (e) {
      console.error(e);
      return;
    }

    try {
      // Send the message to the contract
      const response = await sails.command(
        'ServiceName/MethodName',
        signlessAccount,
        {
          voucherId: currentVoucherId,
          callArguments: [
            // You need to send as an argument the encrypted name
            //of the user that is associated with the keyring account
            encryptString(noWalletSignlessAccountName)
          ],
          callbacks: {
            onLoad() { alert.info('Will send a message'); },
            onBlock(blockHash) { alert.success(`In block: ${blockHash}`); },
            onSuccess() { alert.success('Message send!'); },
            onError() { alert.error('Error while sending message'); }
          }
        }
      );

      console.log('Response: ', response);
    } catch(e) {
      console.error(e);
    }
  }

  // code ..
}- Reading state with queries:
import { useSailsCalls } from "@/app/hooks";

export const Component = () => {
  const sails = useSailsCalls();

  const readState = () => {
    if (!sails) {
      console.error('sails is not ready');
      return;
    }

    // Send a query to the contract:
    const response = await sails.query('QueryService/TrafficLight');

    console.log('state: ', JSON.stringify(response));
  }

  // code ...
}- If you will build a new components that send a message, you have to check that the actual session has an account, so, you need to import the 'signless form' that helps you to optain that account and some data from the context (to handle this part):
import { useState } from "react";
import { useSailsCalls } from "@/app/hooks";
// dApp context and SinglessForm works together to put the keyring account
// at 'application level'
import { useDappContext } from "@/Context";
import { SignlessForm } from "@/components/SignlessForm/SignlessForm";
import { addTokensToVoucher, renewVoucher, encryptString } from "@/app/utils";

const Action = () => {
  const sails = useSailsCalls();

  const {
    signlessAccount,
    currentVoucherId ,
    noWalletSignlessAccountName,
  } = useDappContext();

  const [modalOpen, setModalOpen] = useState(false);

  const signMessage = async () => {
    if (!signlessAccount || !currentVoucherId || !noWalletSignlessAccountName) {
      alert.error('User is not logged in');
      setModalOpen(true);
      return;
    }

    // code ..
  }

  const closeForm = () => {
    setModalOpen(false);
  }

  return (
    <>
      <button
        onClick={signMessage}
      >
        Send message
      </button>
      {
        // Form modal to ask the user credentials
        modalOpen &&
        <SignlessForm
          closeForm={closeForm}
        />
      }
    </>
  );
}
