A Windows 10 ducky script for arduino leonardo that emulates keyboard to steal data from a pc via email.The philosophy behind the ducky scripts, is that you try a script/task using only the keyboard and then you programm it into the rubber ducky. Just load it to your Arduino IDE(or anything else you could use), upload it to your arduino leonardo, and connect it to a PC with a regular smartphone cable(micro USB). It should run out of the box on windows 10 machines with no lag problems. Lately I'm trying to enhance it with remote control via WiFi capabilities, so I created the wifi_controller.ino sketch to use a NodeMCU v0.9 to setup a simple interactive command server that accepts text(command) input via web browser, and then spits it out using serial communication.This way you can essentialy have a remote for your computer(or someone else's?).The wiring between the arduino Leonardo and the NodeMCU is pretty simple: connect NodeMCU's TX to Leo's RX, connect the two devices GND together, and connect the NodeMCU's 5V pin to the computer USB 5V pin.
Some usefull key combinations to keep in mind:
Left_Ctrl+Esc --> opens windows menu(from which we can search for things)
Left_Ctrl+Shift+Return(enter) --> Open Selected app as an administrator(Useful for cmd!)
Alt+Y --> Gives a “Yes” response to the UAC dialog(user account control)
Left_Alt+F7 --> deletes cmd command history
Alt+F3 --> Opens the "Window Menu" of the current window
Alt+F3 and then M --> Enters the "move window" mode. Can now use arrows to move the window(usually outside screen)
And a bit of non-expert advise:
Delete your command history! Especially you logged in somewhere, or you entered personal information suck as passwords and emails!
Hide your Window! You dont want everybody in the room to suddenly see some weird matrix-like effects in their co-worker's PC next to you...
Keep in mind:
1)If you fail to clean your tracks(files,commands etc), the victim will probably be able to trace you!
2)Think of all the things that could go wrong in that PC.It could have Caps Lock on, it could be set to another language
or it could have loudspeakers connected and activated(it may produce a sound if connected!).
3)Remember that the pc you connect your ducky to may be laggy! If thats the case, precautions have to be taken
to ensyre correct timing of the keystrokes(usually using delays after time-y commands)
Technical Advice for reinventing the wheel
1- Please dont.
2- Use Serial1 class and not Serial in Leonardo when trying to use RX-TX pins!
3- When programming the Leo, please, do not have RX and TX pins connected anywhere!
4- When programming the NodeMCU keep in mind that anything else that can wirelessly transfer text and then spit it out using TTL 5V Serial,is worth more of your time than that sob.
5-I hate to say that, really, but do yourself a favour and do not use Ubuntu 18.04 to program your Leonardo. You will learn about all kinds of uploading problems. I switched to my windows 10 machine and everything works like a charm.
Arduino Keyboard() library key codes (from the nice guys at arduino)
KEY_LEFT_CTRL	          0x80	128
KEY_LEFT_SHIFT	        0x81	129
KEY_LEFT_ALT	          0x82	130
KEY_LEFT_GUI	          0x83	131
KEY_RIGHT_CTRL        	0x84	132
KEY_RIGHT_SHIFT	        0x85	133
KEY_RIGHT_ALT         	0x86	134
KEY_RIGHT_GUI         	0x87	135
KEY_UP_ARROW	          0xDA	218
KEY_DOWN_ARROW	        0xD9	217
KEY_LEFT_ARROW	        0xD8	216
KEY_RIGHT_ARROW       	0xD7	215
KEY_BACKSPACE         	0xB2	178
KEY_TAB	                0xB3	179
KEY_RETURN            	0xB0	176
KEY_ESC               	0xB1	177
KEY_INSERT            	0xD1	209
KEY_DELETE	            0xD4	212
KEY_PAGE_UP           	0xD3	211
KEY_PAGE_DOWN	          0xD6	214
KEY_HOME	              0xD2	210
KEY_END               	0xD5	213
KEY_CAPS_LOCK         	0xC1	193
KEY_F1	                0xC2	194
KEY_F2	                0xC3	195
KEY_F3	                0xC4	196
KEY_F4	                0xC5	197
KEY_F5	                0xC6	198
KEY_F6	                0xC7	199
KEY_F7	                0xC8	200
KEY_F8	                0xC9	201
KEY_F9	                0xCA	202
KEY_F10	                0xCB	203
KEY_F11	                0xCC	204
KEY_F12	                0xCD	205
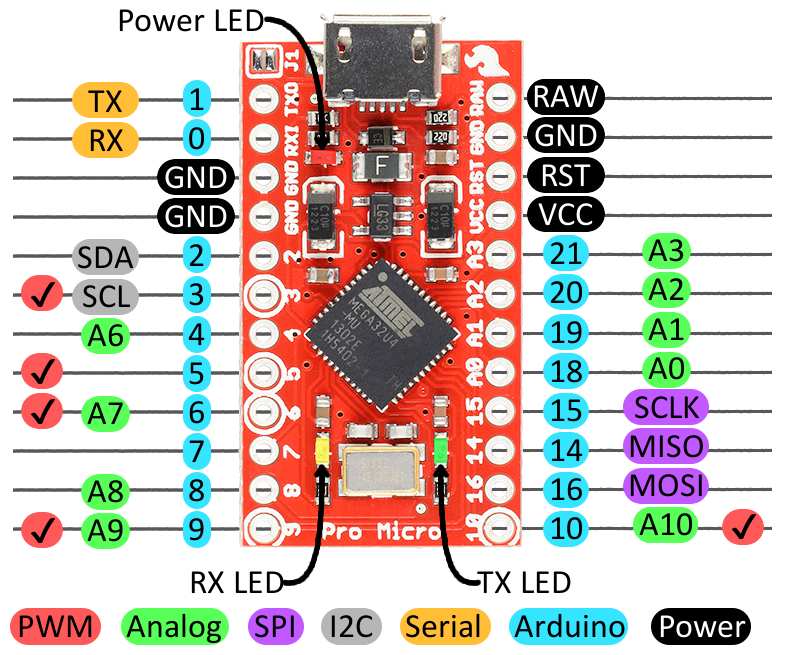
arduino Leonardo/Pro Micro Pinout

My Leonardo Ducky Serial Pinout
I used 2 female-to-female jumper cables cut in half to make available the serial communication and power pins(for external
devices to pass commands to the ducky)
Photos of the actual Leonardo can be found in the Photos Folder.
Pins from top to bottom:
-GND
-RX
-TX
-VCC