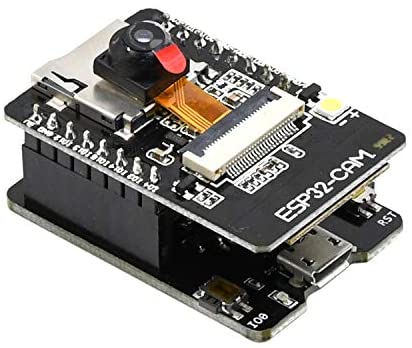
This example is for running a micro neural network model on the 10-dollar Ai-Thinker ESP32-CAM board and show the image classification results on a small TFT LCD display.
This is modified from ESP32 Cam and Edge Impulse with simplified code, TFT support and copied necessary libraries from Espressif's esp-face. esp-face had been changed a lot into esp-dl and thus broke the original example. The original example requires WiFi and has image lagging problems.
See the original example repo or this article about how to generate your own model on Edge Impulse. You can also still run the original example by copy every libraries in this example to the project directory, then re-open the .ino script.
See the video demonstration
The following is needed in your Arduino IDE:
- Arduino-ESP32 board support (select
Ai Thinker ESP32-CAM) - Adafruit GFX Library
- Adafruit ST7735 and ST7789 Library
- Import the Edge Impulse model library
- Download edge-impulse-esp32-cam from this repo and open the .ino file in the directory.
Be noted that you won't be able to read any serial output if you use Arduino IDE 2.0!
For the ESP32-CAM, the side with the reset button is "up". The whole system is powered from a power module that can output both 5V and 3.3V. The ESP32-CAM is powered by 5V and TFT by 3.3V. I use a 7.5V 1A charger (power modules require 6.5V+ to provide stable 5V). My power module only output 500 mA max - you don't need a lot since we don't use WiFi.
| USB-TTL pins | ESP32-CAM |
|---|---|
| Tx | GPIO 3 (UOR) |
| Rx | GPIO 1 (UOT) |
| GND | GND |
The USB-TTL's GND should be connected to the breadboard, not the ESP32-CAM itself. If you want to upload code, disconnect power then connect GPIO 0 to GND (also should be on the breadboard), then power it up. It would be in flash mode. (The alternative way is remove the ESP32-CAM itself and use the ESP32-CAM-MB programmer board.)
| TFT pins | ESP32-CAM |
|---|---|
| SCK (SCL) | GPIO 14 |
| MOSI (SDA) | GPIO 13 |
| RESET (RST) | GPIO 12 |
| DC | GPIO 2 |
| CS | GPIO 15 |
| BL (back light) | 3V3 |
The script will display a 120x120 image on the TFT, so any 160x128 or 128x128 versions can be used. But you might want to change the parameter in tft.initR(INITR_GREENTAB); to INITR_REDTAB or INITR_BLACKTAB to get correct text colors.
| Button | ESP32-CAM |
|---|---|
| BTN | 3V3 |
| BTN | GPIO 4 |
Be noted that since the button pin is shared with the flash LED (this is the available pin left; GPIO 16 is camera-related), the button has to be pulled down with two 10 KΩ resistors.
I used Microsoft's Kaggle Cats and Dogs Dataset which has 12,500 cats and 12,500 dogs. 24,969 photos had successfully uploaded and split into 80-20% training/test sets. The variety of the images is perfect since we are not doing YOLO- or SSD- style object detection.
The model I choose was MobileNetV1 96x96 0.25 (no final dense layer, 0.1 dropout) with transfer learning. Since free Edge Impulse accounts has a training time limit of 20 minutes per job, I can only train the model for 5 cycles. (You can go ask for more though...) I imagine if you have only a dozen images per class, you can try better models or longer training cycles.
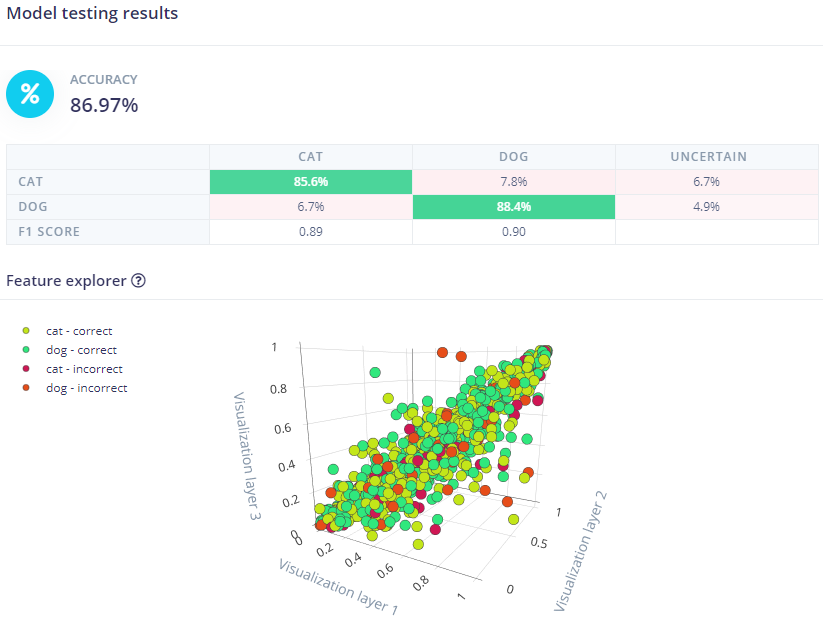
Anyway, I got 89.8% accuracy for training set and 86.97% for test set, which seems to be decent enough.
Also, ESP32-CAM is not yet an officially supported board, so I cannot use EON Tuner for futher find-tuning.
You can find my published Edge Impulse project here: esp32-cam-cat-dog.
ei-esp32-cam-cat-dog-arduino-1.0.4.zip is the downloaded Arduino library which can be imported into Ardiono IDE.
The camera captures 240x240 images and resize them into 96x96. The inference time is 2607 ms (2.6 secs) per image, which is not very fast, with mostly good results. I don't know yet if different image sets or models may effect the result.
The edge-impulse-esp32-cam-bare is the version that dosen't use any external devices. The model would be running in a loop non-stop. You can try to point the camera to the images and read the prediction via serial port (use Arduino IDE 1.x).


