
This Node.js application demonstrates how to build a Virtual HelpDesk, and use the Watson Assistant (formerly Conversation) and Discovery services to interact with end users for simple Q/A. With proper training, Assistant service can cover most of common questions/requests. When it is not been trained to address end users' specific question, the virtual agent searches in the knowledge base through Watson Discovery service and presents relevant entries to the end user. If the end user is still not satisfied, a new ticket is created in a back-office ticketing system, such as ServiceNow system.
Note, this is a variation of the original code pattern VirtualHelpDesk. Instead of Maximo/ICD as the backend ticketing system, this code pattern connects to ServiceNow.

- The knowledge base documents are added to the Discovery collection.
- The user interacts with the virtual agent via the app UI. User input is processed by the virtual agent.
- When the virtual agent is trained to cover the discussion subject, it quickly provide feedback.
- When the virtual agent is not trained to cover the discussion subject, it searches in the knowledge base for suggestion(s). If found, relevant suggestions are displayed via the app UI.
- If no relevant information is found in the knowledge base or the relevant information from knowledge base does not satify end users, the Virtual HelpDesk opens a new ticket in back-office ticketing system.
- Back-office ticketing system takes over the support task.

- IBM Watson Assistant: Build, test and deploy a bot or virtual agent across mobile devices, messaging platforms, or even on a physical robot.
- IBM Watson Discovery: A cognitive search and content analytics engine for applications to identify patterns, trends, and actionable insights.
- ServiceNow: Back-office ticketing system. Other ticketing system can be used alternatively.

- Cognitive: Watson is a cognitive technology that can think like a human.
- Node.js: An asynchronous event driven JavaScript runtime, designed to build scalable applications.

When you click the link above ("Deploy to IBM Cloud"), a Watson Assistant service and a Watson Discovery service are created for you without manual steps. It also deploys the Node.js application for quick verification. So, after you complete this section (if you choose to), you may skip the next two sections
- Setting up Assistant(Conversation) service
- Setting up Discovery service
And continue in section
- Setting up trial IBM Control Desk SaaS system
Node.js application must be redeployed after it is configured to connect to Maximo/ICD system. The instruction is provided in section
- Deploying to Bluemix
OR
-
Create an IBM Cloud account -- Sign up for IBM Cloud, or use an existing account. Your account must have available space for at least one app and two Watson services.
-
Make sure that you have the following prerequisites installed:
- The Node.js runtime, including the NPM package manager.
- The Cloud Foundry CLI.
Clone the virtualhelpdesk-ServiceNow locally.
In a terminal, run:
git clone https://github.com/lee-zhg/virtualhelpdesk-1The Watson Assistant service is used to provide underline infrastructure for the virtual agent in this code pattern.
Watson Assistant service is to be setup to simulate help desk level 1 activities. For topics that the virtual agent has been trained, it can help end users interactively. For subjects that the virtual agent does not understand, it searches the knowledge base through Discovery service, collects information from end user and creates a new ticket in back-office ticketing system, for example Maximo/ICD, if necessary.
Create an instance of Watson Assistant.
-
Login to IBM Cloud console.
-
Location and open the newly created Assistant service under the
Servicesof theResource summaryin the dashboard.
-
Click
Launch tool. -
Go to the
Skillstab. -
Click
Create new -
Select the
Import skilltab. -
Click
Choose JSON file, go to your cloned repo dir, andOpenfiletraining/ITSM_workspace.json(in the project root folder). -
Select
Everything (Intents, Entities, and Dialog). -
Click
Import.

To find the WORKSPACE_ID of the Watson Assistant:
- Go back to the
Skillstab. - Find the card for the workspace you would like to use. Look for
ITSM. - Click on the three dots in the upper right-hand corner of the card and select
View API Details. - Copy the
Workspace IDGUID.

- In the next step, you will put this
Workspace IDinto the `.env file asWORKSPACE_ID.
The Watson Discovery service is used to provide underline infrastructure in this code pattern when searching in knowledge base.
Create an instance of Watson Discovery.
-
Download and unzip the
knowledgebase.zipin this repo to reveal a set of JSON documents -
Navigate to your Discovery instance in your IBM Cloud dashboard
-
Click
Launch tool
-
Create a new data collection, name it whatever you like, and select the default configuration.

-
After you're done, a new private collection is displayed in the UI

-
Click
Drag and drop your documents here or browse from computersection
-
Select three JSON files from local file system where you downloaded and unzipped
knowledgebase.zipfile. This may take a few seconds, you will see a notification when the process is finished


-
Copy the
.env.examplefile and create a new.envfile in the root directory of repository download. -
Populate the following variables in the
.envfile based on your Assistant instance.# Watson Assistant WORKSPACE_ID= ASSISTANT_URL= ASSISTANT_IAM_APIKEY=To find Assistant URL and APIKEY,
- Find and select your Assistant instance
- Navigate to the
Service credentialstab. - Expand the
View credentialsunder Actions in the right pane.
-
Populate the following variables in the
.envfile based on your Assistant instance.# Watson Discovery DISCOVERY_URL=https://gateway.watsonplatform.net/discovery/api DISCOVERY_ENVIRONMENT_ID=4e6058d9-73b7-406e-95ce-145afab07f00 DISCOVERY_COLLECTION_ID=f0f9541d-7583-4b87-b491-5f40a317de22 DISCOVERY_IAM_APIKEY=xpm6QSsOTWwlmHF89sVyqjiuNmHQHHlUnJXNx0G9X6PBTo find Assistant URL and APIKEY,
- Find and select your Discovery instance
- Navigate to the
Service credentialstab. - Expand the
View credentialsunder Actions in the right pane.
To find DISCOVERY_ENVIRONMENT_ID and DISCOVERY_IAM_APIKEY,
- Navigate to
Managetab of your Discovery instance. - Click
Launch tool. - Click your collection.
- Click the
View API detailsicon next to the trash can icon.


-
Set
MAXIMO_AUTHenvironment variable in file .env. It has two parts separated by a blank space. The first part is the value "Basic". The second part isuser:passwordbase64 encoded. You can get its value through any online base64 encoder based on your ICD/Maximo user:password. -
Keep
application/jsonas the value ofMAXIMO_CONTEXT_TYPEenvironment variable. -
Modify the hostname portion of
MAXIMO_REST_URLenvironment variable to point to your ServiceNow system.#Sample ServiceNow settings in .env file MAXIMO_AUTH=BASIC RtaW46SUJNc2VydmljZT MAXIMO_CONTEXT_TYPE=application/json MAXIMO_REST_URL=https://dev626.service-now.com/api/now/table/incident -
Save the file.
-
Navigate to the folder where your local ticketbot application locates.
-
Install required Node.js modules to the local runtime environment:
npm install
-
Start the Virtual HelpDesk:
npm start
-
Point your browser to http://localhost:3000 to try out the app.
When pointing your browser to http://localhost:3000, you are starting a Q/A session.
You may type problem statements such as
- my pc is running slow
- wireless connection is bad
The virtual agent will do its best to address the issue, for example
-
Please reboot your machine
-
Please power off wireless router in the conference room, waiting one minute and power it on


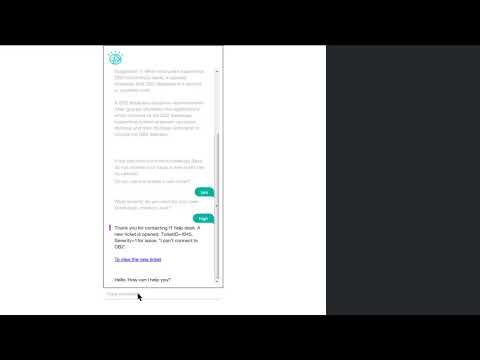
When end users have any question/request that the virtual agent has not been trained to understand, it searches in the knowledge base through Watson Discovery service and presents relavant entries as suggestion(s) to the end users.
For example, when you enter
- can't connect to DB2
in the Q/A session, the virtual agent may return suggestion(s) depending on information in your knowledge base.

If the entries from the knowledge base does not provide sufficient information, end users have option to open ticket.
As the last resort, the virtual agent can collect information and create a new ticket on your behalf. For example, if you ask
- How to program in Java
This is an area that the virtual agent has not been trained and it founds nothing in knowledge base. It then prompts you
```bash
The Virtual Agent has not been trained to answer your question/request.
No relavant entry was found in Knowledge Base.

If the solutions from the Knowledge Base do not resolve your issue, a new ticket can be opened.
Do you want to create a new ticket?
```
When you reply "Yes", the virtual agent will ask
- What severity (high, medium and low) do you want for your new ticket?
After you specify the ticket severity (high, medium and low), the virtual agent opens a new ticket in your backend ticketing system.
- Thank you for contacting IT help desk. A new ticket is opened.
TicketID=365392, Severity=1 for issue: "how to program in java".

Login to your ServiceNow instance. New tcket is created as instance.
For example, https://dev77019.service-now.com
Click Incidents in the left pane. In the right pane, clear the filter by clicking All on the top.

Below is the sample response JSON object from Watson Assistant service. Values of its intents, entities, input, output and context can be gathered and/or manipulated in Node.js code.
At the end of the JSON object, context.newticket and context.severity are related to the slot configurations in the Assistant service.
{
	"intents": [{
		"intent": "greetings",
		"confidence": 0.46840930583966855
	}],
	"entities": [{
			"entity": "severity",
			"location": [
				0,
				1
			],
			"value": "2",
			"confidence": 1
		},
		{
			"entity": "sys-number",
			"location": [
				0,
				1
			],
			"value": "2",
			"confidence": 1,
			"metadata": {
				"numeric_value": 2
			}
		}
	],
	"input": {
		"text": "2"
	},
	"output": {
		"text": [
			"Thank you for contacting IT helpdesk. A new ticket is opened."
		],
		"nodes_visited": [
			"slot_6_1516850647245",
			"node_1_1516850017677",
			"node_13_1516852865520"
		],
		"log_messages": [

		]
	},
	"context": {
		"conversation_id": "40a875f1-c8ef-4b63-9c69-661777bf3d71",
		"system": {
			"dialog_stack": [{
				"dialog_node": "node_13_1516852865520"
			}],
			"dialog_turn_counter": 17,
			"dialog_request_counter": 17,
			"_node_output_map": {
				"Welcome": [
					0
				],
				"node_3_1516832266395": [
					0
				],
				"node_6_1516832414895": [
					0
				],
				"node_5_1516850287208": [
					0
				],
				"node_18_1517000905140": [
					0
				],
				"node_13_1516852865520": [
					0
				],
				"node_4_1516832287824": [
					0
				]
			}
		},
		"newticket": true,
		"severity": 2
	}
}After you have the app deployed and running, you can explore the source files and make changes. Try the following:
- Modify the .js files to change the app logic.
- Modify the .html file to change the appearance of the app page.
- Use the Assistant tool to train the service for new intents, or to modify the dialog flow. For more information, see the Watson Assistant Documentation.
You can use Cloud Foundry to deploy your local version of the app to IBM Cloud.
- In the project root directory, open the
manifest.ymlfile:
- In the
applicationssection of themanifest.ymlfile, change thenamevalue to a unique name for your version of the demo app. - In the
servicessection, specify the name of the Assistant service instance and Discovery service instance that you created. If you do not remember the service name, use thecf servicescommand to list all services you have created.
The following example shows a modified manifest.yml file:
---
declared-services:
  my-conversation-service:
    label: conversation
    plan: free
  my-discovery-service:
    label: discovery
    plan: lite
applications:
- name: vaticketbot
  command: npm start
  path: .
  memory: 512M
  instances: 1
  services:
  - my-conversation-service
  - my-discovery-service
env:
  NPM_CONFIG_PRODUCTION: false
When you are ready to deploy the app to an IBM Cloud environment,
-
With the Cloud Foundry command-line tool, make sure you are in the correct folder where you downloaded the code pattern.
-
Push the app to IBM Cloud:
cf pushAccess your app on IBM Cloud at the URL specified in the command output.
If you encounter a problem, you can check the logs for more information. To see the logs, run the cf logs command:
cf logs <application-name> --recentThis sample code is licensed under Apache 2.0. Full license text is available in LICENSE.
See CONTRIBUTING.