-
Notifications
You must be signed in to change notification settings - Fork 8
Bounding Boxes
A bounding box (rectangular or polygonal) can at any given time be in any of the following three states:
-
Selected (opaque fill and move/resize handles visible):
Select a bounding box by either directly clicking on it in the main image panel or by clicking on its corresponding item in the
Annotated objectstree. -
Highlighted (opaque fill): Highlight a bounding box by either hovering directly over it in the main image panel or by hovering over its corresponding item in the
Annotated objectstree. - Neither selected nor highlighted (transparent fill)

The bounding box states 1 (selected), 2 (highlighted) and 3 (neither)
To temporarily hide a bounding box, either right click the box itself or its corresponding item in the Annotated objects tree and then choose Hide in the context menu. You can also click on the rectangular icon on the box's tree-item to toggle its visibility on and off.
Another way of hiding the currently selected box is by using the shortcut Ctrl+H (Cmd+H on Mac) and unhiding it with Ctrl+V (Cmd+V on Mac).
To hide and unhide all bounding boxes at once, use the eye off/on icons on the left side of the main image panel toolbar or use the shortcuts Ctrl+Alt+H (Cmd+Alt+H on Mac) and Ctrl+Alt+V (Cmd+Alt+V on Mac).
Note: Hiding is recursive, if you hide a bounding box, all bounding boxes belonging to its child categories will also be hidden.
You can click on the rectangular icon on a category's tree-item to toggle the visibility of all assigned bounding boxes on and off. Alternatively right click the category's tree-item and click Hide in the context-menu.

Hiding and unhiding bounding boxes
To delete a bounding box, either right click the box itself or its corresponding item in the Annotated objects tree and then choose Delete in the context menu. Alternatively you can use press the Delete-key to delete the currently selected bounding box.
Note: Deleting is recursive, if you delete a bounding box, all bounding boxes belonging to its child categories will also be deleted.
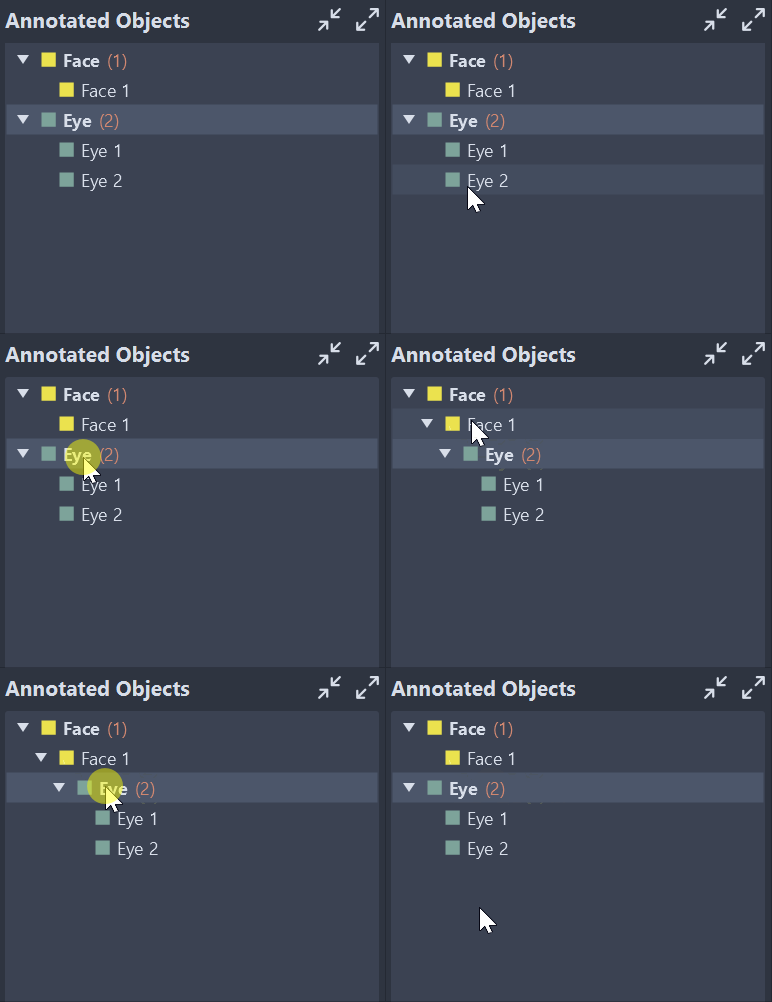
The program allows you to nest bounding boxes using the Annotated objects tree. In the example below the bounding box corresponding to the object Nose 1 is made a part of the bounding box corresponding to the object Face 1 by dragging and dropping its tree item on top of Face 1 object's tree item.

Nesting and 'unnesting' a bounding box
You can also make a whole category (including all its child bounding boxes) a child of a target bounding box by dragging and dropping it on target's corresponding tree item.

Nesting and 'unnesting' a whole category.
You can change the assigned category of an existing bounding box by right-clicking on the box itself or on its corresponding item in the Annotated objects tree and clicking on the Change Category context-menu entry. A small window pops that lets you choose the new category out of the currently existing categories in the Categories panel.

Changing the category of an existing bounding box.
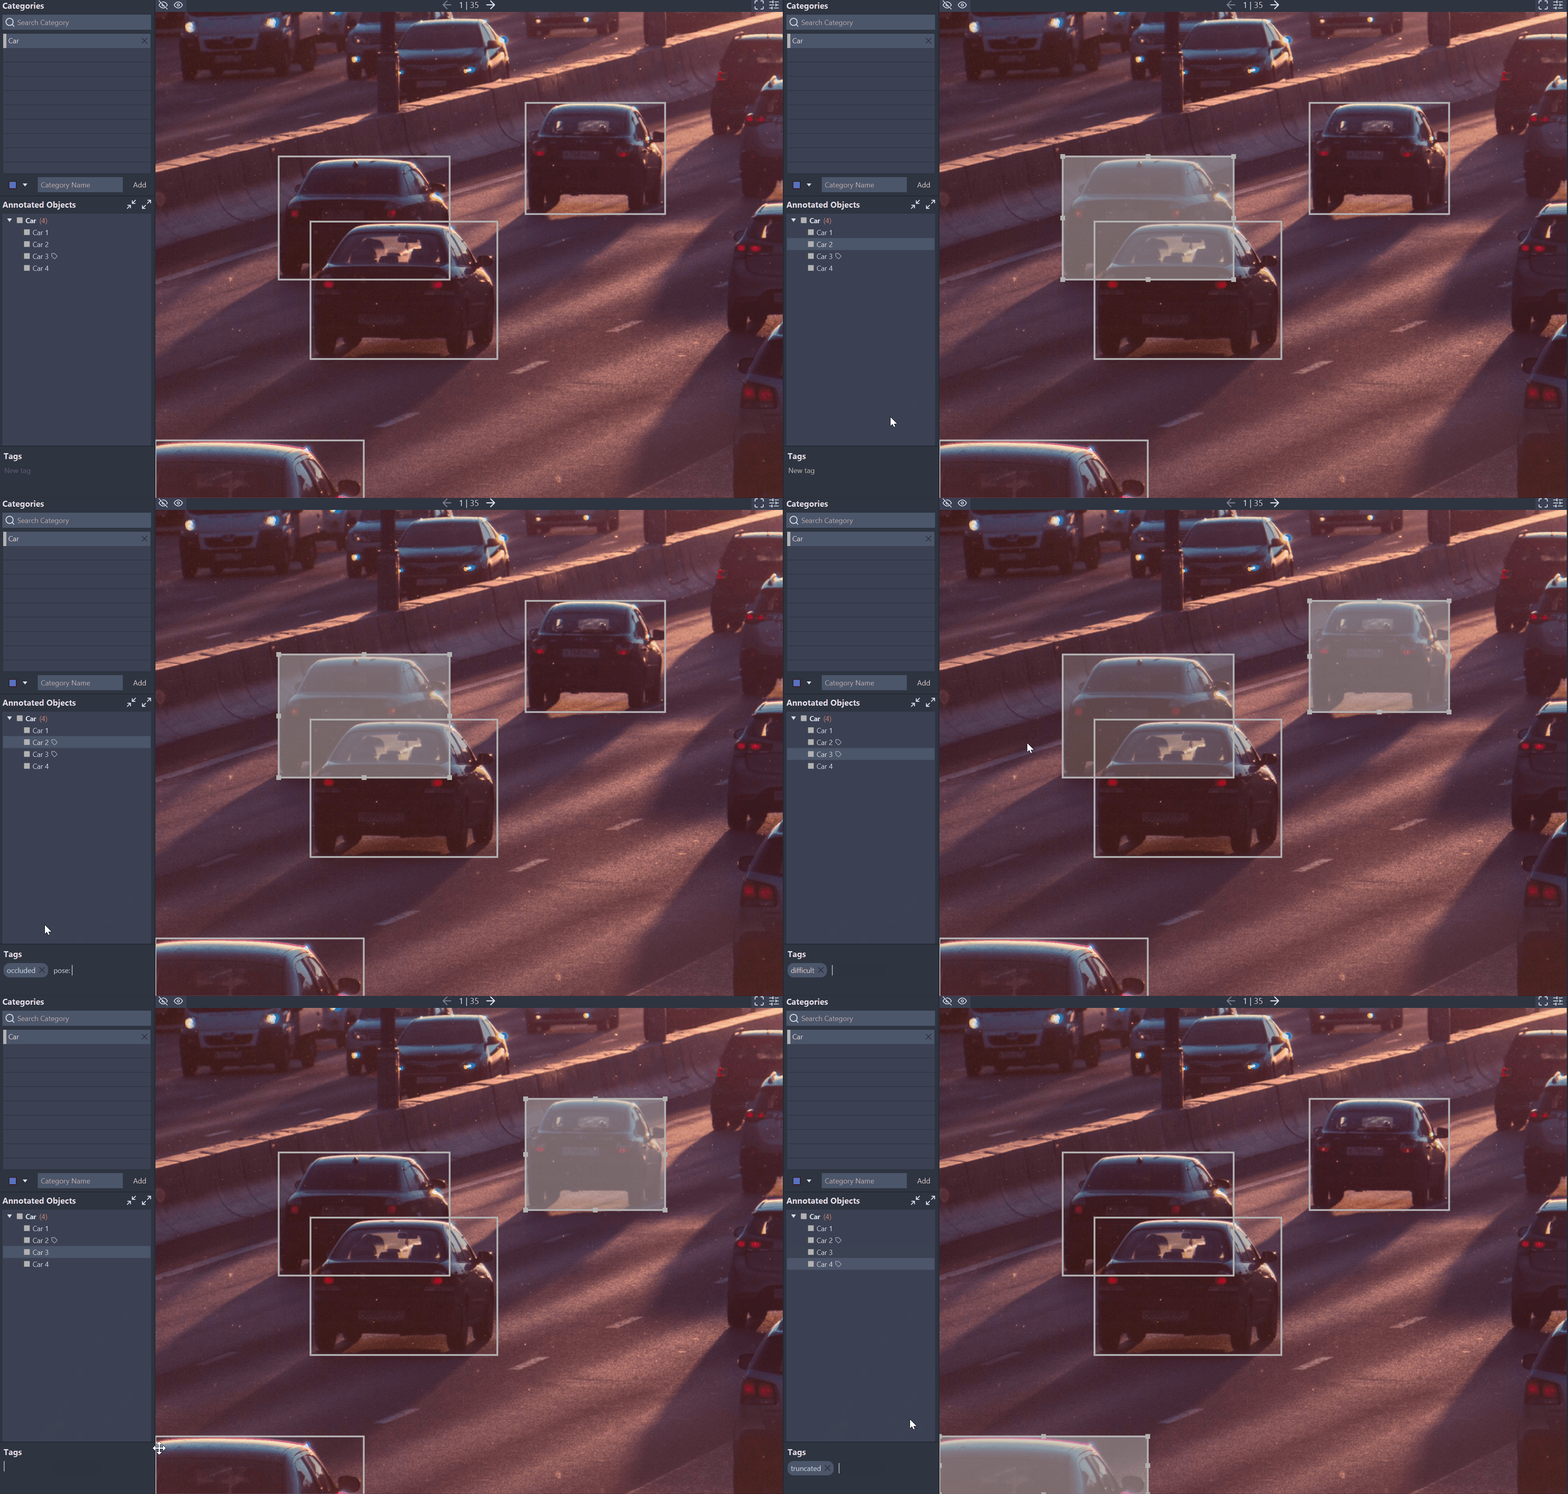
You can tag existing bounding boxes by using the Tags panel. To add a new tag to a bounding box, first select it (see Selected state) then click on New tag in the Tags panel (shortcut Ctrl+T (Cmd+T on Mac) to focus and type the tag-name. Finally press Enter to add the new tag to the tag-list of the selected bounding box. Currently, only the following tag-names will be considered when saving or loading annotations to/from files:
difficultoccludedtruncatedpose: ...action: ...
For bounding boxes with at least one tag, a
small tag icon will be displayed next to their corresponding tree-item in the Annotated objects tree.
Note: Tag-names are case-sensitive and must be unique (Nothing happens if you try to add a tag with an already existing tag-name).
To remove a tag from the tag-list of a bounding box, select the box then click on the x-icon next to the tag you want to delete in the Tags panel.

Adding and removing tags to and from a bounding box
To create a new rectangular bounding box, you first have to select the category it should be assigned to in the Categories panel, and make sure that you are in Rectangle Drawing-Mode (CTRL-1).
![]()
Rectangle Drawing Mode selected
Then draw the bounding box on the image in the main image panel by clicking, dragging and then releasing the primary mouse button. The newly created bounding box will be automatically selected and a corresponding entry in the Annotated objects tree will be created.

Drawing a rectangular bounding box
Note: Annotated images can be recognized in the Images side-panel by a bold-face image title and a highlighted left border.
To be able to resize a bounding box, it has to be selected first, then you can drag the resize handles to change the size. To move a bounding box, click inside it, then drag your mouse.

Moving and resizing a bounding box
There are two methods to create polygonal bounding boxes: You can either successively create the vertices of the polygon by clicking on the image (Polygon Drawing-Mode) or you can use the Freehand Drawing-Mode.
To create a new polygonal bounding box by vertices-selection, you first have to select the category the polygon should be assigned to in the Categories panel, and make sure that you are in Polygon Drawing-Mode (CTRL-2).
![]()
Polygon Drawing Mode selected
Then create a new polygonal bounding box by subsequently clicking on the image with the primary mouse button to create connected vertices. Notice that the first and currently last vertex are highlighted to indicate that a new vertex will be created between them. Once you are finished, right click anywhere on the image to finalize the polygon.
A corresponding entry in the Annotated objects tree will be created automatically.

Drawing a polygonal bounding box
Note: Polygonal bounding boxes cannot be moved as a whole.
To freehand-draw a polygonal box, select the Freehand Drawing-Mode (CTRL-3) then click and hold the primary mouse-button, then drag to draw the polygon outline. When you are done, release the primary mouse-button and the polygon will be created. Note that by default, a topological simplification algorithm is applied to the vertices in order to remove "redundant" vertices according to some distance tolerance. This tolerance can be changed in the settings (Settings > Editor > Simplification tolerance). The automatic simplification can also be turned off (Settings > Editor > Auto-simplify freehand-drawn).
After a polygonal box was created you can still modify its shape and add or delete vertices. You may move existing vertices by clicking and dragging them using the primary mouse button. To add new vertices you must first select a path of vertices by middle-clicking on consecutive vertices of the polygon. Then either SHIFT + Middle-Click inside the polygon or right click on the polygon and then click the Add Vertices entry in the context menu. This will add one new vertex between each pair of selected vertices. To delete selected vertices, either press SHIFT-DELETE or use the Delete Vertices context menu entry. You can simplify a selected polygon (i.e. simplifying its shape by removing vertices) via its context-menu's Simplify entry or by using the shortcut SHIFT-S. The simplification will be performed using the current settings in Settings > Editor > Polygons Section. You can change the tolerance via the Simplification tolerance slider. A lower tolerance leads to less changes of the shape of the polygon (e.g. a tolerance of 0 [lowest setting] means that the simplification will not alter the shape of the polygon but will still remove redundant vertices), a higher tolerance can lead to significant changes in the shape of the polygon.

Modifying a polygonal bounding box
- Home
- Images
- Categories
-
Bounding Boxes
- States
- Hiding and unhiding a bounding box
- Hiding and unhiding a category
- Deleting a bounding box
- Nesting bounding boxes
- Nesting categories
- Changing the category of an existing bounding box
- Adding and removing tags
- Shape specific functions - Rectangular bounding boxes
- Shape specific functions - Polygonal bounding boxes
- Annotations
- Predictions