- Introduction
- Installation
- Updating
- Usage
- Configuration
- Translations
- Tips & Tricks
- Troubleshooting
- Say thank you
This is a Lovelace card for Home Assistant that can be used to create a time schedule for your smart devices. You can create new rules, modify existing rules and temporarily disable rules.
The card works on top of the scheduler custom component. You will need it this as well.
See it in action:

click to show installation instructions
HACS installation:
Note: Ensure you have a www folder created as in config/www or the installation will succeed but fails silently
- Click the Orange + button bottom right and search for Scheduler Card
- Click on "Install" under the new card that just popped up.
- Use the GUI; Configuration -> Lovelace Dashboards -> Resources Tab to add
/hacsfiles/scheduler-card/scheduler-card.js, or add a reference to the card in the resources section ofconfiguration.yaml:
resources:
  - url: /hacsfiles/scheduler-card/scheduler-card.js
    type: module
Note: Ensure to install https://github.com/nielsfaber/scheduler-component and add the integration in order for the scheduler to work properly.
Manual installation
-
Download the latest release of
scheduler-card.jshere and place it intowww/scheduler-card. -
Use the GUI; Configuration -> Lovelace Dashboards -> Resources Tab to add
/local/scheduler-card/scheduler-card.js?v=0, or add a reference to the card in the resources section ofconfiguration.yaml:
resources:
  - url: /local/scheduler-card/scheduler-card.js?v=0
type: module- Add the card in the view where you want it to be shown:
type: custom:scheduler-card
domains:
 ...
entities:
 ...
groups:
...click to show updating instructions
Updating via HACS: HACS should auto-remind you in the HACS tab when an update is available.
Updating manually:
Use git pull for manual installation updates.
Since most browsers will cache the Lovelace card code, you can force a refresh of the browser by editing the entry in the resources: section in ui-lovelace.yaml, by updating the version to ?v=(n+1) (where n the current value).
Click the button 'add item' in the bottom of the card, to start creating a schedule.
The card scans the entities in your HA configuration and suitable candidates should automatically show up in this view.
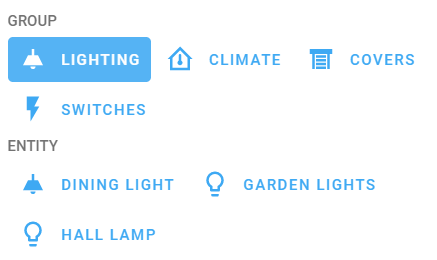
Groups Since HA may contain many entities, the card divides the entities into different groups. Clicking a group automatically will show the entities contained in the group.
The groups that are displayed are depending on your HA configuration. Typically the groups are based on the domain of your entities. If you want to make changes to the groups, you can do this by defining groups configuration.
Entities The entities that you can to control with the scheduler show up here. Clicking a entity automatically will show the actions that you can program for this entity.
Typically an entity is a device in your house, but you can also control an automation, script, input_boolean, etc. You can add all entities that you want to control in the include list.
Actions The actions that you can perform for the selected entity show up here. Typically an action is to either 'turn on' or 'turn off' a device. But some entities have more capabilities. If you are missing an action, you can add it yourself using the customize configuration.
Actions can contain a variable setting (e.g. turn on a lamp at specific brightness, or change the setpoint for a thermostat). These can be defined in the next page.

After clicking the 'next' button, a new view appears. This view is used for choosing when the schedule should be active.
Choose the days of the week for which the schedule should be active.
Every day the default option. The schedule will perform the action every day at the specified time.
Workdays perform action only on Monday thru Friday. If you have the workday integration installed, you can use it to define your own set of workdays. The workday integration and its settings will be automatically detected if it is installed. Note that if you define holidays, they will be excluded from workdays.
Weekend perform action only on Saturday and Sunday. If you have the workday integration installed, the weekend will be considered as the inverse as workdays. This means that holidays and your 'fixed day off' are included in the weekend setting.
Custom choose your own days. A list with all days of the week appears. You can select one or more days by clicking them.
The time at which you want schedule to be activated can be set using the time picker.
The time picker shows the current time setting, and features arrow buttons to increase or decrease the hour and minutes. Note that you can infinitely loop through time. The step size for minutes is 10 minutes by default, but can be configured to your preference.
If you have the AM/PM option enabled, 12-hour format will be used. You can click on the button to switch between AM and PM.
Sunrise / sunset mode
If you have the sun integration in HA, a button with sun/moon icon shows up on the right. This is the mode button, which allows you to switch from a fixed time, to time relative to sunrise or sunset.
The card allows you to choose a time that is 2 hours around sunrise or sunset. The button will be disabled if the current time is not in this range.
In sunrise/sunset mode, the time picker will show the offset relative to sunrise/sunset. The time offset is automatically calculated from fixed time. The sunrise/sunrise button will show a sun icon when offset is relative to sunrise, or a moon icon when offset is relative sunset. The before/after button indicates whether the offset is applied in positive direction (so triggers after sunrise/sunset), or in negative direction (before sunrise/sunset). Also here, buttons can be clicked to toggle.

A time scheme is a more advanced type of schedule, which allows multiple actions during the day through the use of timeslots.
A timeslot defines a time range during which you want an entity to be in a certain state. Every timeslot has a start time and end time, together with an action.
An action defined for a timeslot will normally be executed when the time reaches the starting time of the slot. So in this sense the behaviour is not different compared to a a normal schedule.
But there are differences:
- If you create (or edit) a new time scheme: the schedule will determine which timeslot is active, and trigger this action immediately.
- If you enable a disabled time scheme: the schedule will determine which timeslot is active, and trigger this action immediately.
- If HA is restarted: the schedule will determine which timeslot is active, and trigger this action immediately.
- If the entity (used in the action) is unavailable when the action needs to be triggered: the schedule will wait for this entity to become available (anything other than unavailable), and then trigger the action. Of course only while the timeslot is active.
After a timeslot has triggered the action, the schedule will wait for the next timeslot. So, you can keep controlling your entity as you want without worrying that the schedule will not re-trigger its action again.
The time scheme editor allows you to configure the timeslots of your schedule and visualizes the result.
A time scheme starts at 00:00 and ends at 23:59, so it covers a full day. Depending on the selected days, the schedule continues with the first slot of next day after the last one ended. So usually the first and last slot should have the same action.
Draggable markers The card shows a bar with multiple time markers which you can drag/slide to change the duration of the timeslots. The time step is currently limited to 15 mins intervals.
Selectable timeslots By clicking on a timeslot, it becomes selected and will have highlighted color. When a timeslot is selected, you can assign an action to it.
Divide or merging of timeslots When a timeslot is selected, you can click the '+' or '-' buttons to either divide (split in two) or merge (combine with the next slot)) the selected timeslot.

The options panel gives you access to additional settings that you can set up for schedules.
The options panel is called the way it is, because all settings here are optional. So it is OK to ignore it if you don't miss any of its functions.
The condition editor allows you to define a set of rules which need to pass before the action may be executed. Conditions are currently limited to checking the state of (other) HA entities (so not their attributes). States may be numeric, on/off or string type. Date/time format is not supported.
The editor allows you to make rules in various ways: logic AND, OR, NOT functions, as well as below and above for numeric states. You can combine multiple entities if needed.
All entities having states configured will show up in the editor.
For more information on this, see conditions.
By default, all schedules will have an automatically generated entity ID and friendly name. This means they could be hard to find back in the entity registry.
By defining your own friendly name, this will assigned to the entity, and the entity ID of the entity will be based on this name as well. If you leave the field empty, the automatically generated name shall be used instead.
The behaviour after triggering option does exactly what it says. You can choose what to do after the schedule is triggered:
- Repeat (default option): the schedule will reset the timer for next execution after it is triggered
- Single: the schedule will remove itself after it has been triggered once
- Pause: the schedule will disable itself after it has been triggered once, it can be reset by turning it back on
The configuration of the card is in YAML. Currently there is no UI editor provided (this may change in the future).
Configuration is not necessary, it is only used for customization.
The card includes a standard configuration. It is intended to make setting up the card easy. The standard configuration consists of the following:
- Discovery of devices (entities) of various types in your HA config and making them available for creating schedules
- Defining actions per entity based on their capabilities
- Icons for groups, entities and actions
standard_configuration:false to disable it completely.
| Name | Type | Default | Description |
|---|---|---|---|
type |
string | Required | custom:scheduler-card |
standard_configuration |
boolean | true | Use the standard configuration as a base configuration. |
discover_existing |
boolean | true | Show previously created schedules in the card, also if the related entities are not included in the configuration. Set to false if you have multiple scheduler-cards.See schedule discovery for more info. |
include |
list | none | List of filters to determine which HA entities are available for creating schedules. See include for more info. |
exclude |
list | none | List of filters to determine which HA entities are not available for creating schedules. See exclude for more info. |
groups |
list | none | Organize the entities menu. See groups for more info. |
customize |
dictionary | none | Customize the available actions or visualization of entities. See customize for more info. |
title |
boolean/string | true | Provide a text to replace the title of the card. Set to false to hide the title. |
time_step |
number | 10 | Set the time step (in minutes) for the time picker |
show_header_toggle |
boolean | false | Show a switch at the top of the card that can be used to enable/disable the complete list. |
show_add_button |
boolean | true | Show button for creating new schedules. |
display_options |
dictionary | none | Configure which properties are displayed in the overview. See display options for more info. |
tags |
string/list | none | Filter schedules on one or more tags. See tags for more info. |
The card includes a standard configuration. It is intended to make setting up the card easy. The standard configuration has actions defined for most types of entities in Home assistant.
When including an entity, the standard configuration will automatically detect which actions are supported by it, and will make these available.
Also it has icons for most entity types and actions.
If you would rather set up your own configuration of entities and actions, you can provide standard_configuration:false to disable it.
The include configuration allows you to pick entities from your HA config that you can use for creating schedules.
You can either provide the full entity_id of the entities, or only the domain.
The list supports wildcards (*) as well. It is recommended to use quotes ("") around your input, else it may be wrongly interpreted.
Example:
include:
  - climate.my_thermostat # include an individual entity
  - light # include all light entities
  - "*garden*" # include all entities containing the word 'garden'
...The exclude configuration allows you to remove entities from your HA config from appearing in the scheduler.
The exclude list works on top of the include list, so it behaves like 'ADD (includes) EXCEPT (excludes)'.
Like with include, you can either provide the full entity_id of the entities, or the domain, or use wildcards.
include:
  - light # include all light entities
exclude:
- light.my_light_that_i_never_use # excludeThe groups configuration provides the capability of organizing the entities.
To be clear, they have nothing to do with the group integration in Home Assistant.
By default, entities will be grouped based on their type (domain). Entities that are assigned to your own defined group will not be grouped by type.
| Name | Type | Default | Description |
|---|---|---|---|
| name | string | (same as group_id) | Displayed name for group |
| icon | string | none | Displayed icon for group |
| include | list | none | List of filters to determine which of the entities belong in this group. This has the same functionality as the include filter for defining the entities in the card. |
| exclude | list | none | List of filters to determine which of the entities do not belong in this group. This has the same functionality as the exclude filter for defining the entities in the card. |
Example:
Place all light entities in group labelled "lighting"
groups:
  - name: "Lighting"
    icon: "hass:ceiling-light"
    include:
      - light
Result:
The card checks for the created schedules in your HA config and show them in the overview page.
The schedule discovery is a feature that will ensure that all your schedules will be there.
What is the benefit of this feature?
It could occur that you make changes in the configuration, resulting in previously created schedules to become hidden.
For example, you made a schedule for controlling a fan.
The day after you decide to remove the fan domain from the card. But you forgot to delete the previously created schedule.
Without the discovery, you now have a schedule that is hidden from the card, but will keep running. You cannot remove or change it anymore (unless via the HA configuration panel).
Discovery makes sure that you will always find it back in the card.
The feature can be turned on/off through the discover_existing option.
For your protection, it is enabled by default.
discover_existing:false if you want to use multiple cards. Else you will see each created schedule in every card.
With the customize configuration you can specify configuration for specific HA entities.
configuration in combination with the standard configuration. The configurations will be merged.
| Name | Type | Default | Description |
|---|---|---|---|
| entity | key | Required | Entity id (or filter). Filter works the same as include so you can also use it for multiple entities. |
| actions | list | none | See actions |
| name | string | (take from HA config) | Displayed name for entity |
| icon | string | (take from HA config) | Displayed icon for entity |
| states | list or map | none | Possible states of this entities, for using it in a condition. See conditions for more info. |
| exclude_actions | list | none | Hide actions from the card. Enter a list with names of actions to hide as they displayed in the card (including translation). E.g. 'turn on at 40%' would hide the created action from the example below. |
An action defines what needs to be done when a schedule timer expires.
An action is similar to a service call in HA. It requires a service with optionally additional parameters given by service_data.
Actions are linked to their entities, so the entity ID is sent together with the service call, it is not needed to add it to the service_data).
| Name | Type | Default | Description |
|---|---|---|---|
| service | string | Required | Service to be executed |
| service_data | map | none | Additional parameters to use for the service call |
| variables | map | none | Add variables. See action variable |
| name | string | (same as service) | Displayed name for action |
| icon | string | "flash" | Displayed icon for action |
Example:
Adding an action to turn on a light with 40% brightness
customize:
  light.my_lamp:
    name: "Dining light"
    icon: "hass:ceiling-light"
    actions:
      - service: turn_on
        service_data:
          brightness: 100 # note that brightness is from 0-255 so 100 = 40%
        name: "Turn on at 40%"
        icon: "hass:lightbulb-on-outline"
Result:

Customizing actions from standard configuration
How actions in customize are processed:
- If the action matches with a previously defined action, your action will replace the default action.
- If the action does not match with an existing action, the card will create a new action.
Actions are compared based on matching service and service_data (note that variables are not considered).
This means that you are expected to (re-)define name, icon, and variable configuration.
Some devices allow to operate on a variable working point. For example lights can be dimmed with a brightness, fans can spin at a speed etc.
By providing an action variable, the card allows you to choose the setting you want to apply with the action.
| Name | Type | Default | Description |
|---|---|---|---|
| field | map | Required | field name in the service_data that is represented by this variable |
| name | string | same as field | Name under which the variable is visible in the card |
| unit | string | " " | Displayed unit |
| min | number | Required | Minimum value that can be set. If not provided, it will be read from the entity attributes. |
| max | number | Required | Maximum value that can be set. If not provided, it will be read from the entity attributes. |
| step | number | Optional | Step size |
| scale_factor | number | Optional | Scale factor to apply when calling service. E.g. scale_factor for brightness of a light is set to 2.55, since it is defined in HA in range 0-255, while the card displays 0-100. |
| optional | boolean | false | Setting the variable is optional, the action can also be executed without this variable. If optional:true is provided, a checkbox will be shown that needs to be selected to apply the variable |
Example
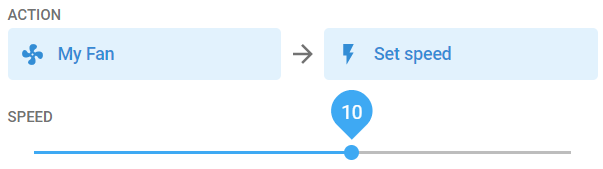
The Xiaomi Air Purifier can be controlled using the Xiaomi Miio integration. To be able to set the speed of this device in your action, you can use:
customize:
  fan.xiaomi_purifier:
    actions:
      - service: xiaomi_miio.fan_set_favorite_level
        name: "set speed"
        variables:
          level:
            name: "Speed"
            min: 1
            max: 16
You can now select the speed for this action in the schedule editor:
With some actions, you can provide an option from a limited list of options.
For example, setting the value of an input_select, but also the operation mode of a thermostat.
By providing the list variable, the card allows you to choose the option when you set up the action.
| Name | Type | Default | Description |
|---|---|---|---|
| field | map | Required | field name in the service_data that is represented by this variable |
| name | string | same as field | Name under which the variable is visible in the card |
| options | list | Required | List of options to choose from |
| value | string | Required | Option value (which is passed with together with the field as service_data) |
| name | string | same as value | Name to show for the option |
| icon | string | none | Icon to show with the option |
Example
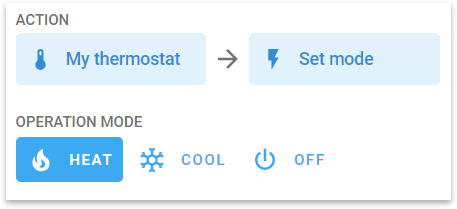
Setting the operation mode of a thermostat.
Note that this configuration will already be set up when using standard configuration.
customize:
  climate.my_thermostat:
    name: My thermostat
    icon: thermometer
    actions:
      - service: set_hvac_mode
        name: Set mode
        icon: "hass:settings"
        variables:
          hvac_mode:
            name: Operation mode
            options:
              - value: heat
                icon: "hass:fire"
              - value: cool
                icon: "hass:snowflake"
              - value: "off"
                icon: "hass:power"
Now the list of options become visible when you set up the action:
If you want to use a specific entity as a condition in a schedule, this can be configured by defining it in customize as well.
To do so, you will need to tell the card which states the entity can have, which is done using the states parameter.
There are two options for this:
- Define a list of possible states
- Define a numeric range for the state
If an entity has its states defined, it will automatically show up when creating a condition.
Example of defining a state list:
customize:
  input_boolean.my_condition_entity:
    states: ['on','off']
Example of defining a numeric range:
customize:
  sensor.my_other_condition_entity:
states: {min: 0, max: 100, step: 1, unit: '%'}From v1.9.0, it is possible to configure what is displayed in the overview list. By default, the card will display the entity + action on the first line, and on the second line the remaining time until the schedule will be triggered. For timeslots, there will be a display of the extra actions.
Supported options for display_options:
| Name | Type | Default | Description |
|---|---|---|---|
primary_info |
string or list | - "{entity}: {action}"- additional-tasks |
Displayed text on the first line. Choose from the properties below. |
secondary_info |
string or list | relative-time |
Displayed text on the second line Choose from the properties below. |
icon |
string | "action" | Choose which icon is displayed (action or entity) |
For creating multiple lines, enter a list of multiple properties. Empty items will be automatically skipped.
For combining multiple properties in a single line, use wildcards (with property in brackets). Make sure to wrap your text in quotes.
<b>{entity}</b> will print the name in bold text.
The following properties are available:
| Name | Description |
|---|---|
name |
Friendly name of the schedule (as configured in the 'options' panel) Only if a custom name is defined (the generated ID will not be displayed). |
entity |
Friendly name of the entity which is involved in the action. |
action |
Description of the action that will be executed when the timer is expired.1 |
relative-time |
Duration until the schedule is triggered (if the schedule is enabled).1 |
time |
Configured time for the schedule.1 |
days |
Configured days for the schedule. |
additional-tasks |
The amount of remaining tasks/actions (other than the displayed one). Only for time schemes, otherwise this property is skipped. |
tags |
Show tags assigned to schedule. See tags. |
1 For time schemes, the displayed value corresponds to the closest timeslot.
Example (this is actually the default format):
display_options:
  primary_info:
    - "{entity}: {action}"
    - additional-tasks
  secondary_info: relative-time
icon: "hass:action"If you want to use multiple scheduler-cards in your Lovelace dashboard, it can be difficult to separate the schedules which show up in each card (with include you can only control which entities are controlled by which cards).
With tags you can filter out schedules and assign them to their own cards.
To start using tags, edit the card configuration and assign tags to the scheduler card.
Example:
type: custom:scheduler-card
#...rest of card configuration
tags: holiday
The effect of assigning tags:
- Only schedules with a matching tag will show up (unless
discover_existingis set to true. - All schedules created with this card will be automatically assigned with this tag.
- You can modify tags of a schedule by clicking 'Options' when editing/creating a schedule.
Notes:
- You can also assign multiple tags to the card. In this case they will not be automatically applied to newly created (you should choose this via 'options').
- You can also assign multiple tags to a schedule. This allows you to make them appear in multiple cards (each with card having its own tag).
- You can assign
tags: noneto a card if you want to have only schedules without a tag showing up here. - The option to assign tags on schedules is only available on cards which have the
tagsoption set.
discover_existing: true to make also schedules accessible which don't have the correct tag (yet).
You can also make the tags for schedules show up in the overview through display_options.
Example usage:
Consider the following situation:
- Card A should contain all normal (everyday) schedules.
- Card B should contain only holiday schedules.
- The normal schedules contain tasks to turn on the garden lights at 19:00 and turn them off again at 23:00.
- The holiday schedules contain tasks to turn on the dining lights at 17:00 and turn them off again at 22:00.
Since both cards have the light domain included, the created schedules would normally show up in both cards, which is not desirable.
Now by assigning tags to the card configurations, you can filter them.
Config for card A:
type: custom:scheduler-card
title: Normal schedule
#...rest of card configuration
tags: none
Config for card B:
type: custom:scheduler-card
title: Holiday schedule
#...rest of card configuration
tags: holiday
Result:

The card is available in multiple languages. The card will automatically detect the appropriate translation based on the language setting for your user account in HA.
Currently the following languages are supported:
| Language | Code(s) | Status / Remarks |
|---|---|---|
| Čeština | cs | |
| Deutsch | de | |
| English | en | Default language. |
| Eesti | et | |
| Español | es, es_419 | |
| Français | fr | |
| עִברִית | he | |
| Italiano | it | |
| Magyar | hu | |
| Polski | pl | |
| Português | pt, pt-br | |
| Русский | ru | |
| Română | ro | |
| Slovenčina | sk | |
| Nederlands | nl | |
| Norsk | no, nb, nn | |
| 简体中文 | zh-Hans |
The translations are maintained by users. If you are missing a translation, or a translation needs to be improved, please contribute. Take the english file as a starting point.
The scheduler-card can only be used to create schedules to trigger a single action at a certain point in time.
Recently, support has been added to trigger an action on a group and for targeting multiple entities for the action (but they have to be of the same type).
If you want to trigger a sequence of actions (e.g. "set fan mode + temperature setpoint for my airconditioner"), the recommended way to do so, is by creating a script. Scripts can be combined with variables to pass some settings which can be configured through the card.
Example
Setting fan mode + heating/cooling to a certain temperature.
scheduler-card configuration:
(note that customize is only available in YAML editing mode):
customize:
  script.set_climate_livingroom:
    actions:
      - service: script.set_climate_livingroom
        name: Set climate
        icon: mdi:air-conditioner
        variables:
          hvac_mode:
            name: HVAC mode
            options:
              - value: heat
                icon: mdi:fire
              - value: cool
                icon: mdi:snowflake
              - value: 'off'
                icon: mdi:power
          temperature:
            name: Temperature
            min: 12
            max: 30
          fan_mode:
            name: Fan mode
            options:
              - value: auto
                icon: mdi:fan-auto
              - value: high
                icon: mdi:fan-speed-3
              - value: quiet
                icon: mdi:fan-speed-1
In scripts.yaml:
set_climate_livingroom:
  alias: Set climate livingroom
  description: "Sets climate parameters for scheduler-card"
  variables:
    target_entity: climate.my_airconditioner
  sequence:
    - service: climate.set_temperature
      data:
        temperature: "{{ temperature }}" # match with variable in the card config
      target:
        entity_id: "{{ target_entity }}"
    - delay: # wait a bit, otherwise the next service call may fail
        seconds: 1
    - service: climate.set_fan_mode
      target:
        entity_id: "{{ target_entity }}"
      data:
        fan_mode: "{{ fan_mode }}" # match with variable in the card config
    - delay: # wait a bit, otherwise the next service call may fail
        seconds: 1
    - service: climate.set_hvac_mode
      target:
        entity_id: "{{ target_entity }}"
      data:
        hvac_mode: "{{ hvac_mode }}" # match with variable in the card config
  mode: single
  icon: mdi:air-conditioner
If you have an issue with this card, please report it here.
If you want to make donation as appreciation of my work, you can buy me a coffee. Thank you!
