Architects Guide
Disclaimer: The Symmetry Wand moved to another mod called 'Create'. Theme creation in 1.14.3 has not been thoroughly tested.
- Videos
- Layer Markers
- All Design Types
- Walls
- Facades
- Corners
- Towers
- Gable Roofs
- Flat Roofs
- Conical and Flat Tower Roofs
More Tips for the Mighty Designer
Bring up the Architect's Menu like you do when creating a new build, the default keybind is [G].
Under [M]anage Themes, you can now enter the Theme Editor for any of your custom Themes.
Create a new Theme, give it a name and you'll be able to choose which types and layers you would like to support with your set of designs. If you aren't sure whether you will add components later on, you can always come back to this menu in the edit perspective.
<!> Note: As of TMA 0.2.0, you can create and manage created Themes in Singleplayer only.

If you have used the Architect's Magic before, you saw that you could choose between different styles when editing a room in the composer. In the Medieval theme, there are separate Designs for "Foundation", "Regular" and the "Open Arcs" Layer. You can decide for yourself which of the styles you'd like to divide your designs into.
Any wall, corner, facade or tower you design can only belong to one style unless you scan it twice.
- If present, the Foundation style gets assigned to the lowest room in a stack to begin with.
- Otherwise, the Regular style is used.
- The Open Arcs style is meant for rooms, that do not have solid walls. (Archways, Roofed Terraces, ...)
Therefore rooms and cylinders in the Open Arcs style will not clear out walls cutting into them, in order to avoid unwanted holes in a building. Furthermore, they do not create a ceiling. - The Special style is made available for any custom uses of this design grouping. Designs of other styles will not mix with these. Check out the Modern theme for its use of this
- Roof designs get their own Style group. In the exporter tool they will be listed under Roofing.
Next to the classic rectangular rooms there are cylindrical towers, requiring their own sets of designs for every style including roofing. You do not have to provide towers, but they add amazing possibilities for users to enhance their builds.
I suggest you allow at least one type of roof for a shape, otherwise the top floor will be just an open room. The major technical difference between gable roofs, flat roofs and the cylindrical types will be explained in the section on Design types below.
In the editing perspective you just now entered, hit [G] again to show your options, there will be a few.
Every Theme comes with a default palette, specifying the 16 different materials used for the designs. For yours, feel free to use the existing default palettes to record your builds. You can however create your own palette for your theme by making one in the palette editor.
As of now, in order to create a new palette, you have to exit the editor and make a quick build with any existing theme to get to the palette picker, but don't worry - your theme saves and will wait patiently for your return.
<!> Important Notes:
- When building your walls, roofs, towers, etc.. do NOT use any other blocks than those in your default palette. When your theme is saved, it is not saved with actual blocks, but with the 16 entries a material palette can have. That's how users will be able to substitute blocks with their palette while still using your theme.
To make things easier for you: Use the [G] + [1 to 4] keybinds to put the available Blocks into your hotbar. - When choosing the Default Palette for your theme, make sure none of the entries have the same block assigned to them. While it is totally feasible for a palette to have that, it will cause ambiguity when scanning the designs. Even most of the included palettes have duplicates, the default Medieval and Modern palettes are safe, though.
Hitting [G] + [1] in the Edit Perspective will grant you a handy selection of gadgets for creating designs for your theme.
- The Design Anchor marks the first position of a design, right-clicking it with the Design Exporter will initiate an export
- The Design Layer Marker denotes the second position, together with the anchor it creates the space that fully encloses the design to export. In addition, this marker block gets stacked up for as high as the design reaches. Within this stack of marker blocks, special traits can be assigned to the design's layers to make it suitable for more than just one vertical size. -> Try placing an Anchor and a Layer Marker to create a virtual rectangle with their little indicators.

The white rectangle will not appear in the game. It merely marks where the design will be read from. You usually place these blocks after you have created a design.
Click on this image to see a short video on the exporter:
Click on this image to see a quick scan for each Type:
Some more notes on exporting Designs:
- Make sure every block you want as part of the saved structure is within the boundaries (white outline). Trapdoors especially like to be missed just outside of it. After you started the selection hologram you can still move the anchors again to fix the boundaries.
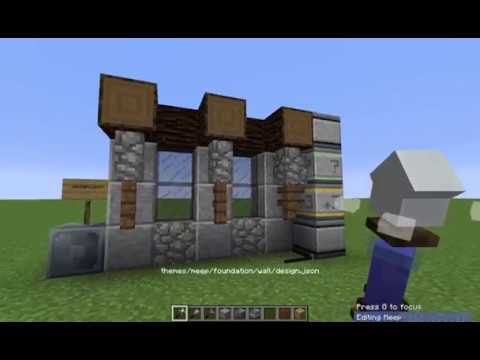
- After exporting a design, a sign will appear on top of the anchor. This is both for you and the architect to keep track of its file index. If you notice the design acting weirdly, just re-scan it with the same sign on top and it will be overwritten. Or just delete it from
./themes/<themeName>/<style>/<type>/design_<index>.json.

Configuring special traits to horizontal slices of your designs can become very powerful for the types that have to fit a certain height (Walls, Facades, Corners and Towers).
As you see in the Image, setting the markers to Optional and Clone layers results in a design that becomes more flexible.
- Configure the Layer traits by right-clicking the side of the respective Layer Marker Block.
- The more flexibility you give to one design, the less designs you will need overall. Instead you can focus on introducing more variety and therefore making your theme interesting.
These are the currently available Layer Traits:
- Standard [ ]: This Layer will always appear.
- Clone Once [+1]: This Layer appears twice if a taller design than the original is searched for.
- Clone Thrice [+3]: This Layer appears up to four times in case a taller size is searched for.
- Optional [?]: This Layer will be left out if a smaller height is searched for.
You might have noticed the special blue Layer Traits, these define vertical positioning aspects, and can only be used at the top or bottom of the layers respectively:
- Merge Above [^]: This layer does not add to the actual height of the design and will be merged/overwritten by the next design on top of it. This is especially useful for decoration that exceeds the height of a wall or tower, as seen in the example above.
- Merge Below [v]: This layer does not add to the actual height of the design and will merge/overwrite whatever layer was below it. Useful for roofs that want to merge into the floor below them a little bit. Also useful for walls that require some kind of support structure in the floor below.
Due to the different nature of design types, the positioning for your design inside the selection varies a little depending on it. Before exporting a design, always make sure the correct style and type is selected in the Design Exporter. Open it's GUI by right-clicking anywhere.

Walls are pretty straight-forward, they cover one face of a room they can fit on. By making certain layers of it repeatable or optional, you can achieve a higher coverage for each wall. On top of that, walls can have a horizontal repetition defined in the Design Exporter:

The repetition goes on indefinitely, that means that this 3m wide Wall will, with Merged Repetition, span 3, 5, 7, 9 meters and so on.
A facade is basically a Wall without horizontal repetition, but with a priority:
For the two shorter faces of a room - the facades - the Architect will first look through all available facades for a design that fits, before it starts going through all the remaining Walls.
Facades are completely optional, but come in handy if you want your house fronts to look different from the walls on the side.

4 Corners surround a room, connecting the walls. A corner design has one solid column at the back-west and anything else expanding out from there. The blue hologram again marks the solid part just like it did with the walls.

Towers are designs that completely surround a cylindrical room with a certain Radius. That means, any tower design can only be chosen for one horizontal size in the composer (Vertical flexibility is allowed). For the cylinder tool, users will only be able to draw towers with a radius between your smallest and largest tower design exported in the theme. The radius of a towers' walls is not directly related to its overall scanned area, as decorations might come off of it.
Therefore, for any tower to export, you choose the correct wall Radius in the Design Exporter Gui. Once again, the blue squares will mark the effective size of this tower, used by the Architect to find a fitting design.
- Important Note for Towers: As opposed to the interior of a rectangular room, the Architect cannot determine what all belongs to the inside area of these designs. If you want your tower to be cleared on the inside (no other walls overwriting it), you can use the Clearing Material (Red Stained Glass Blocks). Especially helpful here is the Filler Wand, as it fills up surrounded areas with exactly that material. Simply right-click inside the finished cylinder to fill it up.
- Also extremely useful for tower designs is the Staff of Symmetry in Octagonal Mode. Try it out, it will save you a great amount of time designing all these different towers and tower roofs.

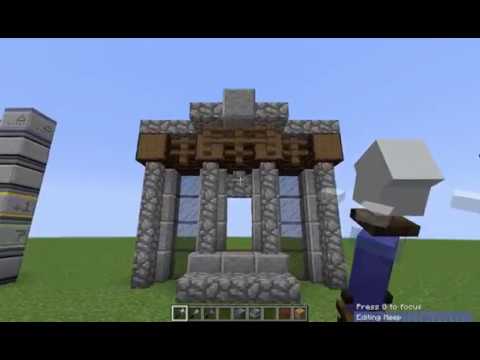
Gable roof designs contain the front facade and 2m of roof behind it. Once scanned the Architect will align the roof facade with the facades (shorter faces of the room) below and repeat the blocks in the hindmost positions for half of the length of the room. The same happens on the opposite side of the room, therefore forming a complete gable roof with facades on either end. In order to ensure the facades lining up, make sure to put it exactly 2m south of where the design starts. You can add as much of an overhang as you wish, but the positioning of the solid wall at the front has to be exact.
- Make sure the front wall of the design is just inside of the blue area, marking the room size below. As mentioned, that is 2m south of the anchor. (See Image above)
- Just like the tower radius, you want to choose the correct width assigned to this roof, as it is not related to the overall width of the design. The parameter Roof Span in the Design Exporter should be exactly the width that this roof should sit on.
- And again, the interior behind the facade and under the roof is to be filled with Clearing Blocks: intersecting roofs will look a lot cleaner and not actually cut into each other on the inside. You can make use of the Filler Wand once again.

Flat roofs, as opposed to gables, can span any room above their size. They are flexible not only in one axis, but in both z and x. They therefore serve as a powerful fallback for covering every space users could imagine needing. Select it just like gables under Roofing and build one corner of it, which will be mirrored to every corner and dragged over the remaining space.
- The corner facing the room should be in the back-east (Corner designs were aligned back-west). You can see it in the Image aswell.
- The parameter for Flat Roofs in the Design Exporter denotes the Margin or the Overhang of the roof design. Basically how far out the roof reaches beyond the actual walls below. Mind the blue squares again.

Between Flat Tower Roofs and the Conical Tower Roofs exists absolutely no technical difference. The only reason they are apart is for the user and you to make a choice between them. Sometimes a flat roof fits better - say for an intermediate roof on top of a Tower in the Open Arcs style.
- Similarly to the Towers, you specify the effective radius of the Tower this roof will be sitting on in the Design Exporter Gui. Make sure the roof is inside the selection and the blue squares represent the correct radius.
- If the Conical Roof becomes large enough to fit a room inside it, don't forget to fill it with Clearing Blocks. (Red Stained Glass)
If you feel confident about your theme, have run various tests, checked that the Validator is happy, then it is time! Themes were obviously not made to be used for yourself alone, you can share your theme with others in many ways.
All the files relevant can be found in your instance Directory under /themes.
- Simply archiving your Theme Folder as .zip or in other formats will allow you to share an editable source of your theme, your mates can unzip it and make it even better!
- In the Architect's Menu you will find the option to Export your theme. This will turn it into a single file others can drop into their themes folder in order to compose builds with your themes, but not edit the theme. The JSON format allows you to share the entire theme in plain-text on platforms such as gist, pastebin, and more!
- The Compressed Theme File is preferred if you need something compact. It will however be saved as a binary and not in text form.
- You might've already spotted all the other options on the Architect's Menu, namely the Theme Validator bound to [V]. This tool looks through all of your created designs and notifies you of any sizes you have missed, resulting in either a plain fallback design or even a completely missing part of the building!
- Having run the Validator you might have noticed that you even have to create designs for heights like 1m. 1 meter high? What kind of room is that? Well.. Be creative, for instance: Create designs with small heights as little trim layers for a building. The users now have even more details to play with. Open Arcs Style Designs with height one could be railings for a balcony, perhaps. And thin foundation layers aren't actually that uncommon!
- Use the Staff of Symmetry, it saves you time once you figure it out.
- Inside the topmost layer of a tower, you can use the Flooring Blocks to create a similar floor to those that are hard-coded into the Rectangular interior. And don't forget the Clearing Blocks! =)
- Try to use the Creative Menu as little as possible, when creating designs. The [G] + [1 to 4] has you fully covered with everything you'll ever need, and makes sure that no unwanted blocks sneak into your scanner.
- Beware of Double Slabs! While rotation and vertical alignment is stored in the designs for anything in your palette that uses it (Slabs, Stairs, Trapdoors), a double slab will be marked as unknown. When building roofs make sure to always use full blocks of your palette and slabs only when they truly are slabs.