Build a To-Do List Native App, created for a DataStax workshop, using React Native, JavaScript, Node.js, and DataStax AstraDB.
Part 1: Create the Database
20 minutes, Beginner, Start Building
This is an example React Native To-Do application using a DataStax AstraDB free tier database.
Mobile App on Android:

Mobile App on iOS:

Web Application in Chrome:

- Create a "from scratch" **React Native ** app using Expo
- Learn about React Native components and how they are used to dynamically update the DOM with new information
- Learn how state and props changes are used
- Learn how to use Swagger to interact with the database using a REST API
- Leverage Netlify and DataStax AstraDB
- Learn how to convert a React web app to a React Native mobile and web app
- Can I run the workshop on my computer?
There is nothing preventing you from running the workshop on your own machine. If you do so, you will need
- git installed on your local system
- node 15 and npm 7 or later
- Expo CLI, Watchman, Xcode, Android Studio, and an iPhone or Android
You will have to adapt commands and paths based on your environment and install the dependencies by yourself. We won't provide support to keep on track with schedule. However, we will do our best to give you the info you need to be successful.
- What other prerequisites are there?
- You will need a GitHub account and an Expo account
- You will also need an Astra DB account, but we'll work through that in the exercises
- Use Chrome or Firefox for the best experience. Other browsers are great, but don't work well with the GitPod integration we use a bit later.
- Do I need to pay for anything for this workshop?
- No. All tools and services we provide here are FREE.
- Will I get a certificate if I attend this workshop?
Attending the session is not enough. You need to complete the homework detailed below and you will get a nice badge.
NEED TO UPDATE THE BELOW LINKS
It doesn't matter if you join our workshop live or you prefer to do at your own pace, we have you covered. In this repository, you'll find everything you need for this workshop:
- Login or Register to AstraDB and create database
- Create a security token
- Create a table with REST API using Swagger
- Insert data in the Table with the REST API using Swagger
- Retrieving values
- Launch GitPod IDE
- Check Node & NPM versions in GitPod
- Register for an Expo Account
- Install Expo mobile application on your phone
- Launch the To-Do app
- View Finished Products
Part 1: Create the Database
ASTRADB is the simplest way to run Cassandra with zero operations at all - just push the button and get your cluster. No credit card required, $25.00 USD credit every month, roughly 5M writes, 30M reads, 40GB storage monthly - sufficient to run small production workloads.
✅ Step 1a: Click the button to login or register with Datastax. You can use your Github, Google accounts or register with an email.
Make sure to chose a password with minimum 8 characters, containing upper and lowercase letters, at least one number and special character

-
Show me!

Use the following values when creating the database
| Field | Value |
|---|---|
| database name | todos_workshop_db |
| keypace | todos |
| Cloud Provider | Use the one you like, click a cloud provider logo, pick an Area in the list and finally pick a region. |
You can technically use whatever you want and update the code to reflect the keyspace. This is really to get you on a happy path for the first run.
You will see your new database pending in the Dashboard.

The status will change to Active when the database is ready, this will only take 2-3 minutes. You will also receive an email when it is ready.
✅ Step 2a: Create a token for your app to use in the settings screen. Use "Database Administrator" permission.
✅ Step 2b: Copy the token value (eg AstraCS:KDfdKeNREyWQvDpDrBqwBsUB:ec80667c....) in your clipboard and save the CSV, this value would not be provided afterward.
👁️ Expected output
-
Show me!


✅ Step 3a: Open Swagger by
- Click on your active database
- Click
ConnectTAB - Click
REST API - Click link to your Swagger endpoint.
As shown on the picture below.

✅ Step 3b: Navigate to the create a table section
- Once Swagger is launched, scroll down and navigate to the schemas section

- Then, within the schemas section, navigate to Create a table and click on it to open the section.
- Take particular note of the REST URI /api/rest/v2/schemas/keyspaces/{keyspaceName}/tables.
- Also, take note that this is using a POST command.

- Click the "Try it out" button

✅ Step 3c: Create table restfromreadme_by_id
- Enter your Astra token (X-Cassandra-Token)
- Enter the keyspaceName
todos
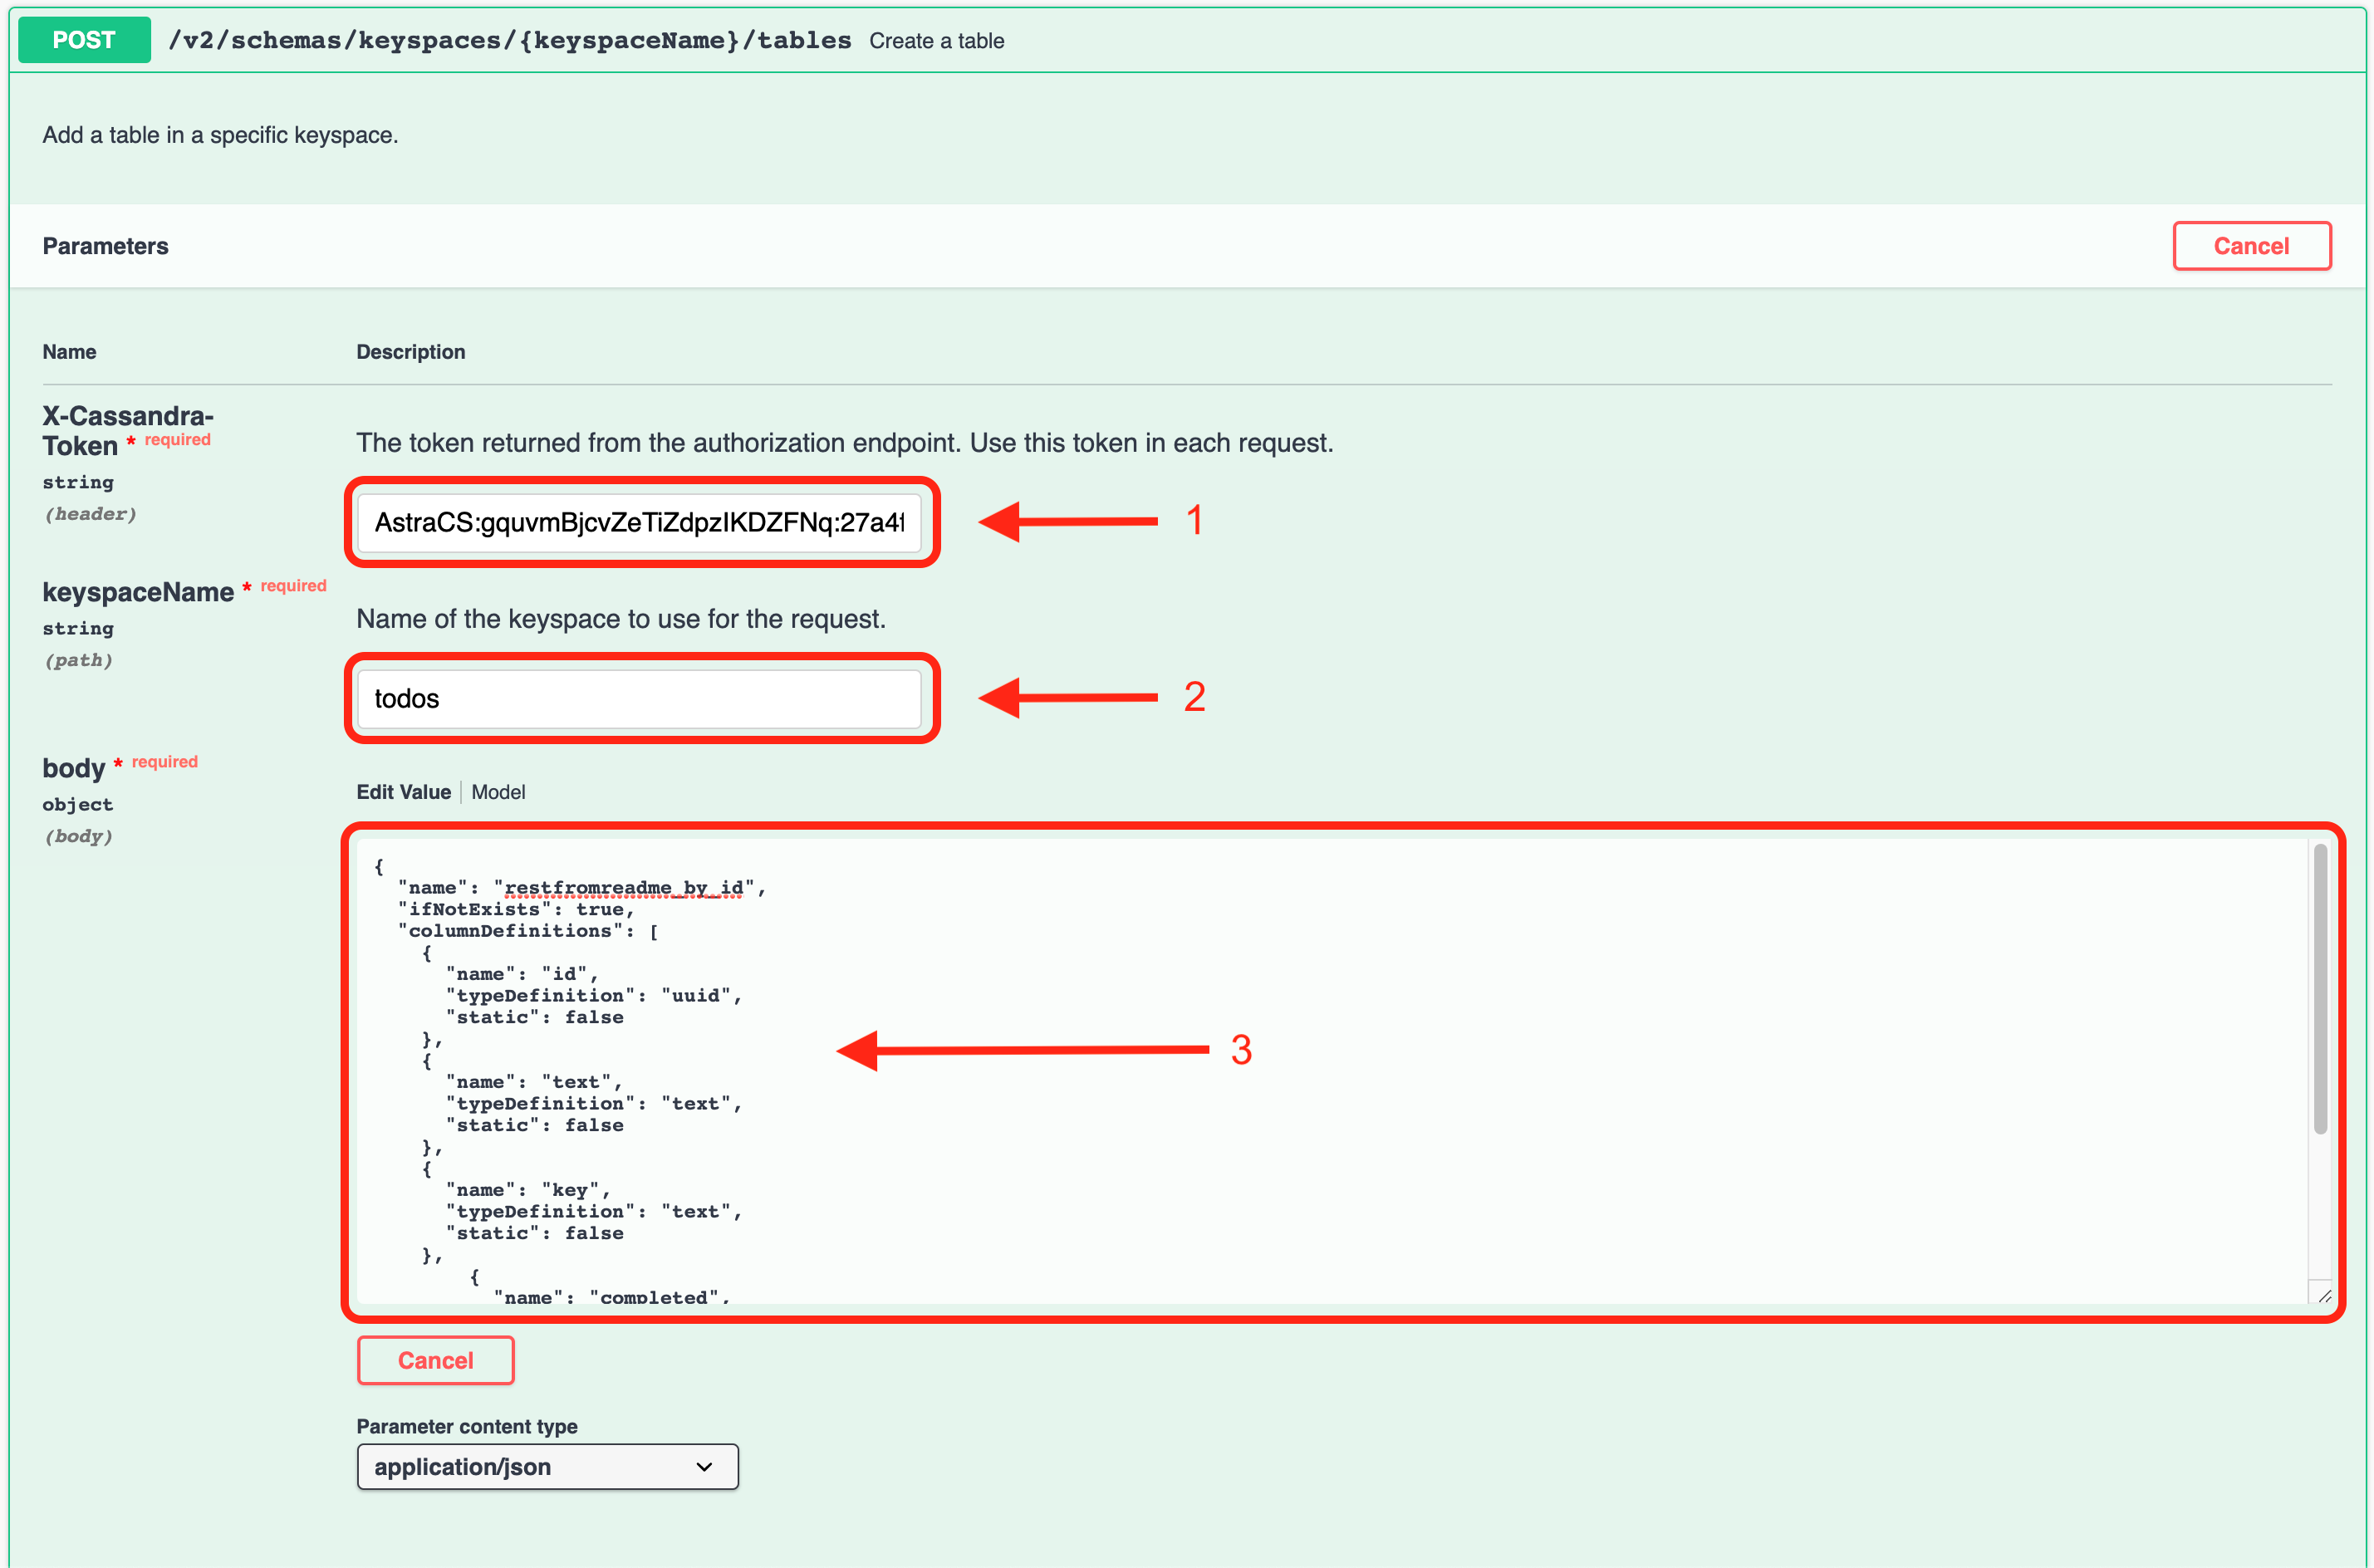
- Finally, copy the create table statement using the code below into the body field
{
  "name": "restfromreadme_by_id",
  "ifNotExists": true,
  "columnDefinitions": [
    {
      "name": "id",
      "typeDefinition": "uuid",
      "static": false
    },
    {
      "name": "text",
      "typeDefinition": "text",
      "static": false
    },
    {
      "name": "key",
      "typeDefinition": "text",
      "static": false
    },
        {
          "name": "completed",
          "typeDefinition": "boolean"
        }
  ],
  "primaryKey": {
    "partitionKey": [
      "id"
    ]
  }
}- And click execute to apply the command and create the table

You should see a 201 response telling you it correctly created the "restfromreadme_by_id" table.
Again, take a note of the Request URL that was used to create the table. This comes into play later when we take a look at the code in astraRestClient.js used to create our TODO application table.

Now that we have a table to use, let's insert a row of data into the table, again using REST to do so.
✅ Step 4a: Navigate to Add row section
- Scroll down and navigate to the data section
- Then find Add row and click it to open the section
- Also take note this is using a POST command.
- Click Try it out just like we did previously

✅ Step 4b: Fill in values and add a row
- Add your Astra token
- Add the keyspaceName
todos - Add the tableName
restfromreadme_by_id. Note, this is the table we created in the earlier step
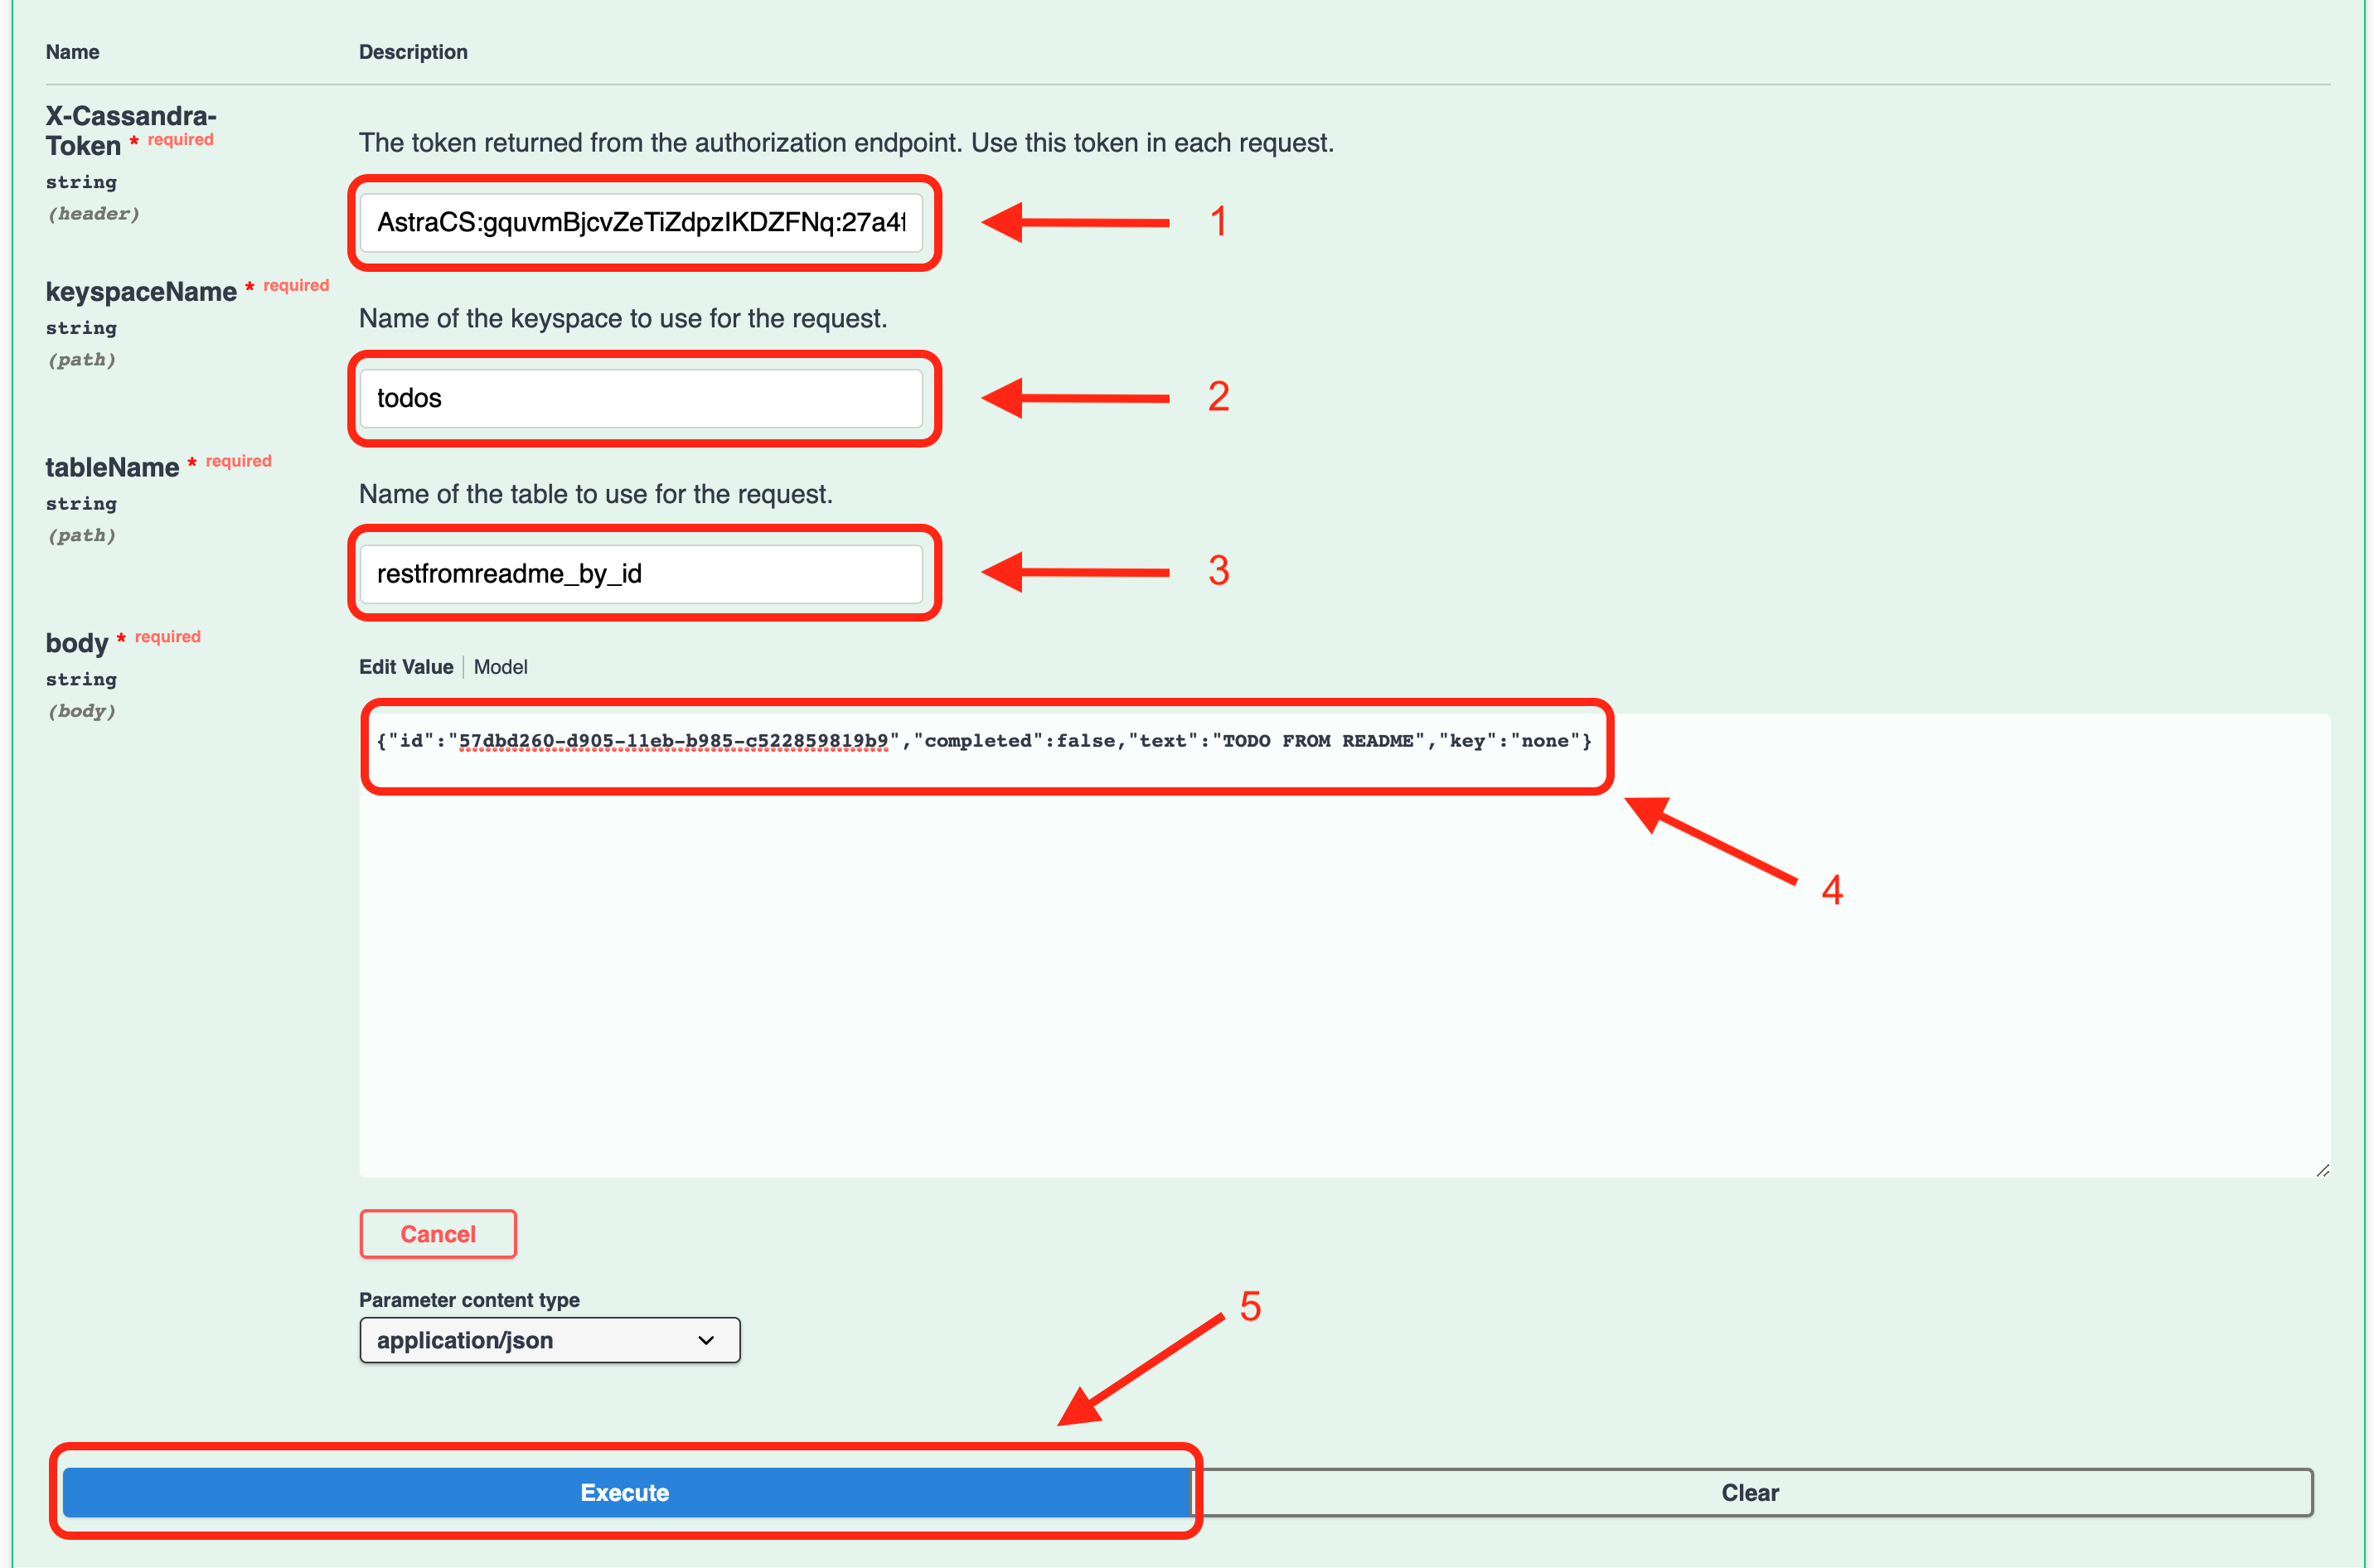
- Copy the following JSON into the body
{"id":"57dbd260-d905-11eb-b985-c522859819b9","completed":false,"text":"TODO FROM README","key":"none"}- Click Execute. You should see code 201 in the response telling you it was a success and displaying the id of the row you just created.
Finally, now that we created a table and inserted a row of data let's GET the data back out.
✅ Step 5a: Navigate to Retrieve all rows section
- Scroll up within the data section
- Then find Retrieve all rows and click it to open the section
- Take note this is using a GET command.
- Click Try it out just like we did previously

✅ Step 5b: Execute the command to display the data
- Enter your Astra token (X-Cassandra-Token)
- Enter the keyspaceName
todos - Enter the tableName
restfromreadme_by_id
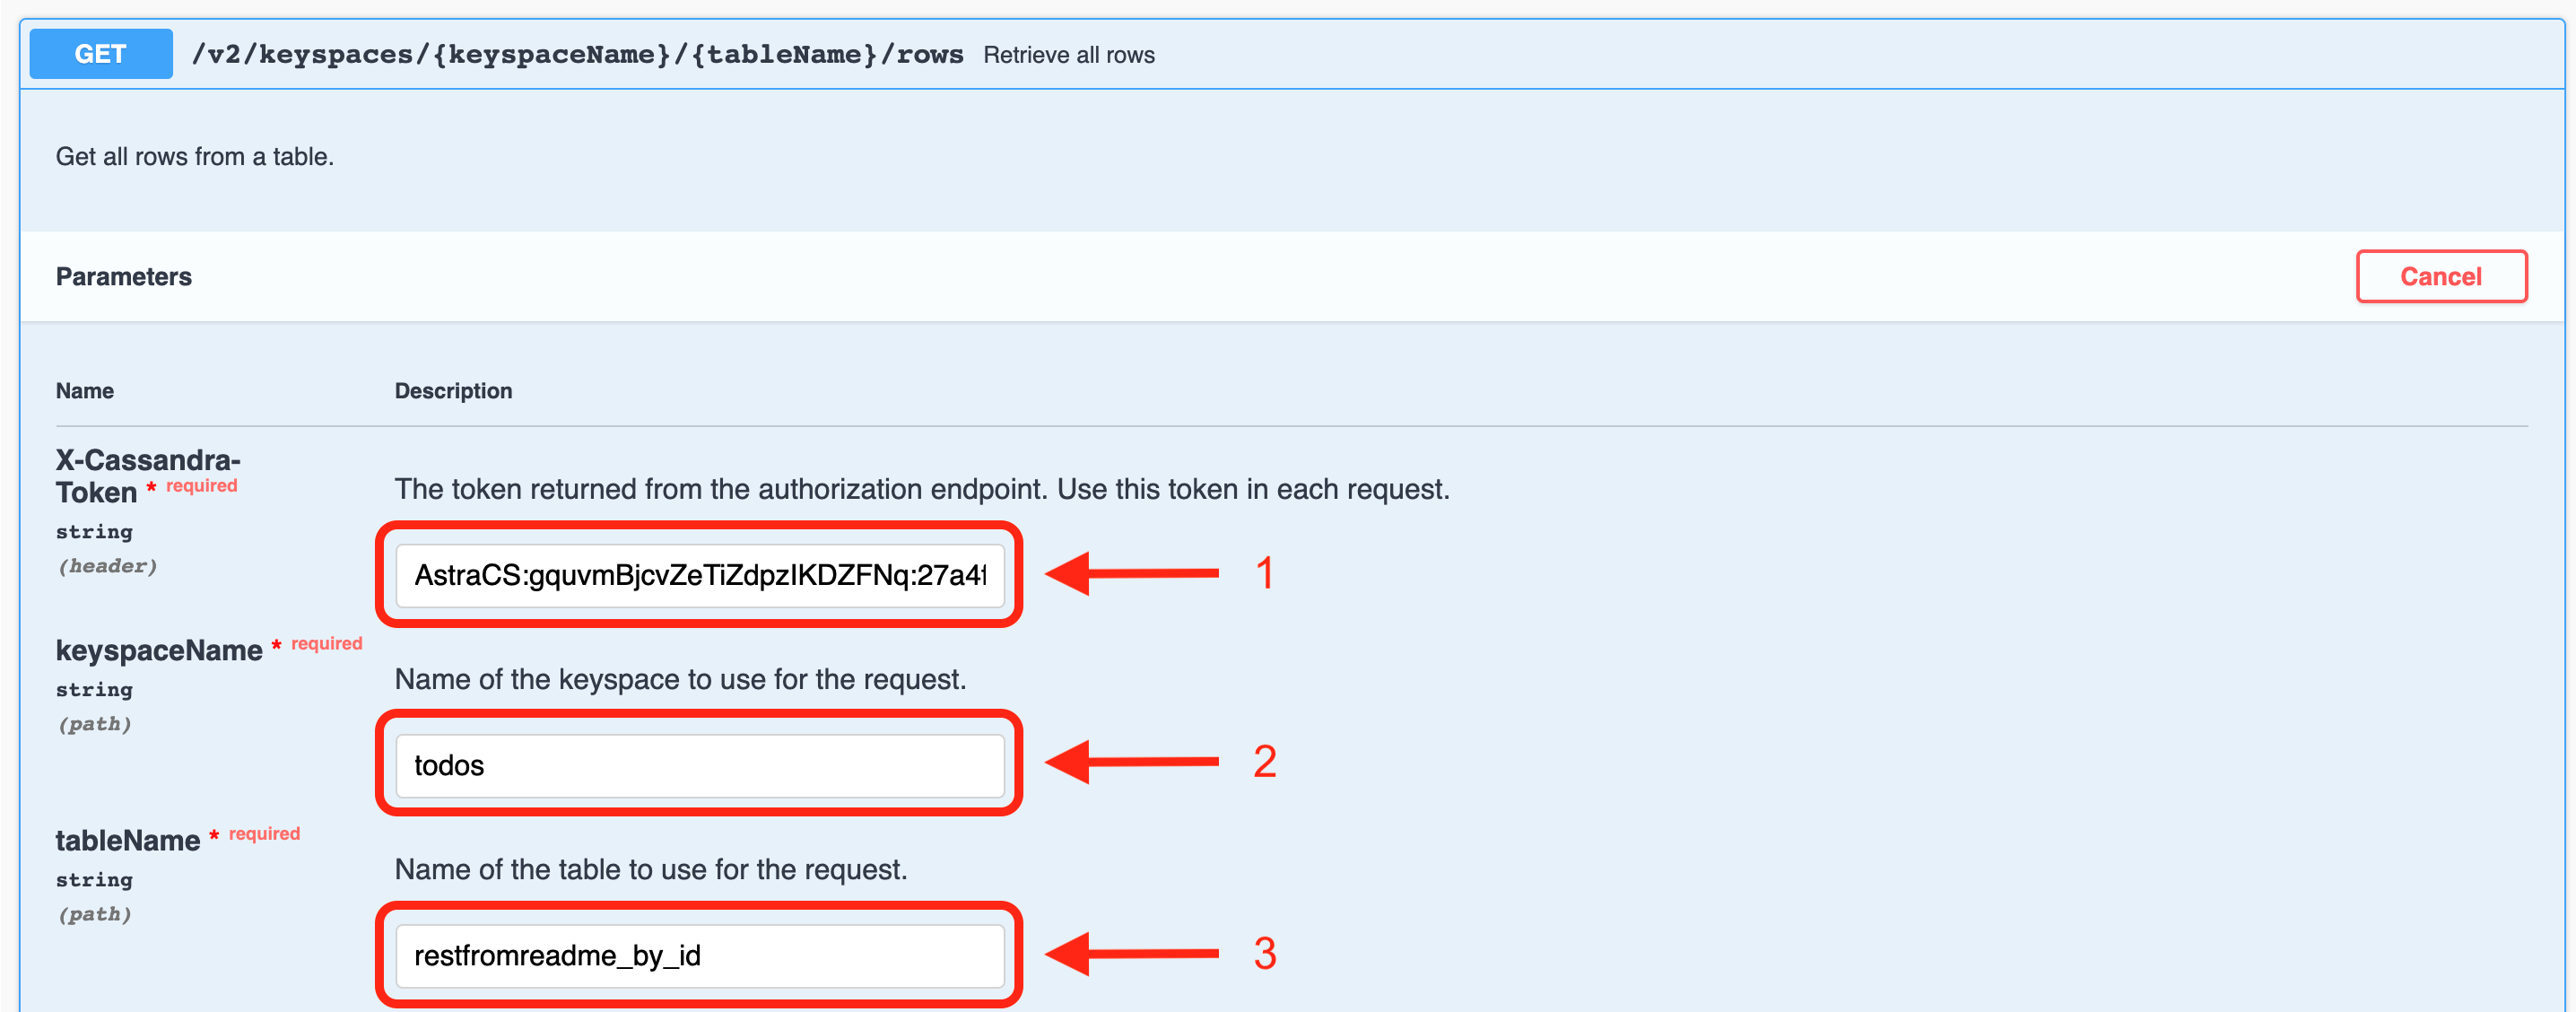
- Click Execute
- View the end result data that should be exactly what we created in the previous step

Part 2: Launch the Native Application
✅ Step 6a:
- Click the button to launch the GitPod IDE.

- Check out the .gitpod.yml file to see the environment setup. We've installed the Expo CLI, the Netlify CLI, and updated Node and NPM for you already.
✅ Step 6b:
- Create split terminals
Click on the double-panel icon:

End Result:

You will need node 15 and npm 7 or later.
npm -vnode -vIf either are not updated, run the following commands respectively.
npm installnvm install nodeIf you don't have an account:
expo registerIf you already have an account:
expo loginDouble check that you are logged in.
expo whoami Download the Expo App from the Android Play Store or iOS App Store.
✅ Step 10a: Retrieve application token to securely connect to the database
Use the token you previously generated. If you no longer have the token and did not download a .csv, you can generate a new token using the instructions above
✅ Step 10b: Configure Environment Variables and Install Dependencies
- Set up your Astra Environment
In the repository directory run the following command to set up your Astra environment. Note that this does require Node 15 and NPM 7 to work. You can install a node version manager like nvm or n to use multiple versions on your system.
npm exec astra-setup todos_workshop_db todos✅ Step 10c: Add Host URL to .env
Get workspace URL:
gp url 8888Take the output of the previous command and replace line 6 in your .env file:
Example:
HOST="https://8888-pink-jasmine-vdeak5gt.ws-us13.gitpod.io"
✅ Step 10d: Add PORT, IS_PROD, and GITPOD environment variables to .env
PORT="8888"
IS_PROD="false"
GITPOD="true"
Final output should look like the below:

✅ Step 10d: Start Netlify and Expo
- Run the application (Ignore the QR code generated here)
netlify dev
In a new terminal window: (or have a split terminal)
expo start --tunnel
Enter 'y' for yes when asked too use another port. Port 19000 is being used for the web app launched with netlify dev, that starts the web app with expo start --web (This opens when you start do netlify dev.)

Note: if you get a message saying that Tunnel is reverting to LAN because of ngrok - Press y to continue.

✅ Step 10e: Launch your app in the web browser
Open your web application at the URL specified in the HOST line above in a new tab in your browser.
Web Application in Chrome:
✅ Step 10f: Launch your app on your mobile device
Scan the QR code with your phone camera to open your application in the Expo App!
The QR code in the terminal will look like this:

See examples of what your finished product should look like:
Mobile App on Android:
Mobile App on iOS:
Take me to the React stuff
We've created a separate repo going over the Basics of React. To get there, click the link below.When you're done, just click on the "Back to Main" breadcrumb to come back here.
- The contents of this repo are based on Jake's port of the TodoMVC code originally written by Pete Hunt.
- The example is modified from https://github.com/huksley/todo-react-ssr-serverless.