After quite a few revisions and an attempt to make this code non-CPTC specific, the current version of ATM Processor is available for research use.
- This code comes with no warranty or support
- This code is meant for research purposes only. Tampering with real (in use) ATMs is likely very illegal so don't do it!
- Code is provided as-is and currently depends on Python 2. As such as OpenWRT builder is provided to make a self-contained firmware package.
This is currently designed to use A GL.iNET MT300A (v2) router which has adequate RAM and Flash storage to support running the python processing code. However any router will do, some even have GPIO built in which would allow for RTC to be built in and not require Arduino. During runtime approximately 60MB of RAM is utilized leaving about half free. To fit supporting tools and Python with needed SSL support the flash is 12.5MB or about 80% full. Without SSL support (and hashlib) is about 48% full. You can customize build.sh as needed to accommodate different router/embedded systems.
To make the code as flexible as possible, the decision was made to use the built in SD card reader. Firmware supports reading DOS-FS/FAT file systems and the launch scripts in the firmware automatically mount and launch scripts off the SD Card.
An embedded system was chosen over a Raspberry Pi due to the smaller footprint and easier ability of the firmware to be reset and restored as needed. Less concerns about wear and other issues that happen on Raspberry Pis.
This allows the following:
- Additional customizability for ATM processing without need to reflash every time code is changed
- Ability to add additional libraries without concern for storage limitations
- Easy customizability of code by simply removing SD Card
- Entware-NG support if desired to add and update packages on embedded system
- Limit writes (Flash is more reliable then SD cards so main booting is stored in memory [RAM] or Flash) and code is limited to read-only operations primarily.
- Ability to store logging and debug data for research
All code is stored now in the flash for easy building, however it is still recommended to store these files on an SD card and simply mount over them for flexibility. Files are located in files/atm.
Due to the limited GPIO ports on the embedded router chosen, an Arduino Nano was chosen due to small size and 5v logic. Any Arduino will do, supports Arduino Uno, Mega, Nano, Micro as long as they're operating at 5v due to the router providing 5v power. The Arduino acts as a RTC and GPIO controller via the onboard serial port of the router.
| File | Purpose |
|---|---|
| build.sh | Contains the OpenWRT Image Builder Commands and Packages. Requires Image Builder for your desired platform |
| files/ | Contains OpenWRT Customizations including ATM Config Web Config setting and defaults to communicate with an Arduino for RTC if you desire. Any files here are added into the firmware. |
| serial-processor.py | Handles Base communications and connection with ATM(s). If you need to adjust configuration such as encryption keys or similar, you would do so here. It passes work off via network socket to external handler so you can have a beefier computer handle and perform work on messages. |
| atm-processor.py | Actual transaction handler, performs lookups on ATM IDs and performs validations for all transactions supported. This code is hard coded to accept all transactions with a specified amount configurable via the web UI. Set the UIConfig portion to false if you do not wish to use it with OpenWRT |
| fix-serial.sh | Requires screen, fixes ATM dialing sequence per transaction to ensure ATM is ready and null bytes do not crash anything |
| arduino-rtc-handler.ino | Arduino Code, requires RTCLib and TimeLib, designed to act as an intermediate for extra IO on systems which do not support it. You can use GPIO USB devices if you have multiple USB ports if you desire. This code currently supports reading and setting an RTC as well as controlling two LEDs and monitoring temperature inside the enclosure. |
| arduino-rtc-handler.ino | Arduino Code, requires RTCLib and TimeLib, designed to act as an intermediate for extra IO on systems which do not support it. You can use GPIO USB devices if you have multiple USB ports if you desire. This code currently supports reading and setting an RTC as well as controlling two LEDs and monitoring temperature inside the enclosure. |
| rtc-comms.py | Python code designed to interface with Arduino. Specifically acts as a hwclock-like tool designed to primarily syncronize RTC via cron. Supports setting internal hwclock (on embedded device) as well as setting RTC depending on time offsets. |
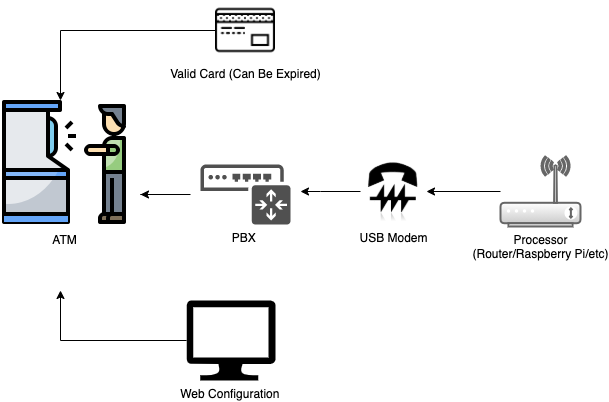
The ATM processor requires several components to be able to run. During our setup to handle multiple ATMs and for debugging purposes we used a PBX. This is not nessarily required but we recommend it in order to match our lab environment completely. Below is a hardware guide of what we used and recommended available components - you can substitute as needed.
Please note: the ATM validates cards so they must have a "valid" prefix number to be able to be used. No code or processing systems validate the cards or store the information.
The following components were used:
- ATM (Needs to support same protocol)
- Linux Compatible USB Modem (StarTech 56K USB Modem or V-Top USB v92 Modem)
- Embedded Linux System (Raspberry Pi or as we used embedded router such as GL.iNET MT300Nv2)
- PBX (PABX was what we used, they are hard to find now, may be cheaper on eBay or similar)
- (optional) RTC module (DS3231 i2c Breakout)
- (optional) Arduino Board (Arduino Nano with Terminal Board)
- (optional) Hardware Enclosure (Big Red Box)
Part of this system bundles all components into a embedded Linux image based off of OpenWRT. To do this we utilize OpenWRT Image Builder.
- The process for setting up image builder is here - https://openwrt.org/docs/guide-user/additional-software/imagebuilder
- Optional frontends are available (but untested) - https://openwrt.org/docs/guide-developer/imagebuilder_frontends
Our build system was based off of Ubuntu 18.04, however any Linux distro may be used:
apt install build-essential libncurses5-dev libncursesw5-dev \
zlib1g-dev gawk git gettext libssl-dev xsltproc wget unzip python htop screen
- Obtain Image Builder for specified device - for example the MT300N-v2 would be: https://downloads.openwrt.org/releases/19.07.5/targets/ramips/mt76x8/
- Once downloaded, extract files to working directory and copy contents of this repo into that directory
- Ensure the files/ directory is located in that directory along with build.sh
- chmod +x build.sh and run it. It will pull down and execute all build processes and obtain additional dependencies.
- bin will contain built firmware, you can use your respective firmware upgrade to flash
This software is for research only, use at your own risk.