-
Notifications
You must be signed in to change notification settings - Fork 2
CineRat 03 Hardware build Instructions
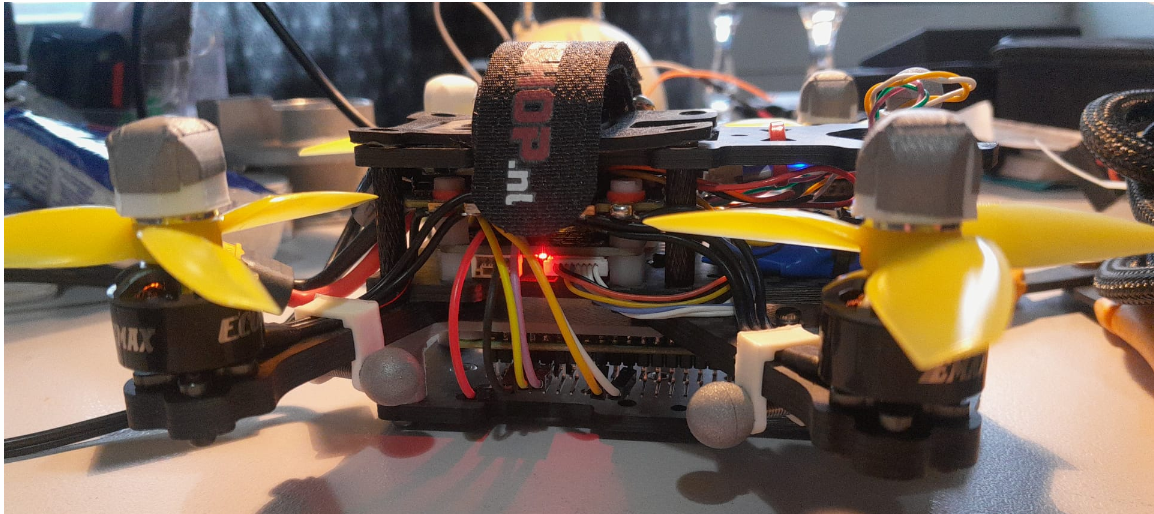
Frame assembly: See pictures https://www.team-blacksheep.com/products/prod:cinerat_cfhw and https://droneshop.nl/ethix-cinerat-drone
Mount ESC at the bottom now, don't use vibration isolation for that.
Do use vibration isolation for the FC, to bring down the noise on the accelerometer which is used more extensively in indiflight.
OUTDATED:
- 4x M3x7mm bolts (shortened from 10)
- rubber buffers (the ones that came with ESC)
- ESC
- 4x threaded standoffs M3x5mm standing height, 6mm thread
- Mateksys Flight Controller
- 4x threaded standoffs M3x5mm standing height. 4mm thread (shortened from 6mm, then chamfered for easier threading)
- Baseplate
- 4x M3 nuts
- 3d print raspberry pi mounting bracket
- Raspberry Pi Zero 2W
- Bottomplate (can be a baseplate, topplate or any plate with some holes for the mounting, just to protect the pi)
- 4x long M3 bolts that screw the bottom plate and the pi mounting bracket onto the standoffs
 Front -->
For awareness, we will be mounting the propellers in an "inwards" configuration:

Bottom views:
 <-- Front
 <-- Front
NOTE: If possible, wire VCC of a 5V device to 4V5 instead of 5. This way the device is also powered on USB power, and not just on battery. This is a quirk of the Mateksys H7.
Top view:
 Front -->

I'm using an Aikon AK32 4-in-1 35A (the closest official documentation in here: https://www.aikon-electronics.com/index.php?id=28).
Both the Mateksys and the Aikon use tiny JST-SH-8Pin connectors to communicate. The Mateksys package or the Aikon package should include a pigtail cable and a few empty JST-SH housings that can be pinned as follows (also see images above):
| Aikon AK32 4-in-1 35A 6S | Matek H743 SLIM V3 | color | Note |
|---|---|---|---|
| - | G | black | |
| + | Vbat | red | used to power Matek, vbat sensor is on Matek |
| 1 | S1 | White | Motor 1 BDShot |
| 2 | S2 | White | Motor 2 |
| 3 | S3 | White | Motor 3 |
| 4 | S4 | White | Motor 4 |
| CR | Curr | Yellow | |
| TE | Rx8 | Blue | Low-frequency telemetry. Not configured in software. If you need RX8 for other purposes, do not connect this. |
#todo setup in BF, with Current/Voltage scale

I'm using the FrSky R-XSR EU LBT ACCESS for most of my builds. You need to update the firmware though, so they work with the EU EdgeTX/OpenTX RCs. You can ask Erik about that, I've never done it myself.
The R-XSR uses a 5-pin Molex Picoblade. They normally ship with a pigtail cable that can just be soldered onto the FC, but these cables can also be assembled from pre-crimpled wires and connector housings at the MAVLAB.
Pinout:
| R-XSR | Matek H743 SLIM V3 |
|---|---|
| GND | G (Ground) |
| +5V | 4V5 |
| S.Port | Tx7 |
| SBUS_OUT | Rx6 |
| SBUS_IN | NC (Not Connected) |
The RPi has 3 interfaces to the flight controller:
- UART to forward optitrack and position setpoints to the Matek
- Optional: SWD to wirelessly flash new software and live-debug in VSCode
- Optional: USB to wirelessly configure INDIflight via USB and download logs
A ground-station laptop connects to the Raspberry Pi via Wifi.
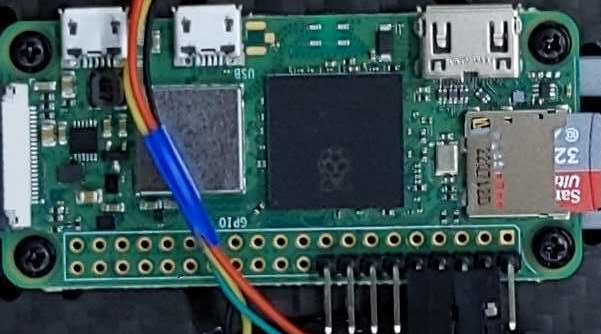
All of the functions require 6 GPIOs and conveniently these are all in one row. So you can get away with only soldering a 12pin 90degree male header onto the PI, like so (note that this picture only shows 9pins and only the UART connection, but I recommend soldering 12 pins):

You can then either grab a 10 or 12pin Dupont connector housing and crimp AWG 28 wire or just use a solder-type female 10 pin header:
 Left: DuPont housing, Right: Female pin header. Both are in a box in the rack next to the soldering station at the MAVLab
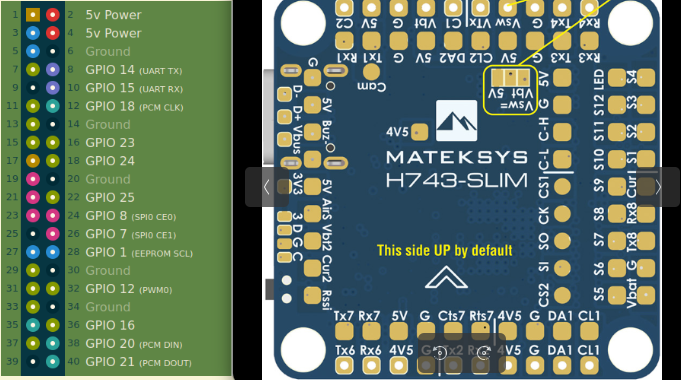
 Left: RPi pinout. Right: Matek.
| Raspberry Pi Zero 2W | Matek H743 SLIM V3 | Note |
|---|---|---|
| 5V (Pin 4) | 5V | could try 4V5 on the Matek here. I didn't test that |
| Ground (Pin 6) | G | |
| GPIO 14 (Pin 8) | RX2 | Remember that UART RX/TX should be twisted-pair! |
| GPIO 15 (Pin 10) | TX2 | Idem |
| GPIO 24 (Pin 18) | D (SWD) | Optional, for SWD debug and flash. Solder pads on Matek are on lower left edge, see above. |
| GPIO 25 (Pin 22) | C (SWD) | Idem |
You can just use a micro-USB to USB-C cable to connect RPi to Matek. They are super bulky though, so I soldered them. Quirks:
- USB requires a shielded cable with twisted-pair wiring of D+/D-. Won't work otherwise. I just cut up a USB cable i had laying around.
- The USB interface of the Matek seems isolated somehow, so I also wired Ground and Vbus, in addition to the data D+/D-. However, Vbus may not be necessary as I may have messed up something else that made it not work before.
- NOTE: if still want to use the USB-C port of the Matek normally to connect to your PC, then you need to either power-down the Raspberry, or remove the connection. On the Raspberry Pi side of the cable, I kept the USB-micro connector for this purpose, but it's bulky...
 Backside of the PI
| Raspberry Pi Zero 2W | Matek H743 SLIM V3 | Color | Note |
|---|---|---|---|
| GND | G | Black | |
| DM | D- | White | |
| DP | D+ | Green | |
| 5V | Vbus | Red | may not be needed |
- See list of known-good cards in CineRat -- 02 Parts List and 3D prints.
- See warnings and procedures in CineRat -- 04 Software Installation and Setup#Optional -- INDIflight blackbox for logs.
I used an active beeper from Kiwi Electronics (https://www.kiwi-electronics.com/en/grove-piezo-buzzer-active-buzzer-2033), but it's not really the right one. This one would likely have been better (https://www.kiwi-electronics.com/en/piezo-buzzer-active-11258).

| Active Buzzer | Matek H743 SLIM V3 | Color |
|---|---|---|
| Q1 Emitter | Buz- | Yellow |
| J1 pin 2 | 5V | Red |
See picture below as well
| Foxeer M10Q | Matek H743 SLIM V3 | Color | Note |
|---|---|---|---|
| SPI CLK | CL1 pad | Green | Magneto. don't think it has to be twisted-pair |
| SPI Data | DA1 pad | Purple | |
| TX | RX4 | Yellow | Definitely twisted pair (top left in picture above) |
| RX | TX4 | White | |
| Ground | G | Black | |
| VCC | 4V5 | Red |
 <-- Front
NB:
- USB Vbus may not be needed and work better without
- TX/RX2 (yellow/purple) should be twisted pair
- RX6/TX7 (yellow/orange) should be twisted pair (also, no clue why I didn't chose TX6 btw)
- Some pads use horrible jumper wires that I cut and stripped. Please use proper AWG 28 wires instead.