Usage
We can invoke GRAMS from command line by calling grams or python -m grams.cli. Run grams --help to see the following input options.
Usage: cli.py [OPTIONS]

  Annotate tables using GRAMS

  Args:
      infiles: path to input tables. You can use a combination of wildcard (`*`) or named wildcard wrapped by curly brackets (e.g., `{name}` or `{group1}`), which behaves as wildcard. The named wildcard can be used in `outfiles` to name the output file. The list of input tables is retrieved by glob.glob (unix style pathname pattern expansion). Examples:
          - `/tables/{filename}.json`
          - `/tables/{filename}.csv`
      outfiles: path to the output annotations. You can only use named wildcard defined in `infiles`. Examples:
          - `/outputs/{filename}/version.01.json`
      data_dir: pass through option to GRAMS.data_dir
      proxy: pass through option to GRAMS.proxy
      cfg_file: cfg_file contains configuration of GRAMS

Options:
  -i, --infiles TEXT   path to input tables. You can use a combination of
                       wildcard (`*`) or named wildcard wrapped by curly
                       brackets (e.g., `{name}` or `{group1}`), which behaves
                       as wildcard. The named wildcard can be used in
                       `outfiles` to name the output file. The list of input
                       tables is retrieved by glob.glob (unix style pathname
                       pattern expansion). Examples: -
                       `/tables/{filename}.json` - `/tables/{filename}.csv`
                       [required]

  -o, --outfiles TEXT  path to the output annotations. You can only use named
                       wildcard defined in `infiles`. Examples: -
                       `/outputs/{filename}/version.01.json`

  -d, --data_dir TEXT  pass through option to GRAMS.data_dir
  -p, --proxy          pass through option to GRAMS.proxy
  --cfg_file TEXT      cfg_file contains configuration of GRAMS
  -r, --viz            visualize the annotated models
  --help               Show this message and exit.
Besides the input tables and output directory, you can specify:
-
-dor--data_dir: the directory to store Wikidata's data. You can download pre-built databases as mentioned in the installation guide to avoid sending queries to a remote Wikidata service. -
-por--proxy: if enabled, we will send queries to the Wikidata service to retrieve entities that we do not found in the local databases. -
--cfg_file: location of GRAMS's configuration (you can find an example here) -
-ror--viz: if enabled, we will visualize the output semantic model using graphviz. You must havedotavailable in your PATH to use this function.
Here is an example:
cd <gram_repo>
python -m grams.cli -pv \
    -i ./examples/semtab2020_novartis/tables/{filename}.csv \
    -o /tmp/test/{filename}/version.01.json
Output of a table from the command:

The correct semantic description:

The data structure of input table is specified in the grams.inputs.linked_table.LinkedTable class. An input can be loaded from JSON file, which properties are aligned with properties of the class (see the class definitions for the schema of JSON object), or can be loaded from a csv file containing table data and a tsv file containing links/entities associated with each cell in the table using the function grams.inputs.linked_table.LinkedTable.from_csv_file. By default, if the tsv file (link file) is not provided, grams.inputs.linked_table.LinkedTable.from_csv_file will look for a file of same name in the same folder but ends with .links.tsv.
The csv file containing table data follows the common format: the first row is header and next rows are rows in the table. Below is an example:
col1, col2, col3
row1-cell1,row1-cell2,row1-cell3
row2-cell1,row2-cell2,row2-cell3
...
The tsv file containing links/entities in the table has a simple format. Each row is <row_index>\t<col_index>\t(<link>|(<entity_id>(\t<entity_id>)*)), where:
-
row_indexandcol_indexstart from 0 -
row_indexdoes not count the header of the table (i.e., skip the first row ofinfileif it's the header) -
(<link>|(<entity_id>(\t<entity_id>)*))is either:-
<link>a json string encoding Link object and can be deserialized usingLink.from_dictfunction - or (<entity_id>(\t<entity_id>)*) a list of entity ids joined by
\ttab character, each entity id can be a wikidata qnode id (e.g., Q414) or a full qnode uri (e.g., "http://www.wikidata.org/entity/Q414"). The first entity is considered as the correct entity of the cell, and the rest are considered as the candidate entities of the cell
-
Note that a pair (<row_index>, <col_index>) don't have to be unique as each cell in a table can have more than one link.
The JSON output file contains a list of semantic_models. Currently, the list only has one item. Each item is a serialized graph of a semantic model following the Python class definition (see here). In particular, it is: {"nodes": List<Node>, "edges": List<Edge>}, where basic properties of an edge are source, target (ids of source & target nodes), abs_uri (uri of ontology predicate), and basic properties of a node is id and label. A column node also has col_index and a class node also has abs_uri denoting uri of the ontology class.
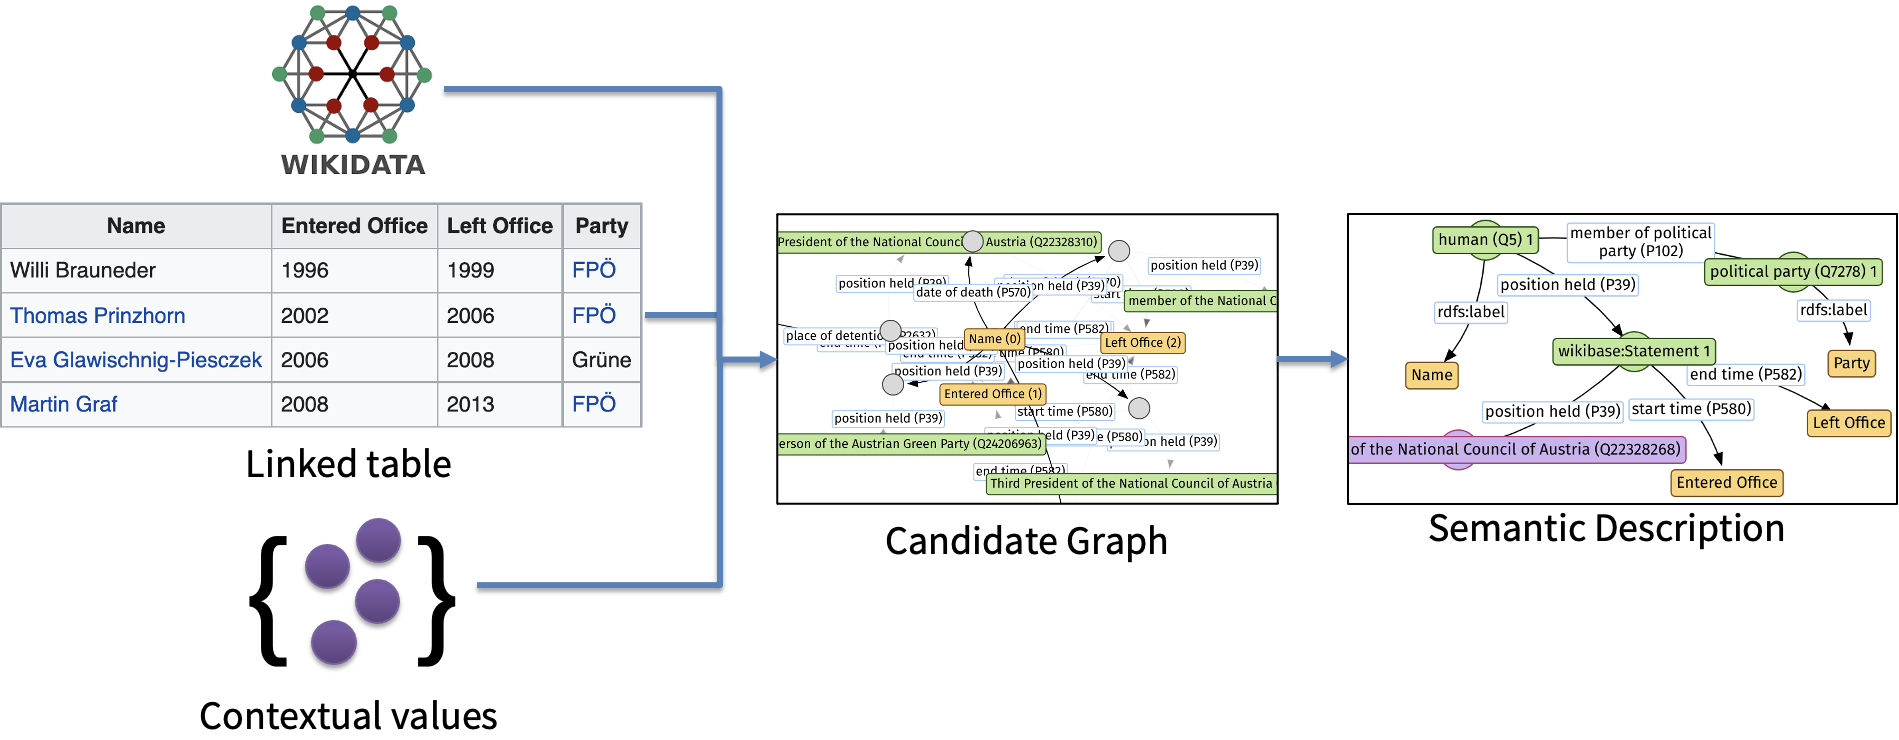
GRAMS can also be used as a library. The starting point is the class GRAMS in the main.py. The class takes three parameters: data_dir, cfg, and proxy that we have explained above in the CLI section. To annotate a table, we only need to pass a table to the function annotate. The function performs two steps as illustrated in the below image. You can found the code that construct the candidate graph (also sometimes called semantic graph) in two files: grams.algorithm.data_graph and grams.algorithm.semantic_graph. The code to implement the last step can be found in grams.algorithm.psl_solver.
 .
.
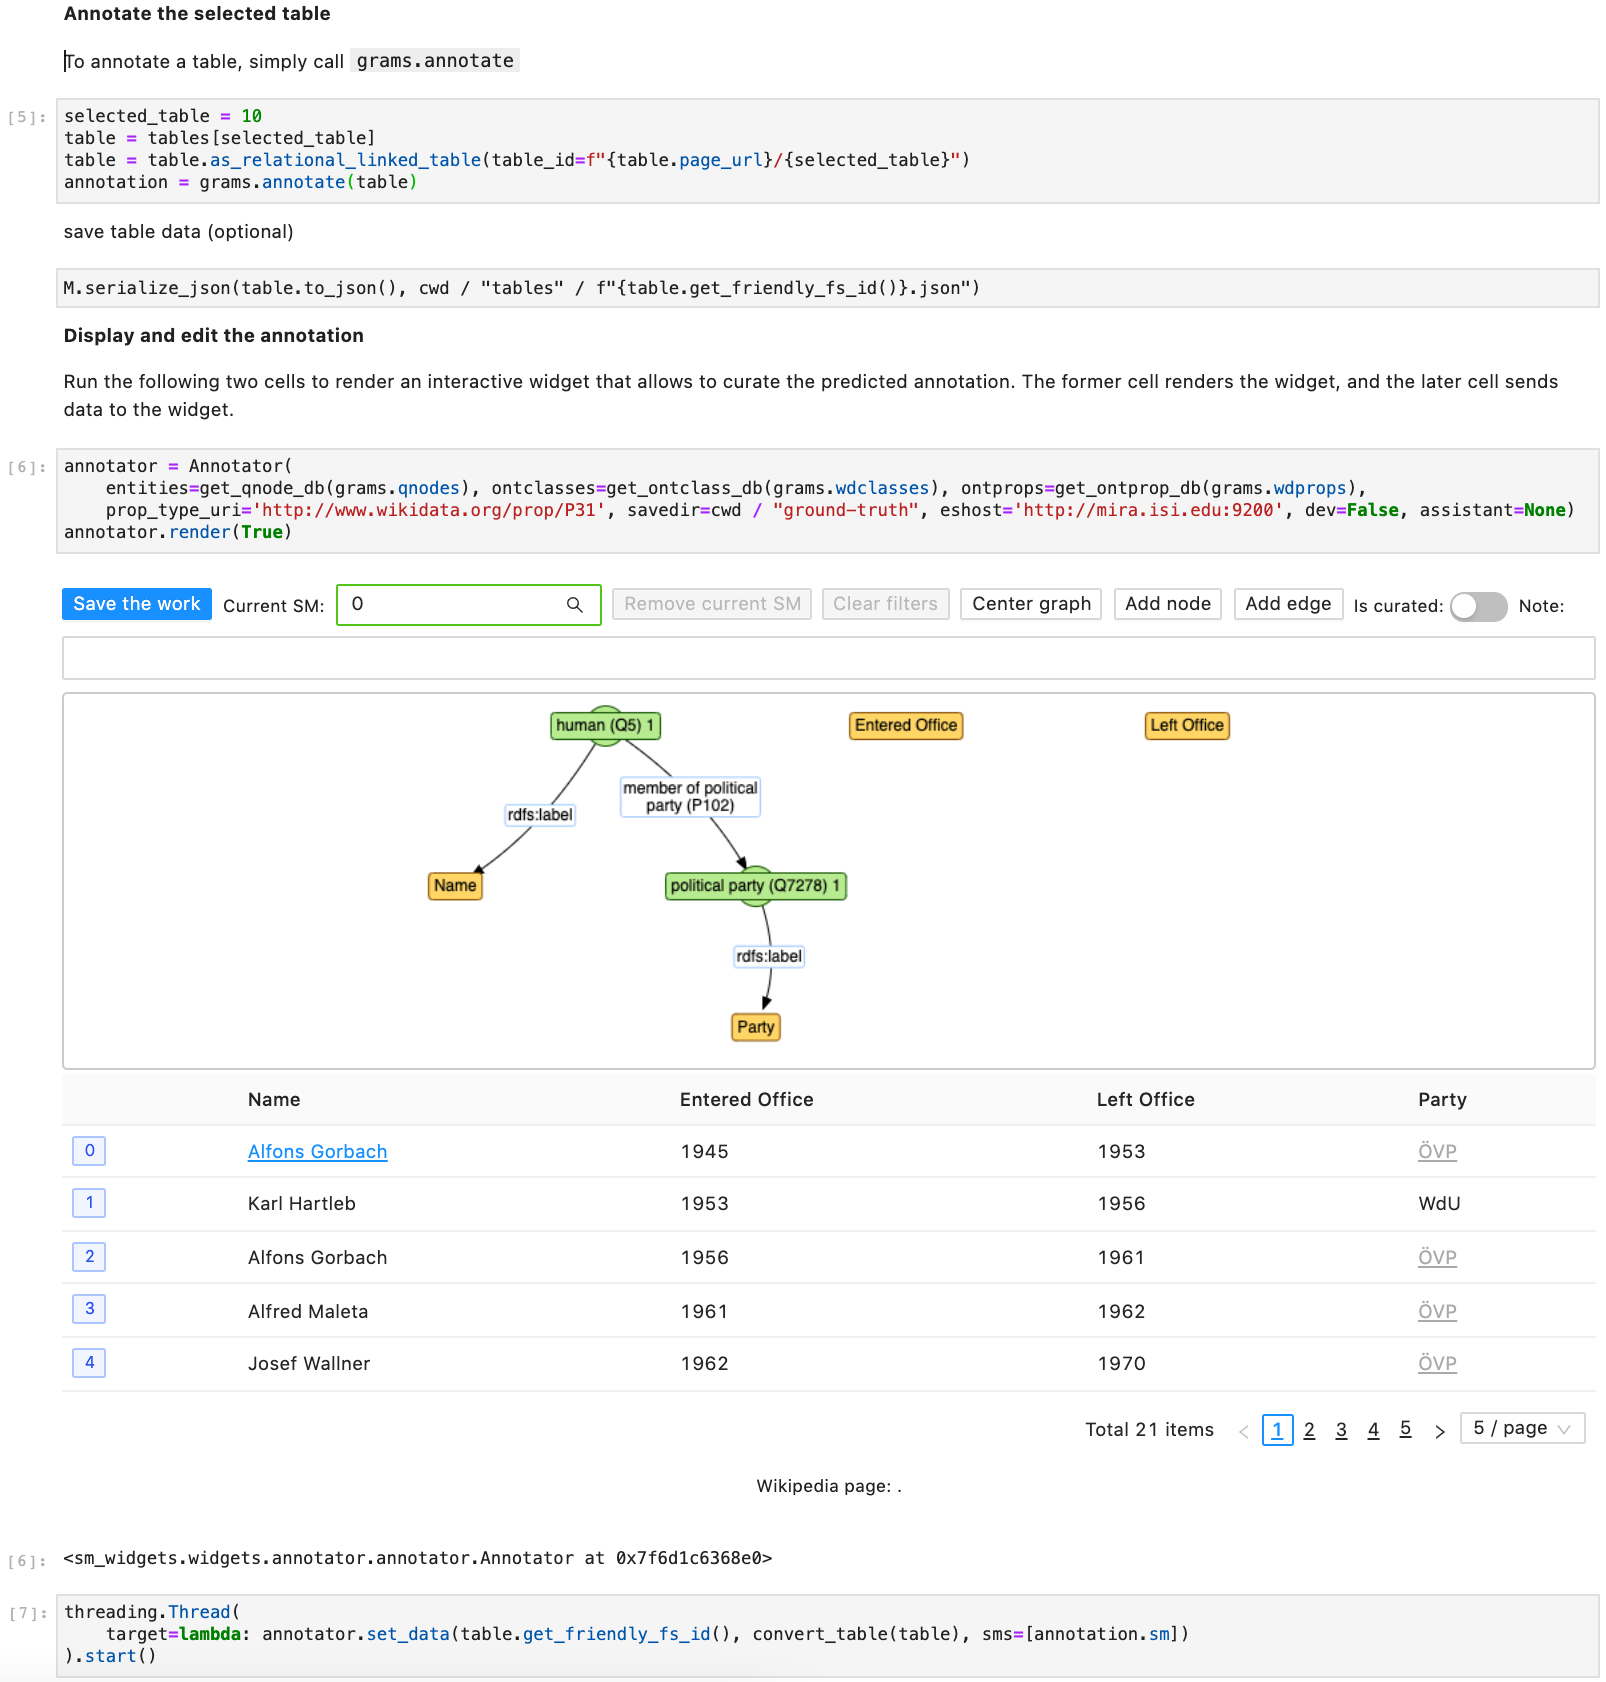
We created two Jupyter notebooks demo and semtab-medicine demonstrating how to use GRAMS's API. The former notebook shows how to fetch table from a Wikipedia page and run GRAMS to annotate the table. The later notebook shows how to load tables from disk and annotate them with the help of GRAMS.
Below is the screenshot of the second half of the demo notebook. As the notebook uses Javascript to support data curation, if we open the notebook in Github, we can't see rendered results as it is rendered as just <IPython.core.display.Javascript object>.