bpmn
BPMN (Business Process Model and Notation) is a widely used graphical representation for specifying business processes in a business process modell.
On the Service Integration course, we will use Bonita as our BPMN editor and workflow framework. Bonita is an Eclipse RCP application.
![]()
In this laboratory, we will create the workflow of an application store. In the application store the users can browse and upload applications. On the Model Driven Software Development and Service Integration Courses in 2012, the teams had to design and implement the workflow of an application store.
-
Start Bonita Studio. Bonita will prompt you to register. You can choose to skip it but it's highly recommended to register because registration provides access to well-made official tutorials and thorough documentation.

-
Create a new process from Diagram | New.
-
A simple process will show with only a start event and a human task. Click on the process, choose the Pool page and click the Edit... button. Rename the process to
BrowseApplication. -
Rename the lane to
Lane. -
Click the
Step1task and look at its properties on the General tab. On this tab, you can set the execution-specific properties of the process, e.g. it's Name and Task type. Rename the task toAcknowledge. -
Add an end event to the workflow. Connect the
Acknowledgetask to the end event.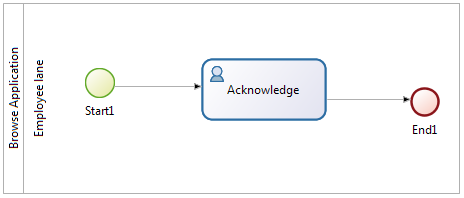
-
Let's create a graphical user interface for this task. Choose the Application tab. On the Forms page click Add.... Click Finish.
-
A graphical editor will appear. Add a message to the top of the form. Edit the properties of the message element on the Data page. You can edit plain text or HTML code. Type
Hello world!. -
Click the Run button or choose your process in the Server | Run menu. The generated web page will show in a browser.

-
On the web interface, you can control the workflow by the buttons provided. In this example, if you click the Submit1 button, the workflow finishes.
-
Click the Bonita BPM Portal link and browse this interface. Try to start a new workflow from this.
-
Create the following tasks:
-
Download the application names: script task. -
Show the applications: human task. -
Buy the application: abstract task.
-
-
Note that the
Show the applicationshuman task uses the actor defined in the lane.
-
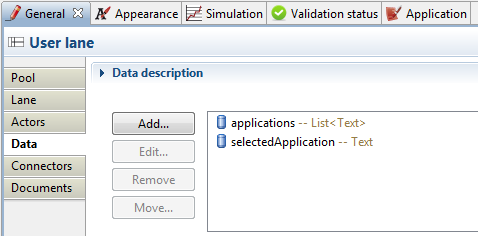
Let's add some workflow variables to the process. Click the process and choose the Data page. Create the following variables:
-
applications: is the collection of names of the downloadable applications. The type of this variable isTextand the multiplicity is multiple. -
selectedApplication: The user will select one of the available application. ThisTextvariable with single multiplicity contains its name.
-
-
Let's create a script that substitutes the calling of other services. Select the Download the application names task and go to the Connectors page. Add a new script by selecting Script | Groovy 1.8 -- Execute a Groovy 1.8 script.
-
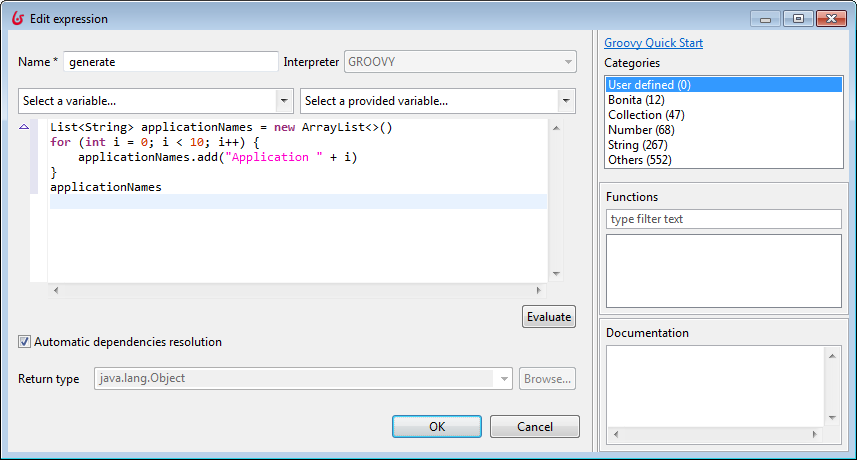
Name the script instance to Get the applications, time it to the enter phase of the activity and hit Next. Select the Edit... button. A Groovy editor will appear. This allows us to edit a Java-like expression or a method body where every flow variable is available.
-
Create this script that returns a collection of application name:
List<String> applicationNames = new ArrayList<>()
for (int i = 0; i < 10; i++) {
  applicationNames.add("Application " + i)
}
applicationNames
Click next and set that the
applicationstakes the value of theresult. -
Add a form to the Show the applications task. In the All widget based on... groupbox you can select the variables shown in the form. In this case we want to specify every element by hand so unselect all.
Drag a Radio buttons widget to the top of the view and go to the Data page of the property view. We would like to show the application names in this list, so go to the Available values and select the
applicationsvariable.We also want to put the name of the selected value to a variable, so edit that the
selectedApplicationvariable takes value offield_Radio_buttons1.
-
The message of the Acknowledge action should refer to the selected variable, so let's set it. If you closed the editor page go to the properties of the action select the Application page and edit the Hello task pageflow.
At the Data edit the
Hello world!. Add a script the following Groovy script:"Thank you for downloading " + selectedApplication + "."
-
Try to run the application. Don't be afraid of the presettable variable at the begining. If you want to get rid of this form, go to the process' Application tab and set the Forms tab to Skip.
-
Sometimes an action may fail and the error should be handled. Change the
Buy the applicationtask's type to Script. Select the Throw error event at the If connector fails... options and name the error tofailed. The script should looks like this:if (selectedApplication == applications.get(0)) { throw new UnsupportedOperationException() }
This script will fail with an exception if the user downloads the first application. The output should be neglected.
-
Add a Catch error item to the Buy the application action from the palette. Create a human task for the initiator and edit the control flow:

Create a webpage for the task where there is a message that shows Error in the web services!.
-
Run the workflow and select the first application. It looks like that the workflow stops but eventually the next action arrives to the inbox.

We will implement a workflow for the actions of the user.
-
Create a new pool and name it to
UserWorkflow. -
Create a start event, an end event and create the following tasks:
-
Authenticate: service task -
User action: human task -
Login failed: human task -
Browse applications: call activity -
Upload application: abstract task -
Logout: human task
For the human tasks, set the actor to Initiator.
-
-
Create a XOR gateway.
-
Time to create some variables:
-
userID: Integer -
username: Text -
password: Text
-
-
Also create a new variable named
action. To create an enumeration, click List of options.... Set the Name toUserActionTypeand add the following options:BrowseUploadLogout
Click OK and Finish.

-
To create the login screen, click on the
UserWorkflowpool. On the Application tab's Entry Pageflow page add a new form namedLogin. -
In the Add widgets based on... groupbox only select the
usernameandpasswordwidgets. -
Set the password field's Field type to Password.

-
Connect the start event to the
Authenticatetask. This is a service task which simulates the authentication of the user. Add a new Groovy connector namedSimulation of Authentication.if (username.equals(password)) { return username.hashCode() } else { return -1 }
The
resultfrom connector's output goes to theuserIDvariable. Click Finish. -
Depending on the authentication's result, the user can proceed or fail the login. Create transitions from the
Authenticatetask to theUser actiontask namedsuccessand theLogin failedtask namefail. -
On the
successtransition choose Edit expression... in the Condition combobox and typeuserID != -1. If this condition is not satisfied, the login fails. To implement this, tick the Default flow checkbox for thefailtransition. -
Add a form to the
User actiontask. Only select theactionwidget, which will be mapped to radio buttons. -
Now we have to create the conditions to the transitions from the XOR gateway. To do this, click on the transition and from the Condition combobox choose Edit expression....
- For the transition to the
Browse applicationstask, set the expression toaction == "Browse". - For the transition to the
Upload applicationtask, set the expression toaction == "Upload". - For the transition to the
Logouttask, tick the Default flow checkbox.
- For the transition to the
-
The user can browse and upload applications multiple times. To implement this in the process, we have to create loops. Add the necessary transitions from the
Browse applicationsand theUpload applicationstask. -
For the
Browse applicationstask change the Task type to Call Activity and set the Subprocess Name toBrowseApplication. -
Create a form for the
Logouttask. Add the following script:"User " + username + " logged out". -
Create a form for the
Login failedtask. Add the following message:Login failed.
-
From the
Login failedand theLogouttasks draw a transition to the end event.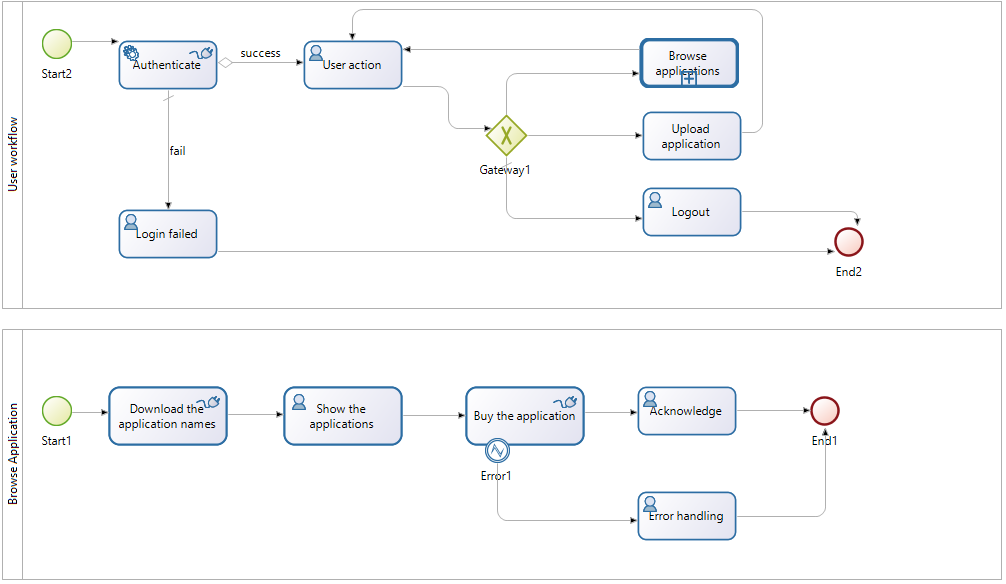
- If you close some windows by mistakes, you can make them reappear by choosing View | Reset view.
- If you name a transition and then delete the name, Bonita will mark it as faulty with the following message:
Empty name detected for a SequenceFlow. The solution is to name the transition. - Sometimes, the error markings don't disappear until you manually validate the workflow by clicking Validation status | Refresh.
- Do not use
LinkedListin the Groovy connector as it does not work, useArrayListinstead. - To use version control, you have to export the Bonita workflows. The workflows are stored in binary
.bosfiles -- beware that version control systems cannot diff or merge such files.