-
-
Notifications
You must be signed in to change notification settings - Fork 20
ReaLearn Tutorial 1
Users often ask if it’s possible to do control surface bank-style mapping in order to switch to a completely different set of mappings with the press of a button. Yes, it is! It’s done using the conditional activation feature with the activation mode "When bank selected".
|
Tip
|
ReaLearn >= 2.11.0 provides an alternative and probably more straightforward way to implement banks: The [realearn-enable-disable-mappings] target. |
I’ll show you a minimal example but in great detail. Once you understand this example, you should be able to progress to bigger things. So let’s assume you have 2 knobs and 2 buttons on your controller and you want to map some controls to parameters of the Vital synth. Here’s our goal:
-
Knob K1: Controls decay of ENV X
-
Knob K2: Controls frequency of LFO X
-
Button B1: Sets X to 1
-
Button B2: Sets X to 2
First, it’s important to understand that conditional activation does one thing only: It switches mappings on or off. It doesn’t magically change the target of a mapping or anything like that. Just on or off! Thus, the first thing you should do is adding all the knob mappings (for example by using "Learn many"). Here’s the result:
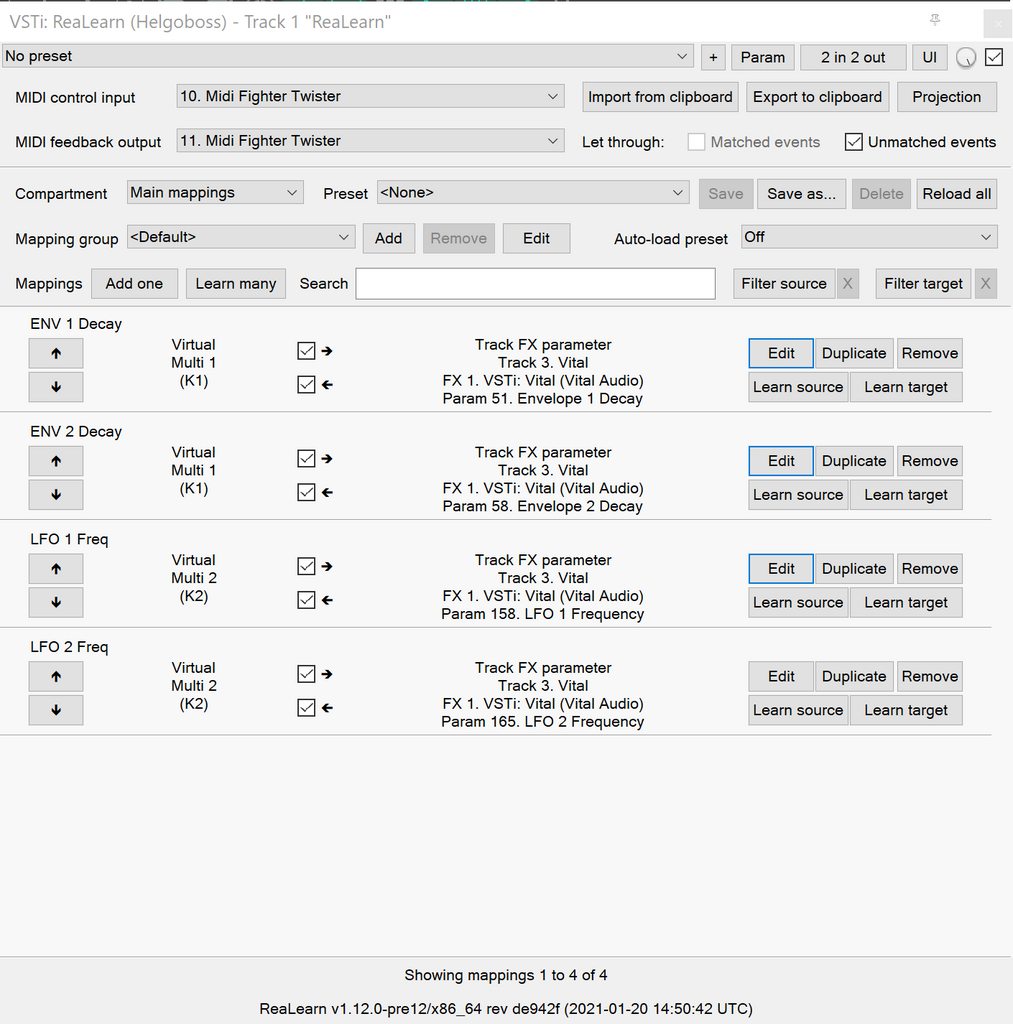
Note: As you can see, I gave the mappings friendly names, which is nice in general but really pays off once you use the projection feature. Also note that I used my Midi Fighter Twister preset and renamed the relevant encoders to K1 and K2.
At this point, all those mappings are always active, so moving K1 will affect both ENV 1 and ENV 2 decay whereas moving K2 will affect both LFO 1 and LFO 2 frequency! We need activation conditions to make sure that not all mappings are active at the same time.
Now we could shoot ahead and directly set the activation condition of each mapping individually. But usually it’s much better to activate/deactivate complete groups of mappings. When you press button B1, you want to have the "ENV 1 Decay" and "LFO 1 Freq" mappings active (= "Group 1"). When you press button B2, you want "ENV 2 Decay" and "LFO 2 Freq" to be active instead (= "Group 2"). And this is just a minimal example. You will probably have many more mappings in one group in the end.
Turns out, ReaLearn has something made exactly for that: Mapping groups. Using them will make your life way easier. We will create those 2 groups and distribute our knob mappings into both groups.
-
Right to "Mapping group", press "Add" and enter the name "Group 1". Repeat the same for "Group 2".
-
Select mapping group
<Default>again. -
Now move every mapping to its corresponding group by right-clicking the mapping row and choosing the desired group.
Here’s how "Group 1" looks like after this:
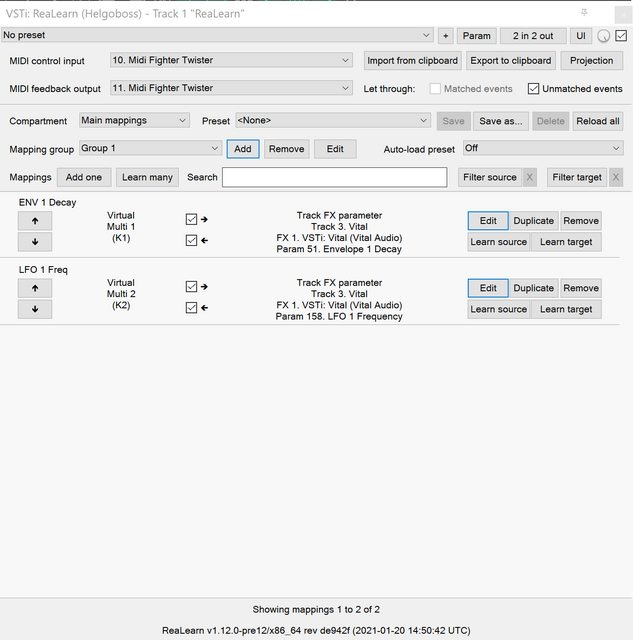
Please note that until now, this is purely cosmetic. It hasn’t changed in any way how the mappings work.
Now let’s set the activation conditions. First for "Group 1":
-
Select mapping group "Group 1".
-
Press "Edit".
-
In the "Active" dropdown, choose "When bank selected". Make sure that "Parameter" is set to "1. Parameter 1" and "Bank" to 0.
Repeat the same for "Group 2", but set "Bank" to 1. Should look like this:
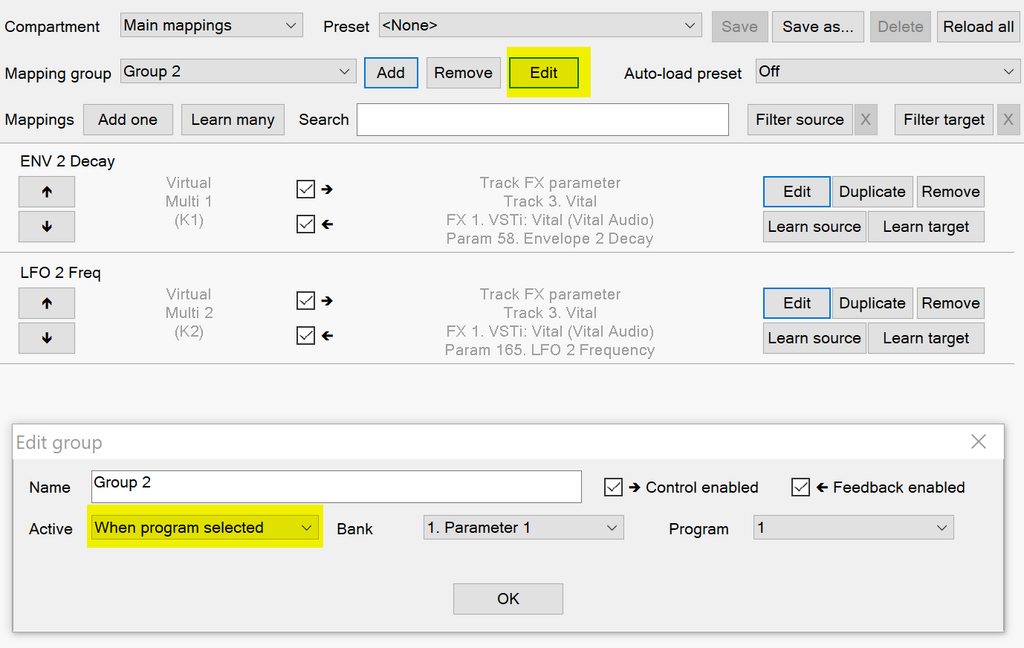
Did you see how the mappings in "Group 2" turned grey? That means they became inactive! At this point, moving the knobs should affect ENV 1 and LFO 1 only.
In the previous step, we have set "Parameter" to "Parameter 1". It’s important to understand that we are talking about ReaLearn’s own VST parameters. Each ReaLearn instance has 200 free parameters (100 per compartment) which don’t do anything by default. One easy way to make them visible is by pressing the "UI" button at the top right of the FX window to switch to the parameter view:
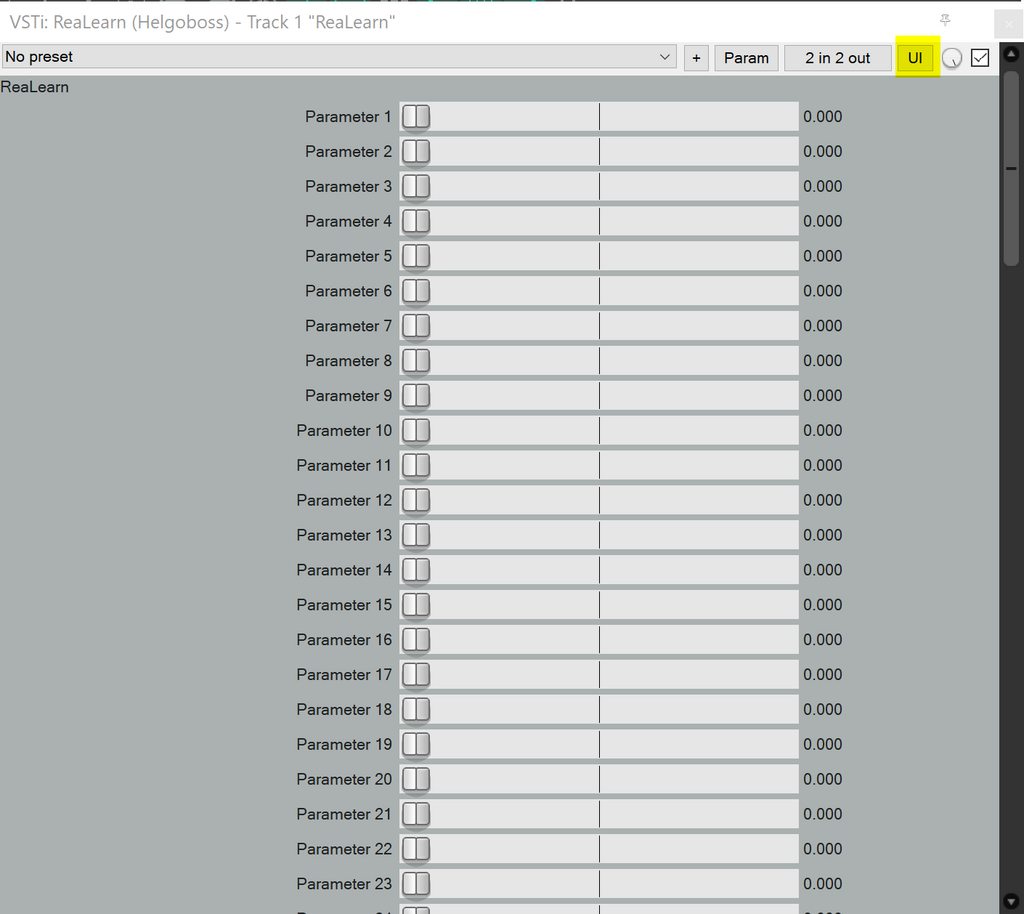
See "Parameter 1" at the top? That’s the one we used in our activation condition! Hence, once we change the value of this parameter, mappings will get activated or deactivated. You can try it! Move the parameter slider a bit to the right and you will observe that "Group 1" turned inactive. "Group 1" will be active when the slider is on the very left. "Group 2" will be active when the slider is pushed slightly more to the right. If you push it even more to the right, none of the mappings will be active. Enough! Press "UI" again to go back to the ReaLearn user interface.
Now that we know that the value of ReaLearn’s internal "Parameter 1" is the key to activate/deactivate our mappings, the next step should be obvious: We need to map our buttons to it!
We are going to map the buttons to "Parameter 1". Button B1 will set its value to 0 and button B2 will set its value to 1. Remember how we defined these two numbers in the activation conditions … they are the "Bank" numbers!
-
Select mapping group
<Default>. -
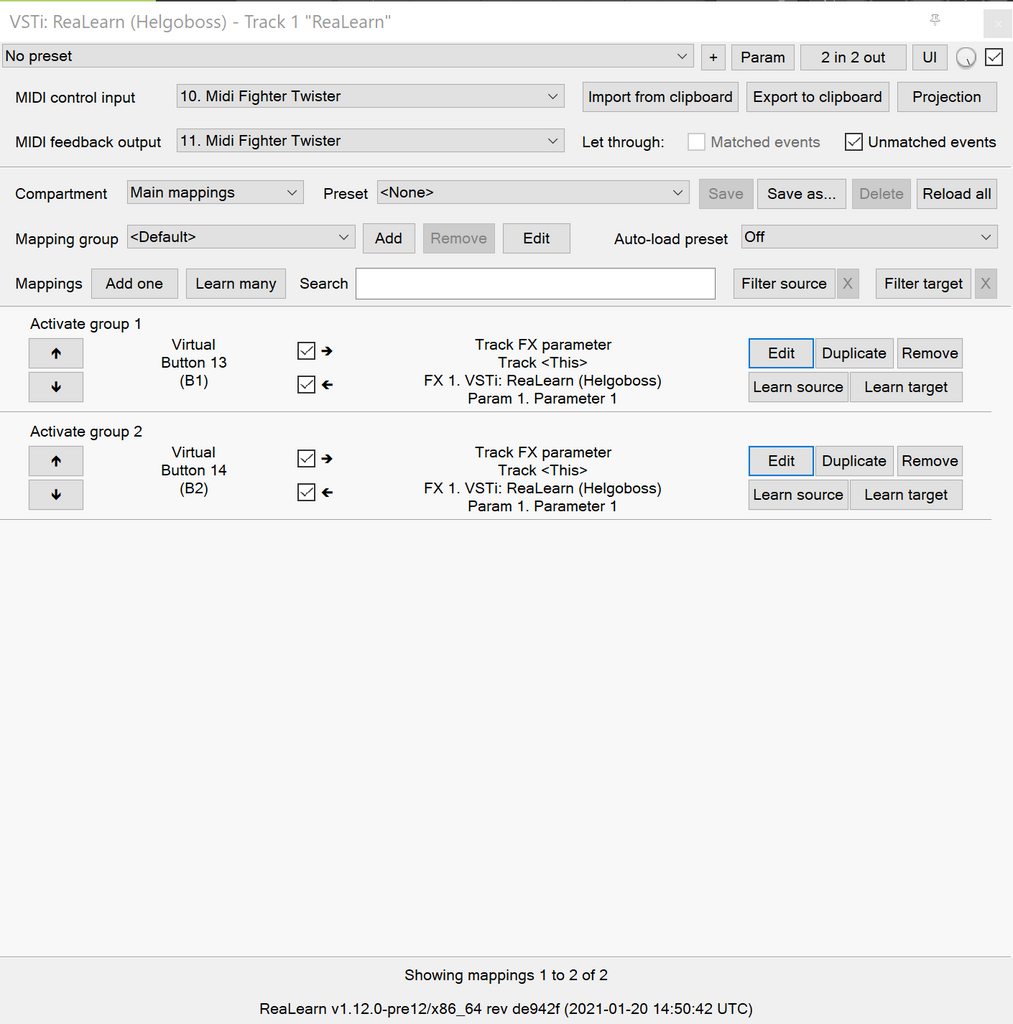
Map the two buttons. The easiest way is to use "Learn many", switch to the parameter view once again and move the "Parameter 1" slider whenever ReaLearn asks you to touch the target.
-
Before you continue, make sure your screen looks similar to this (take note how I’ve given the mappings friendly names again):
-
-
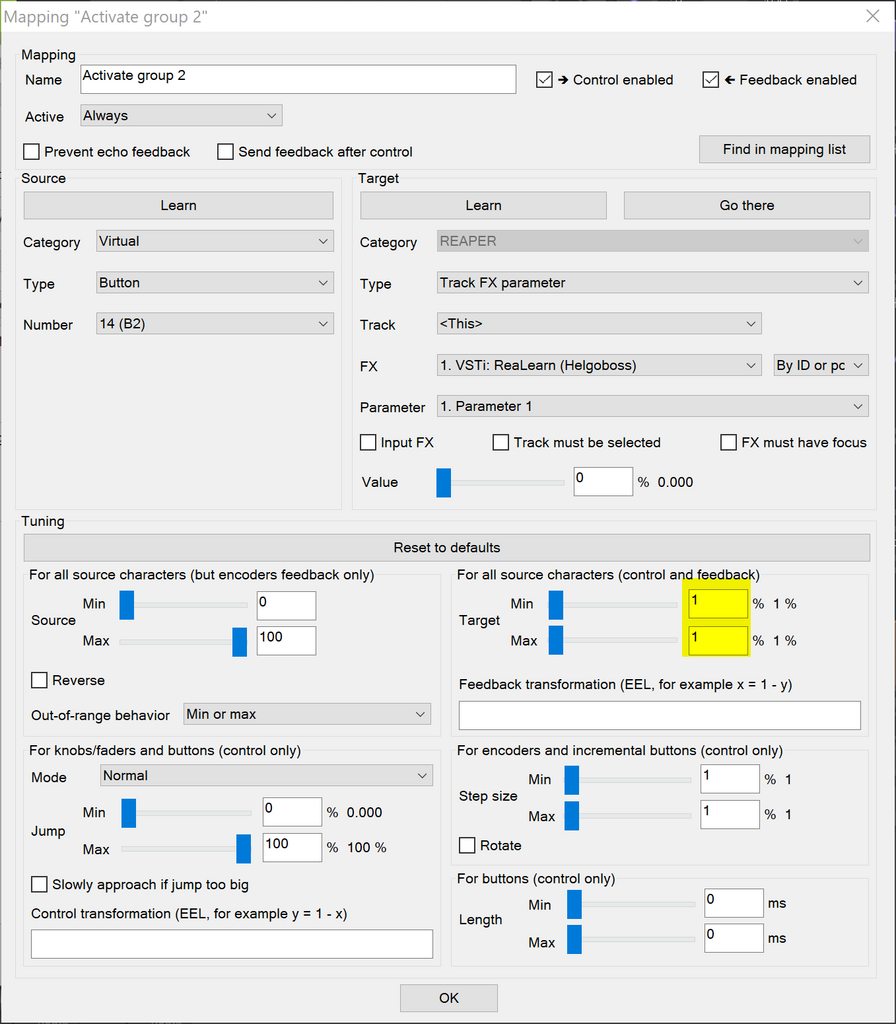
Edit the mapping for button B1 and set both Target Min/Max to 0 (this causes the button to always set the fixed value 0).
-
If you have a controller that is capable of feedback (button has LED), also set "Out-of-range behavior" to "Min". This makes sure that the LED lights up whenever this bank is selected but switches off otherwise.
-
-
Edit the mapping for button B2 and set both Target Min/Max to 1.
-
Here’s how the mapping panel for button B2 looks afterwards:
-
If feedback is desired, set "Out-of-range behavior" as described in the previous step.
-
That’s it, the goal is achieved! Press the buttons and move the knobs to test it.
You might wonder why ReaLearn has been designed to use this particular mechanism for activating/deactivating mappings, in particular why it uses generic parameters to do the job. The answer is: This mechanism is insanely powerful. If you take the time and digest this for a while, you will realize that you can do almost anything with a clever combination of the "Mapping", "Parameter" and "Activation condition" concepts. This scenario is just one of many. Just see the next tutorial to understand why.
Now let’s assume you don’t want 2 buttons where each button should activate one particular bank but you want previous/next buttons to switch between the banks. Do everything as in tutorial 1 with the exception of step 5.
|
Tip
|
ReaLearn >= 2.11.0 provides an alternative and probably more straightforward way to implement cycling through banks with previous/next buttons: By combining multiple mappings with [realearn-enable-disable-mappings] target (for defining the banks) with one [realearn-browse-group-mappings] targets (for cycling). |
-
As in tutorial 1.
-
As in tutorial 1.
-
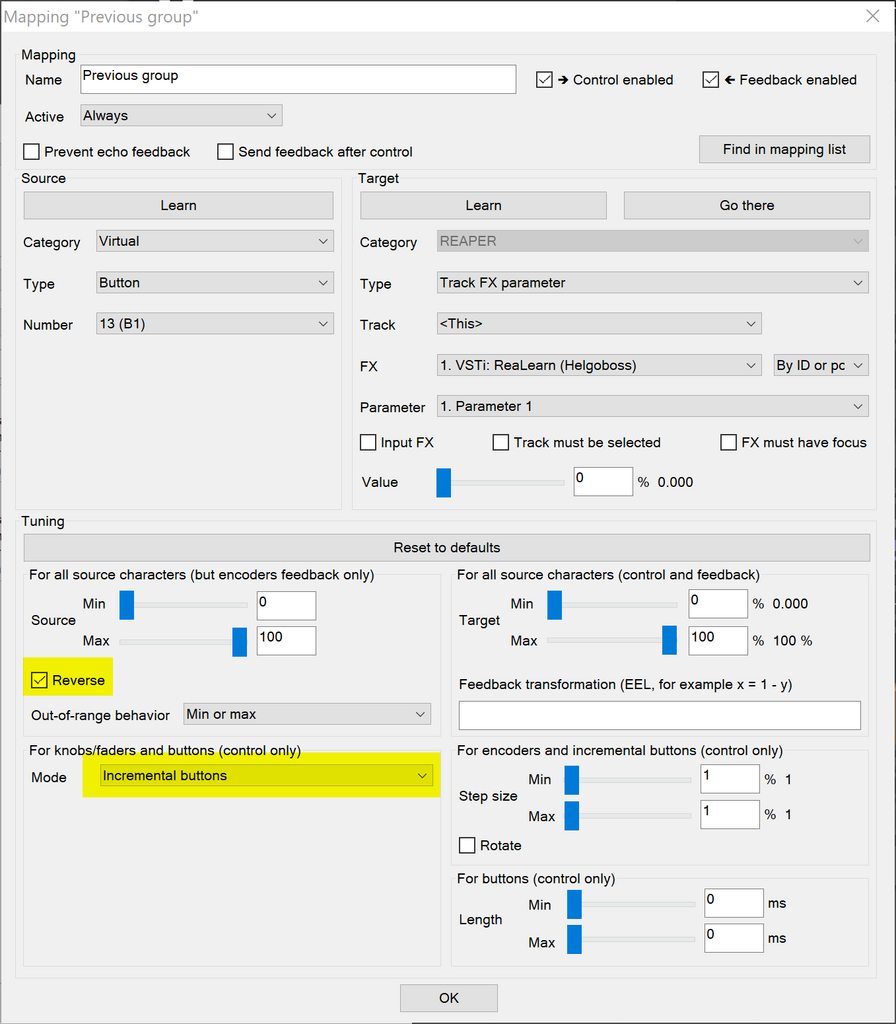
Edit the mapping for button B2 ("Next group") and set mode to "Incremental button"
-
Edit the mapping for button B1 ("Previous group"), set mode to "Incremental button" and check the "Reverse" box (because you want to go in the other direction).
The "Previous group" mapping then looks like this:
Learn how to contribute to this Wiki!